


|
• |
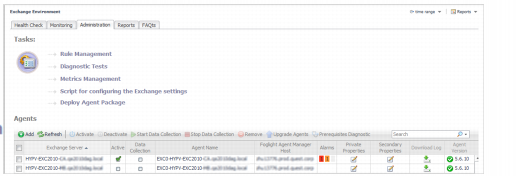
Deploy Agent Package: Deploy the Exchange agent package, create Exchange agent instances on one or more servers at a time, activate or deactivate Exchange agents, and start and stop collecting data. |
|
• |
Rule Management: View and manage rules that exist in your environment. For more information, see Foglight for Exchange rules. |
|
• |
Diagnostic Tests: View a list of diagnostic tests that are available, as well as run a test immediately or define a schedule for when a test is to be run. For more information, see Running diagnostic tests. |
|
• |
Metrics Management: View, edit, and enable/ disable the optional metric collections that are configurable for Exchange agents. For more information, see Managing Exchange metrics. |
|
• |
Script for configuring the Exchange settings: Download and run a script that automatically configures the Exchange servers. |

|
• |
|
• |
|
• |
|
1 |
Start the Create a Report wizard. |
|
2 |
|
• |
Scheduled Report Name: Type a valid name for the report. |
|
• |
Report Templates: Select the template on which you want to base your report. The Report Inputs section is populated with the template’s report parameters. Use the default parameters to quickly create a report, or optionally change the report parameters to customize the report to better meet your requirements. For more details about Exchange template reports, see Foglight for Exchange reports. |
|
3 |
|
• |
Schedule: Select the report schedule from the list of available options. |
|
• |
Retained Results: Type the number of results retained for the report. |
|
• |
Enabled: Select the check box if you want to enable the report. Clear the check box if you want to disable the report. |
|
• |
Report Format: Select the report format from the list of available options. |
|
• |
Email Recipients: Type the email addresses of the recipients to be notified when the report is generated. |
|
1 |
Start the Copy Existing Report wizard. |
|
2 |
|
3 |
|
• |
Scheduled Report Name: Type a valid name for the new report. |
|
• |
Report Templates: The report template can not be modified, only the report parameters in the Report Inputs section at the bottom of the page. |
|
• |
Schedule: Select the report schedule from the list of available options. |
|
• |
Retained Results: Type the number of results retained for the report. |
|
• |
Enabled: Select the check box if you want to enable the report. Clear the check box if you want to disable the report. |
|
• |
Report Format: Select the report format from the list of available options. |
|
• |
Email Recipients: Type the email addresses of the recipients to be notified when the report is generated. |
|
1 |
Start the Edit Existing Report wizard. |
|
2 |
|
3 |
|
• |
Scheduled Report Name: Change the report name, as necessary. |
|
• |
Report Templates: The report template and its parameters can not be modified. |
|
• |
Schedule: Select the report schedule from the list of available options. |
|
• |
Retained Results: Type the number of results retained for the report. |
|
• |
Enabled: Select the check box if you want to enable the report. Clear the check box if you want to disable the report. |
|
• |
Report Format: Select the report format from the list of available options. |
|
• |
Email Recipients: Type the email addresses of the recipients to be notified when the report is generated. |
|
|
|
