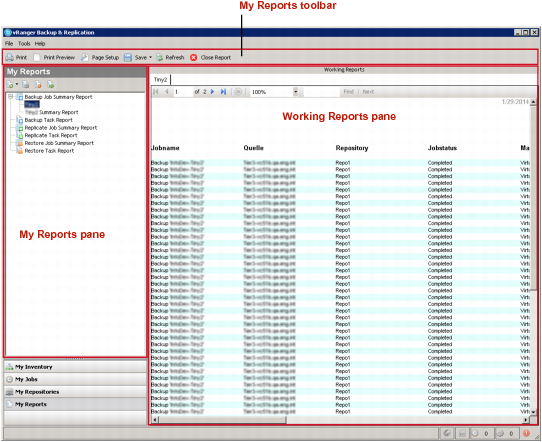
Chat now with support
Chat with Support

vRanger 7.6.4 - User Guide

Introduction Configuring vRanger
Configuring vRanger through the Startup Wizard Configuring vRanger manually Supplemental instructions: additional repository types
Using vRanger Backup Restore
Restoring a physical server Performing a full restore for VMware VMs Performing a full restore for Hyper-V® VMs Performing a full restore for VMware vApps Performing a full restore of a physical machine Performing an FLR on Windows Performing an FLR on Linux Restoring from manifest
Replicate VMs Reports Integrating and monitoring vRanger Using the vRanger Console vAPI Cmdlet details
Add-BackupJobTemplate Add-CIFSRepository Add-DdbReplicationRepository Add-DdbRepository Add-EsxHost Add-HypervCluster Add-HypervHost Add-HypervRestoreJobTemplate Add-NFSRepository Add-NVSDRepository Add-PhysicalMachine Add-RdaRepository Add-ReplicationJobTemplate Add-RestoreFromManifestJobTemplate Add-RestoreJobTemplate Add-VirtualAppforLinuxFLR Add-VirtualAppforLinuxFLRVA Add-VirtualCenter Disable-Job Dismount-LinuxVolume Enable-Job Get-AddressBook Get-BackupGroupEntity Get-CatalogSearchData Get-CatalogStatus Get-ConfigOption Get-Connection Get-CurrentTemplateVersionID Get-Datastore Get-GlobalTransportFailover Get-InventoryEntities Get-IsInventoryRefreshing Get-Job Get-JobTemplate Get-MonitorLog Get-Network Get-PhysicalMachineDiskMap Get-Repository Get-RepositoryJob Get-RepositorySavePoint Get-RestoreDiskMap Get-SavepointDisk Get-SavepointManifest Get-Savepoints Get-TransportFailover Get-VirtualApplianceConfig Get-VirtualApplianceDeploymentStatus Get-VirtualApplianceReconfigStatus Get-VirtualMachinesUnderInventory Get-VmDisk Get-VMDKVolume Install-VirtualAppliance Mount-LinuxVolume New-BackupFlag New-BackupGroupMember New-Daily Schedule New-EmailAddress New-IntervalSchedule New-MonthlySchedule New-ReplicationFlag New-RestoreFlag New-SMTPServer New-TransportConfiguration New-VirtualAppliance New-WeeklySchedule New-YearlySchedule Remove-AllMount Remove-BackupGroupEntity Remove-BackupGroupMember Remove-Catalog Remove-DdbStorageUnit Remove-JobTemplate Remove-LinuxVolume Remove-Repository Remove-SavePoint Remove-VirtualAppliance Remove-VirtualApplianceConfiguration Run-JobsNow Run-ReplicationFailover Run-ResumeReplicationFailover Run-TestReplicationFailover Set-Cataloging Set-CBTonVM Set-LinuxVolume Set-MountPath Set-Resources Stop-vRangerJob Update-BackupJobTemplate Update-GlobalTransportFailover Update-HypervRestoreJobTemplate Update-Inventory Update-ReplicationJobTemplate Update-RestoreJobTemplate Update-VirtualAppliance Update-VirtualApplianceConfiguration
About us

My Reports view

Previous Next


Using vRanger > My Reports view

My Reports view

From the My Reports view you can create and manage reports and email them. The My Reports view is made up of three areas: My Reports on the left, which lists all reports for backups and restores; Working Reports on the right, which displays the report itself; and the Report Template Detail area on the lower right.

My Reports toolbar

The toolbar is located under the Main toolbar — File, Tools, Help. The options on this menu are only enabled if a report is showing in the Working Reports pane, and act only on that report.

My Reports pane

This area features several nodes in a tree structure: Backup Job Summary Report, Backup Task Report, Replicate Job Summary Report, Replicate Task Report, Restore Job Summary Report, and Restore Task Report. Under each of these nodes, all reports that you create and save are nested by type. At the top of the pane, there is a menu bar and toolbar. Within the pane itself, backup and restore reports are designated different icons.

Print: Use this icon to print the report displayed in the Working Reports pane.

Print Preview: Use this icon to review the report before printing it.

Page Setup: Use this icon to adjust the report before printing it.

Save: Use this icon to save your report as a PDF or Excel file.

Refresh: Use this icon to refresh the selected report.

Close: Use this icon to close the selected report.

The Reports pane includes nodes for the following types of reports:

You can also create a report or work with existing reports through the Reports pane toolbar icons. For more information, see Reports.

Reports pane toolbar

Add: Use this icon to start the process of creating a backup or restore report. This icon lets you add any of the six reports types using the Restore Wizard:

When you first open the My Reports view, this icon is the only one that is enabled.

Edit: Click this icon to open the Report Wizard and change the selected report’s configuration. Enabled only when a job is selected in My Jobs.

Remove: Click this icon to delete the selected report. Enabled only when a job is selected in My Jobs.

Run: Click this icon to run the selected report. Enabled only when a job is selected in My Jobs.

Working Reports pane

Previous Next


Using vRanger > My Reports view > Working Reports pane

Working Reports pane

In this pane, report listings display. The name of the report is at the top of the pane. The format of the text that is displayed depends on the options you select in the Report Wizard when you create the report. For example, if you add color or pagination to the report, those settings appear in this pane.

Backup

Previous Next


Backup

Backup overview

vRanger offers two types of backups: virtual and physical. Each type is described in the following topics. Where information relates to only one type of backup, that restriction is noted in the topic title or as a note in the text.

Virtual machine (VM) backup

vRanger protects two varieties of VMs:

For more information on the different types of virtual backups, see the following topics:

Protecting VMware VMs

When protecting a VMware® virtual environment, vRanger uses VMware snapshot technology to store incoming write requests temporarily while the source VMs are being backed up. After a VMware backup completes, the snapshot is deleted, which commits those pending writes to disk. vRanger can back up a VMware VM that already has an open snapshot and can back up the open snapshot, but any secondary consolidated helper snapshots are closed prior to running the backup.

With Inventory Node Selection, you can browse the VMware® vCenter™ or VMware® vCloud Director® inventory and select which VMs, groups, or VMware vSphere® vApp(s)™ you want to protect. You can select a VM, folder, resource pool, vApps, VMware® ESXi™ host, data center, or vCenter, and back up all the VMs located under that node in the tree.

VMware Virtual Volumes and Storage Policies

When you protect a VMware environment, vRanger records data regarding the setup. This data includes whether the VM resides on a DRS-enabled cluster, if there are storage policies involved, and the datastore configuration — network-attached storage (NAS), storage-area network (SAN), VMware Virtual Machine File System (VMFS), or Virtual Volumes (VVols). When you perform a restore or replication, vRanger uses the default settings from the original configuration but provides the option of changing these settings. For example, you can restore a backup from a non-VVol datastore to a VVol datastore, or you can restore a backup from a datastore that is governed by one storage policy to a datastore that is governed by a different policy, or no policy.

Protecting VMware vApps

VMware vSphere® vApp(s)™ are containers — similar to a resource pool — that help you manage and control resources for the VMs contained within. vApps are used to group the individual components of a multi-tier application properly, allowing for application-level resource control and portability. When protecting vApps, vRanger backs up both the VMs and the vApp metadata to maintain the vApp settings and structure upon restore.

Protecting Hyper-V VMs

When protecting a Hyper-V® host, the vRanger Hyper-V Agent is installed on the host. The vRanger Hyper-V Agent works with the VSS writer present on all Hyper-V hosts to back up every VM on the host and send the backups directly to the repository. If the host is on the same network as the repository location, such as a SAN, the client can perform LAN-free backups.

Incremental backups with Resilient Change Tracking

Hyper-V 2016 introduces Resilient Change Tracking (RCT), a native utility that provides change tracking for Hyper-V virtual machines. RCT maintains a record of block changes over time, enabling vRanger to quickly identify blocks changed since the last incremental backup and eliminating the need to scan the disk to identify changes.

Physical machine backup

For backing up physical machines, vRanger uses a physical backup client, similar to the one used for protecting Hyper-V® VMs, to perform backup and communication operations. The client can be installed when the source server is added to the vRanger inventory, or installed manually to comply with change control requirements.

After it is installed, the physical client does the following:

vRanger physical backups are performed using the direct-to-target architecture. Depending on how the source server is connected to the repository, this process can result in network backups or LAN-free backups. For backups to be LAN-free, the source server and repository must exist on the same SAN.

IMPORTANT: Physical backups are only supported on Windows® machines matching the list of supported operating systems. For more information, see the Quest vRanger Installation/Upgrade Guide.

Reviewing backup transport options

Previous Next


Backup > Reviewing backup transport options

Reviewing backup transport options

vRanger offers different data transport options for backup tasks.

Related Documents

The document was helpful.

Select Rating

I easily found the information I needed.

Select Rating