Chat now with support
Chat with Support

vRanger 7.6.4 - User Guide

Introduction Configuring vRanger
Configuring vRanger through the Startup Wizard Configuring vRanger manually Supplemental instructions: additional repository types
Using vRanger Backup Restore
Restoring a physical server Performing a full restore for VMware VMs Performing a full restore for Hyper-V® VMs Performing a full restore for VMware vApps Performing a full restore of a physical machine Performing an FLR on Windows Performing an FLR on Linux Restoring from manifest
Replicate VMs Reports Integrating and monitoring vRanger Using the vRanger Console vAPI Cmdlet details
Add-BackupJobTemplate Add-CIFSRepository Add-DdbReplicationRepository Add-DdbRepository Add-EsxHost Add-HypervCluster Add-HypervHost Add-HypervRestoreJobTemplate Add-NFSRepository Add-NVSDRepository Add-PhysicalMachine Add-RdaRepository Add-ReplicationJobTemplate Add-RestoreFromManifestJobTemplate Add-RestoreJobTemplate Add-VirtualAppforLinuxFLR Add-VirtualAppforLinuxFLRVA Add-VirtualCenter Disable-Job Dismount-LinuxVolume Enable-Job Get-AddressBook Get-BackupGroupEntity Get-CatalogSearchData Get-CatalogStatus Get-ConfigOption Get-Connection Get-CurrentTemplateVersionID Get-Datastore Get-GlobalTransportFailover Get-InventoryEntities Get-IsInventoryRefreshing Get-Job Get-JobTemplate Get-MonitorLog Get-Network Get-PhysicalMachineDiskMap Get-Repository Get-RepositoryJob Get-RepositorySavePoint Get-RestoreDiskMap Get-SavepointDisk Get-SavepointManifest Get-Savepoints Get-TransportFailover Get-VirtualApplianceConfig Get-VirtualApplianceDeploymentStatus Get-VirtualApplianceReconfigStatus Get-VirtualMachinesUnderInventory Get-VmDisk Get-VMDKVolume Install-VirtualAppliance Mount-LinuxVolume New-BackupFlag New-BackupGroupMember New-Daily Schedule New-EmailAddress New-IntervalSchedule New-MonthlySchedule New-ReplicationFlag New-RestoreFlag New-SMTPServer New-TransportConfiguration New-VirtualAppliance New-WeeklySchedule New-YearlySchedule Remove-AllMount Remove-BackupGroupEntity Remove-BackupGroupMember Remove-Catalog Remove-DdbStorageUnit Remove-JobTemplate Remove-LinuxVolume Remove-Repository Remove-SavePoint Remove-VirtualAppliance Remove-VirtualApplianceConfiguration Run-JobsNow Run-ReplicationFailover Run-ResumeReplicationFailover Run-TestReplicationFailover Set-Cataloging Set-CBTonVM Set-LinuxVolume Set-MountPath Set-Resources Stop-vRangerJob Update-BackupJobTemplate Update-GlobalTransportFailover Update-HypervRestoreJobTemplate Update-Inventory Update-ReplicationJobTemplate Update-RestoreJobTemplate Update-VirtualAppliance Update-VirtualApplianceConfiguration
About us

Main toolbar

Previous Next


Using vRanger > Main toolbar > Main toolbar

Main toolbar

The Main toolbar appears at the top of the vRanger UI and includes the drop-down menus described in the following table.

File

The only submenu available under File is Exit. Click it to close the application.

Tools

Catalog Search: Use this form to search and browse for savepoints that contain the files and folders you are looking for. Restore operations can be started from the items in the results pane.
Startup Wizard: Select this command to start the Startup Wizard, through which you can add a VC, host, repository; license a host; set up a mail server; and add email addresses.
Virtual Appliance Deployment Wizard: Select this command to start the Virtual Appliance Deployment Wizard, through which you can deploy and configure vRanger virtual appliances for backup and replication.
Options: When you select this command, the Configuration Options dialog box appears. It contains information in these categories: General, Virtual Appliance Configuration, Licensing, and My Jobs.

Help

Help Contents: Select this command to view online help.
License Information: The License File dialog box includes the total number of licensed CPUs, the total number of days that the license covers, and the number of days remaining under the current license. From this dialog box, you can import a license file.
What’s New: Select this command to view a list of new features and enhancements in your version of vRanger.
About vRanger Backup & Replication: Click this option to view version number, copyright information, a link to the website, and licensing terms. Also access the System Information dialog box, which includes hardware resources, components, software environment, and internet settings. The dialog box features a window and submenus that let you view remote computers and system history.

The About vRanger screen includes a System Info button that collects information about the vRanger machine. You may export this information to a text to aid interactions with Quest Support.

Status Bar

Previous Next


Using vRanger > Main toolbar > Status Bar

Status Bar

In every view, several icons display in the Status Bar at the bottom of the vRanger UI. Regardless of the view displayed, the Status Bar always gives you a glimpse of active job and task count. Using the example from the following table, the Active Jobs Count (4) corresponds to the first number in the My Jobs: Current Jobs node. The Active Tasks Count (2) corresponds to the second number at the same node level. That is, these counts display in this format in My Jobs: Current Jobs (4,2).

Service Support Logging: Right-click this icon to enable log files to help in troubleshooting Windows® vRanger service.

Client Support Logging: Right-click this icon to enable log files to help in troubleshooting the vRanger UI.

Active Jobs Count: This indicator tells you the total number of active backup, restore, and replication jobs running in real time.

Active Tasks Count: This indicator tells you the total number of active backup, restore, and replication tasks running in real time.

New Failed Jobs: Indicates that there are new failed jobs.

When you click the New Failed Jobs icon, this action resets the data in the Status Bar. In place of the new failed jobs icon, this icon appears and the active job and task counts are reset, populating with zeroes (0) initially.
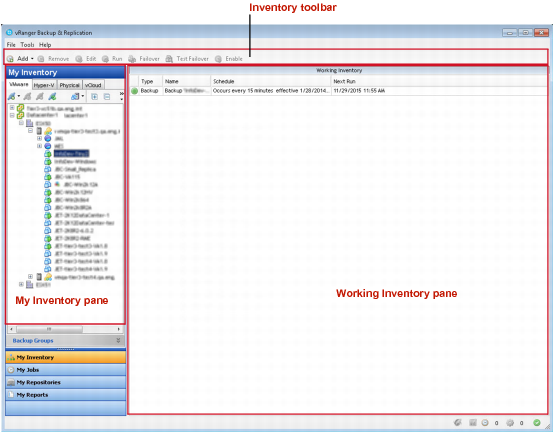
My Inventory view

Previous Next


Using vRanger > My Inventory view

My Inventory view

The My Inventory view displays the virtual infrastructure, configured jobs, and job details. It consists of the My Inventory pane on the left and the Working Inventory pane on the right. This view is the one from which most backup and replication jobs are added.

My Inventory pane

Previous Next


Using vRanger > My Inventory view > My Inventory pane

My Inventory pane

The My Inventory pane offers four tabs — one to show the infrastructure of VMware® VMs, one to show the inventory of Hyper-V® VMs, one for physical servers, and one to show the inventory of VMware vCloud Director® servers.

From this pane, you can navigate and refresh the tree; add or remove connections to VCs or VMware® ESXi™ servers; and add credentials to virtual servers. You can also add a backup or replication job.

Related Documents

The document was helpful.

Select Rating

I easily found the information I needed.

Select Rating