Chat now with support
Chat with Support

NetVault 11.4.5 - Administration Guide

Introduction Getting started Configuring clients Configuring storage devices Backing up data Managing policies Restoring data Managing jobs Monitoring logs Managing storage devices
Monitoring device activity Managing disk-based storage devices in table view Managing disk-based storage devices in tree view Managing tape libraries in table view Managing tape libraries in tree view Managing tape drives in table view Managing tape drives in tree view Adding shared devices
Managing storage media Managing user accounts Monitoring events and configuring notifications Reporting in NetVault Backup Working with client clusters Configuring default settings for NetVault Backup
About configuring default settings Configuring encryption settings Configuring plug-in options Configuring default settings for post-scripts Configuring default settings for Verify Plug-in Configuring Deployment Manager Settings Configuring Job Manager settings Configuring Logging Daemon settings Configuring Media Manager settings Configuring Network Manager settings Configuring Process Manager settings Configuring RAS device settings Configuring Schedule Manager settings Configuring Web Service settings Configuring Auditor Daemon settings Configuring firewall settings Configuring general settings Configuring security settings Synchronizing NetVault Time Configuring default settings for global notification methods Configuring the reporting utility Configuring NetVault Backup to use a specific VSS provider Configuring default settings using Txtconfig
Diagnostic tracing Managing diagnostic data Using the deviceconfig utility NetVault Backup processes Environment variables Network ports used by NetVault Backup Troubleshooting

Creating Source Sets for backup jobs

Source Sets are used to specify source device options. Source Sets are required for Plug-in for Consolidation jobs, Plug-in for Data Copy jobs, and Secondary Copy jobs.You can create Source Sets from the Create Backup Job page.

1
Start the backup job wizard, and click Create New next to the Source Storage list.
2
On the Backup Job Wizard — Create Source Set page, click Device Selection, and configure the following settings.

Any Device

This option is selected by default. If you do not specify a device type, NetVault Backup uses any suitable device for a job.

Specify Device

To use particular devices for a job, select this option. In the associated box, clear the check marks for the devices that you do not want to use. When you remove a library, the associated drives are automatically removed.

Local Drives Only

To use only devices that are locally attached to the target client, select this check box.

3
Click Save, and in the Create New Set dialog box, type a name for the set.
Click Save to save the Restore Source Set.

Creating Backup Advanced Options Sets

An Advanced Options Set is used to specify backup retirement settings, Secondary Copy job definitions, and other advanced options. You can create a Backup Advanced Options Set from the Create Backup Job page.

1
Start the backup job wizard, and click Create New next to the Advanced Options list.
2
On the Advanced Options page, click the corresponding button, and configure the options described in the following sections:
3
Click Save, and in Advanced Options Set Name, type a name for the set.
Click Save to save the Advanced Options Set.

Setting backup retirement options

1
On the Advanced Options page, click Backup Life, and configure the following settings.

Archive

To create an archive, select this option.

An archive cannot be used as a base for Incremental or Differential backups. When archiving data, you must always select the Full Backup type. If you select Incremental or Differential Backup type, the restore job fails.

Backup

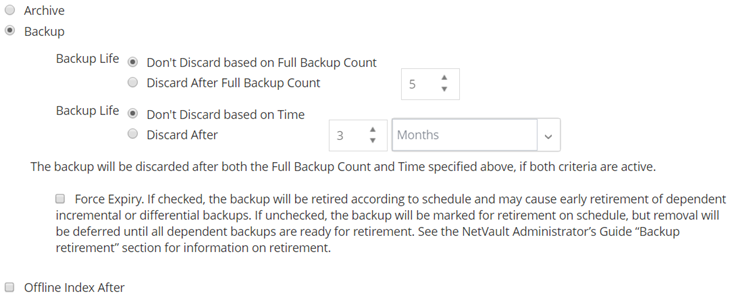
This option is selected by default. To create a backup, use this option.

Backup Life

This option specifies how long a backup is retained.

A backup can be retained indefinitely or retired after a specified period. NetVault Backup supports generation- and time-based retirement methods for backups. For more information about backup retirement methods, see Backup retirement.

You can specify the retirement options in the Backup Advanced Options Set. Alternatively, you can use the Change Expiry method to set or change the expiry date or generation count for existing savesets. For more information about the Change Expiry method, see Configuring saveset expiry options.

To set the Backup Life option, do the following:

Backup life — based on Full Backup count: To configure generation-based retirement, select the Discard After Full Backup Count option. In the associated list, type or select the maximum number Full Backups that you want to retain.
Backup life — based on time: To configure time-based retirement, select the Discard After option. Type or select the period, and in the associated list, select the Days, Weeks, Months, or Years option.
By default, the Backup Life option is set to Discard After and the retirement period is set to three months.


Force Expiry: By default, if a backup has any dependent backups, its retirement is deferred until all dependent backups are ready for retirement.
To apply this rule globally to all backups, you can modify the Media Manager settings. For more information, see Configuring retirement rules for dependent backups. If the Retirement Timing Control option is set to Force Always, the Force Expiry is option is used, regardless of state of this check box.
Retain a backup indefinitely: To retain a backup indefinitely, select the Don't Discard based on Full Backup Count and Don't Discard based on Time options.


NOTE: If you set both Discard After Full Backup Count and Discard After options for a Full Backup, the backup is retired only when both conditions are met. For example, if you set the Discard After Full Backup Count option to four Full Backups and the Discard After option to 30 days, the backup is retired after five Full Backup counts and 30 days.

Offline Index After

Online backup indexes allow you to quickly scan through the contents of a saveset without loading the media. However, these indexes can increase the overall size of the NetVault Database. To manage the database size, you can delete the online indexes.

You can use different methods to delete online indexes:

You can configure the Offline Index After option in the Backup Advanced Options Set to automatically delete the online index for a backup after the specified period. This method is described in this section.
You can use the Days of inactivity before an index is offlined setting to configure a global policy for deleting online indexes after a specified period of inactivity. For more information, see Configuring Media Manager settings for backup indexes.

To specify the index retention period in the Backup Advanced Options set, select Offline Index After option. Type or select the length of time that you want to retain the index, and in the associated list, select the Days, Weeks, Months, or Years option.

2
Click Set to save the settings and close the dialog box.

Specifying additional options

1
On the Advanced Options page, click Additional Options, and configure the following settings.

Enable Encryption

NetVault Backup provides two encryption plug-ins:

NetVault Backup Plug-in for Standard Encryption (Plug-in for Standard Encryption)
NetVault Backup Plug-in for Advanced Encryption (Plug-in for Advanced Encryption)

These plug-ins provide support for CAST-128, AES-256, and CAST-256 algorithms to meet regulatory backup security requirements. For more information about these plug-ins, see the Quest NetVault Backup Plug-in for Standard Encryption User’s Guide or Quest NetVault Backup Plug-in for Advanced Encryption User’s Guide.

Once the Plug-in for Standard Encryption or Plug-in for Advanced Encryption is installed on a client, you can do either of the following:

The job-level encryption option is useful in the following situations:

To perform job-level encryption for a primary backup, select the Enable Encryption check box. For more information about using job-level encryption for a secondary copy, see Encrypt Secondary Copy Only.

Enable Deduplication

Deduplication is enabled by default. Clear this check box if the target device does not support data deduplication.

When performing backups to devices that support deduplication, we recommend that you clear this check box for the following jobs:

Incremental Backups that you want to consolidate using the Plug-in for Consolidation. By not selecting this option, you eliminate the unnecessary overhead of rehydrating the deduplicated Incremental Backups during the consolidation process. You can enable deduplication while backing up the Consolidated Full Backup.

Verify After Backup

To verify the stream length written to the media and ensure that no blocks were dropped during backup, select this check box.

Backup verification is performed as Phase 2 job after the actual backup is completed. If any dropped blocks are detected, the verification phase reports an error and fails. You must run the backup again if the verification phase fails.

By default, the verification job runs on the NetVault Backup Server. To configure a different client to run the verification phase, see Configuring default settings for Verify Plug‑in.

Use Network Compression

To use network compression while transferring data over the network, select this check box.

The data is compressed on the backup client before being transferred over the network. On the machine to which the target device is attached, the data is decompressed before being written to the media.

Network compression does not work for the following types of jobs:

Backups performed using the NetVault Backup Plug-in for NDMP, NetVault Backup Plug-in for NetWare, and NetVault Bare Metal Recovery products
2
Click Set to save the settings and close the dialog box.
Related Documents

The document was helpful.

Select Rating

I easily found the information I needed.

Select Rating