Chat now with support
Chat with Support

NetVault 11.4.5 - Administration Guide

Introduction Getting started Configuring clients Configuring storage devices Backing up data Managing policies Restoring data Managing jobs Monitoring logs Managing storage devices
Monitoring device activity Managing disk-based storage devices in table view Managing disk-based storage devices in tree view Managing tape libraries in table view Managing tape libraries in tree view Managing tape drives in table view Managing tape drives in tree view Adding shared devices
Managing storage media Managing user accounts Monitoring events and configuring notifications Reporting in NetVault Backup Working with client clusters Configuring default settings for NetVault Backup
About configuring default settings Configuring encryption settings Configuring plug-in options Configuring default settings for post-scripts Configuring default settings for Verify Plug-in Configuring Deployment Manager Settings Configuring Job Manager settings Configuring Logging Daemon settings Configuring Media Manager settings Configuring Network Manager settings Configuring Process Manager settings Configuring RAS device settings Configuring Schedule Manager settings Configuring Web Service settings Configuring Auditor Daemon settings Configuring firewall settings Configuring general settings Configuring security settings Synchronizing NetVault Time Configuring default settings for global notification methods Configuring the reporting utility Configuring NetVault Backup to use a specific VSS provider Configuring default settings using Txtconfig
Diagnostic tracing Managing diagnostic data Using the deviceconfig utility NetVault Backup processes Environment variables Network ports used by NetVault Backup Troubleshooting

Navigation pane

To view the Navigation pane, move the pointer over the icon in the Header pane. The Navigation pane is displayed. To hide the Navigation pane and increase the Operations pane area, move the pointer away from the icon. You can set the option to automatically hide or lock the Navigation pane in NetVault Backup WebUI.

1
In the Header pane of NetVault Backup WebUI, click the Options icon. Options dialog box is displayed.
3

The following table provides a brief description of the links available in the Navigation pane.

Monitoring

Server Monitor

Opens the Server Monitor page.

Use this page to view the overall status of your NetVault Backup Server. The Activity Chart shows the data transfer rate for jobs and the number of active jobs. You can also view the events that occurred during the selected time window.

For more information, see Monitoring the NetVault Backup Server.


Job Status

Opens the Job Status page.

Use this page to monitor the progress and status of your jobs. You can also use the page to manage your jobs and perform various job-related tasks, such as canceling a job, stopping or restarting a job, viewing job logs, or removing a job schedule. For more information, see Managing jobs.


Device Activity

Opens the Device Activity page.

Use this page to monitor data flows and data transfer rates for devices that are in use. For more information, see Monitoring device activity.


View Logs

Opens the View Logs page.

Use this page to view the current log messages. You can also use this page to perform various log-related tasks, such as downloading, exporting, or deleting log messages. For more information, see Monitoring logs.


View Events

Opens the View Events page.

Use this page to view events logs for NetVault Backup. For more information, see Viewing event logs.


Deployment Task Status

Opens the Deployment Task Status page.

Use this page to monitor the progress and status of push installation tasks. The page shows the summary of current and completed tasks in the form of bar charts and provides the progress information for individual machines. For more information, see Monitoring deployment tasks.

Jobs

Create Backup Job

Starts the backup job wizard.

For more information about creating and scheduling backup jobs, see Creating backup jobs.

Create Restore Job

Starts the restore job wizard.

For more information about creating and submitting restore jobs, see Creating restore jobs.

You can also use this page to perform index management tasks. For more information, see Managing online backup indexes.

Manage Sets

Opens the Set Management page.

Use this page to view, modify, or delete existing sets. For more information, see Managing sets.

Manage Job Definitions

Opens the Manage Job Definitions page.

Use this page to view, modify, or remove job definitions. For more information, see Managing job definitions.

Manage Policies

Opens the Policy Management page.

Use this page to create and manage policy-based backups. For more information, see Managing policies.

Explore Storage

Opens the Explore Storage page.

Use this page to explore and manage disk- and tape-based storage media. You can also use this page to perform various media-related tasks, such as labeling media, scanning media, blanking media, or write-protecting tapes. For more information, see Managing storage media.

Reporting

View Reports

Opens the View Reports page.

Use this page to access the predefined reports. For more information about these reports, see Available reports. You can do the following: view reports, customize report views, send reports by email, and export reports to PDF files. For more information, see Reporting in NetVault Backup.

Job History

Opens the Job History page.

Use this page to view completed jobs. You can also use this page to view or modify job definitions. For more information, see Viewing job history.

Configuration

Guided Configuration

Starts the NetVault Configuration Wizard.

The wizard guides you through the various aspects of setting up your backup system. You can use the wizard to install client and plug-in packages, add clients, configure devices, install license keys, and create backup jobs.

For more information, see Using the configuration wizard.

Manage Clients

Opens the Manage Clients page.

Use this page to add and manage clients, client groups, and virtual clients. For more information, see Configuring clients and Working with client clusters.

Manage Devices

Opens the Manage Devices page.

Use this page to add and manage disk- and tape-based storage devices. For more information, see Managing storage devices.

Manage Users

Opens the Manage User Accounts page.

Use this page to create and manage user accounts, create user notification profile, and set user password policy. For more information, see Managing user accounts.

Configure Notifications

Opens the Editing Global Notification Profile page.

Use this page to configure global notification methods for one or more NetVault Backup events. For more information, see Using global notification methods.

Change Settings

Opens the server and client setting pages.

Use these pages to customize the NetVault Backup system and change default settings for the NetVault Backup Server and Client machines. For more information, see Configuring default settings for NetVault Backup.

Help

Documentation

Provides access to the product documentation. The link opens in a new browser window or tab.

Video and Tutorials

Provides access to the video tutorial page. The link opens in a new browser window or tab.


Support Diagnostics

Opens the Support Diagnostics page.

Use this page to download the detailed information of your NetVault Backup environment to your local machine or upload the diagnostic data corresponding to a SR number and provide it directly to Quest Technical Support for further analysis. For more information, see Managing diagnostic data.

Quitting NetVault Backup

To quit NetVault Backup, move the pointer over the user area at upper-right corner of the NetVault Backup WebUI, and click Sign Out.

Using the configuration wizard

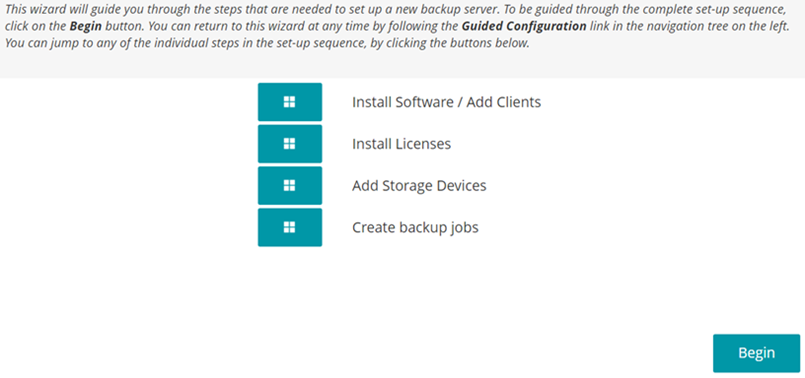
The NetVault Backup WebUI provides a configuration wizard that guides you through the various aspects of setting up your backup system. You can use the wizard to install client and plug-in packages, add clients, configure devices, install license keys, and create backup jobs. The configuration wizard can be accessed from the Guided Configuration link in the Navigation pane.

2
In the Navigation pane, click Guided Configuration.

Install Software and Deploy Clients (Windows only)

Installs and upgrades client and plug‑in packages on remote machines, and adds new machines as clients to the NetVault Backup Server. For more information, see Performing push installations.

Add Clients (Linux only)

Adds a NetVault Backup Client to the Server. For more information, see Adding a client to the NetVault Backup Server.

Install Plugins (Linux only)

Installs a plug-in on one or more clients. For more information, see Installing plug-ins using the configuration wizard (Linux/UNIX).

Install Licenses

Installs product license keys. For more information, see Installing product license keys.

Add Storage Devices

Adds a storage device to the NetVault Backup Server. The available device types include the following:

Single virtual disk device: Adds a virtual standalone drive. For more information, see Virtual standalone drives.
Virtual tape library/media changer: Adds a Virtual Tape Library (VTL). For more information, see Virtual Tape Libraries.
Single physical tape device: Adds a standalone tape drive. For more information, see Physical tape devices.
Tape library/media changer: Adds a tape library. For more information, see Physical tape devices.
Add NetVault SmartDisk: Adds a Quest® NetVault SmartDisk®. For more information, see NetVault SmartDisk.
Add Quest RDA Device: Adds a Quest DR Series System. For more information, see Quest DR Series Systems.
Add Data Domain Boost Device: Adds an EMC® Data Domain® System. For more information, see EMC Data Domain Systems.

Create Backup Jobs

Select this option to create and schedule backup jobs. For more information, see Creating backup jobs.

Monitoring the NetVault Backup Server

You can monitor the overall status of your NetVault Backup Server from the Server Monitor page. You can use this page to view the status of clients, devices, regular jobs, and policy jobs. The Activity Chart shows the data transfer rate for jobs and the number of active jobs. You can also view the events that occurred during the selected time window.

NOTE: The Server Monitor page is automatically loaded when you log on to the WebUI.
2
On the Server Monitor page (see Figure 2, NetVault Backup WebUI home page), you can view the following information.

Client Status

This area shows the number of online clients and total client count. Move the pointer over the count to view the total number of clients and number of offline clients.

You can click this area to open the Manage Clients page.

Storage Devices

This area shows the number of online devices and total device count. Move the pointer over the count to view total count, the number of offline devices and number and type of online devices.

You can click this area to open the Manage Devices page.

Total Data Stored

This area shows the total amount of data backed up from various clients.

You can click this area to open the Explore Storage page.

Activity Chart

This chart displays the data transfer rate for active jobs and the number of active jobs. You can also view the events that occurred during the selected time window.

You can use the following settings to modify the Activity Chart:

Time window: This setting allows you to change the time window for the Activity Chart. The available options are 10 minutes, 1 hour, 8 hours, 12 hours, and 24 hours.
Event type: This setting allows you to change the event type displayed on the page. The available options are Errors Only, Key Events, and All Events.

Job Activity Charts

This area shows the summary of current jobs, policy jobs, and regular jobs in the form of bar charts.

Current Activity: The individual bars represent the number of jobs that are in active, waiting, pending, and scheduled states.
Policies: The individual bars represent the number of policy jobs that have completed successfully, completed with warnings, and failed.
Regular Jobs: The individual bars represent the number of regular jobs that have completed successfully, completed with warnings, and failed.

You can click a bar to open the Job Status page and view the job details for that category. For example, you can click the Active bar in the Current Activity area to view the jobs that are in progress. Similarly, you can click the Errors bar in the Regular Jobs area to view the regular jobs that have failed.

Related Documents

The document was helpful.

Select Rating

I easily found the information I needed.

Select Rating