PST Flight Deck can be configured to use OAuth in order to authenticate with Microsoft Office 365.
|
|
NOTE: OAuth is currently supported over the EWS endpoints. |
Step 1: Create a new Registered Application in Azure (steps can be found here)
To get an application ID:
1.Go to https://portal.azure.com and log in to your Office 365 tenant with an administrator account.
2.From the left menu, select Microsoft Entra ID > App registrations.
3.Click New registration.
4.Enter a name.
5.From the Supported account types, select Supported Account Type Single tenant.
6.Dont enter anything for Redirect URI (optional). Leave it as it is.
7.Click Register.
8.Copy the Application (client) ID and save it somewhere you will remember and securely. You will need it later.
Step 2: Add a certificate to the server running the Office 365 module.
To add an untrusted certificate to your bridgehead servers local certificate store:
1.Access the server where the Office 365 module is installed.
2.Open the certificates manager by start/run certlm.msc
3.Expand Trusted Root Certificate Authorities > Certificates.
4.Right-click Certificates and select All Tasks > Import to launch the Certificate Import Wizard.
5.Locate the (.cer) certificate file and follow the wizard prompts.
6.Supply password, if required.
7.Right-click Certificates and select All Tasks > Import to launch the Certificate Import Wizard.
8.Locate the (.pfx) certificate file and follow the wizard prompts.
9.Supply the password, if required.
Step 3: Configure Permissions and Roles
Configure Application Permissions: Return to the Azure portal and access Microsoft Entra ID > App registrations > owned applications. Then find the application you created in Step 1 above.
1.Select your application, and then select API Permissions.
2.Click Add a Permission.
3.In the Request API permissions section > Select APIs my organization uses, search for Office 365 Exchange Online and select this API.
4.Click Application Permissions
5.In the Permissions list section, select the full_access_as_app.
6.Click Add permissions.
7.Click Grant Admin consent.
Assign User Administrator role to the registered Application:
1.Navigate to Active Directory - Roles and Administrators
2.Find and open the User Administrator role
3.Click on Add Assignments
4.Search for the registered application (by Display Name)
5.Select the application and click Add.
The application is now recognized as Service Principal for the User Administrator role.
Step 4: Get a Thumbprint
To get a thumbprint:
1.Go to Certificates & Secrets and click the Upload Certificate button.
2.Upload your certificate file from Step 2.
3.Copy the certificate Thumbprint and save it somewhere. You will need it later.
Step 5: Add your Application ID and Thumbprint on the server running the PST Flight Deck Office 365 ingest module
1.In PST Flight Deck, open the Credential Editor. Click Credential Editor for more.
2.Select the Office 365 tab and click Add.
3.Enter the Application ID, Thumbprint, and Tenant (eg. tenant.onmicrosoft.com).
4.Save and close the Credential Editor.
To create an application registration in Azure for OAuth, follow these steps:
1.Log into your Azure portal and select the App Registration option located in your dashboard, or type the name into the search bar.
2.In the app registration, select the New Registration option.
3.Fill the following columns:
Name Name the application after your custom preferences
Supported account types choose the account type that fits most of your organization
Redirect URI http://localhost
4.Click Register.
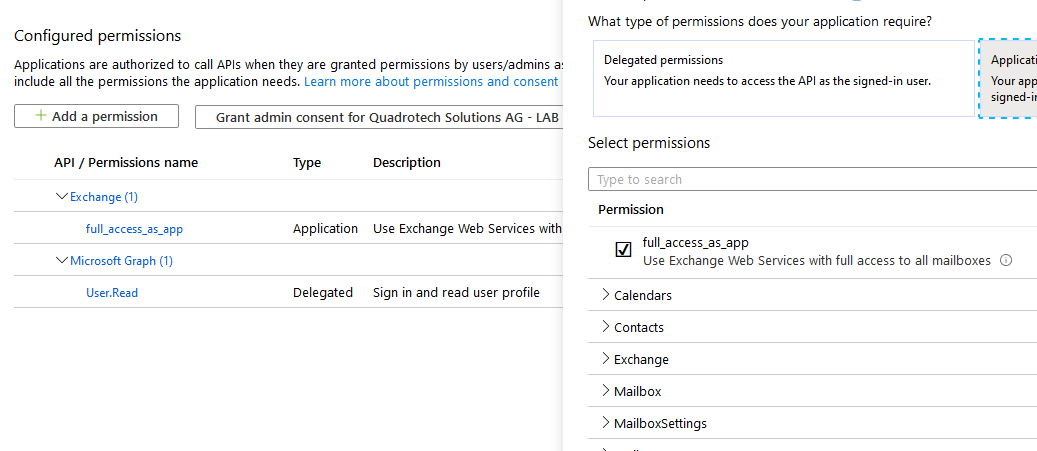
Your App registration is now complete. When the application is created, the API permissions must be configured. This can be via the API Permissions bookmark on the left panel in the Azure portal by clicking on the Add a permission button.
From the permissions, select Exchange > Application Permissions > full_access_as_app.
To upload the certificate that has been previously generated in your PST Flight Deck server machine within the app registration you have just created, navigate to App registrations > Certificates & secrets:

By clicking Upload certificate, you are able to load the certificate into your Azure application.
These steps are mandatory to configure the Credentials Editor, which uses OAuth as described here.
To create a self-signed certificate for testing purposes, you can follow the steps described in the article here.
The following PowerShell commands will install the required components for the installation and operation of PST Flight Deck:
Windows 2008 R2 Service Pack 1
Import-module servermanager
Add-windowsfeature application-server, web-server, bits, web-asp-net, Web-Windows-Auth
Windows 2012 and Windows 2012 R2
Install-WindowsFeature Application-Server, Web-Server, Web-Windows-Auth, BITS
Install-WindowsFeature Net-Framework-Features
Install-WindowsFeature Web-Net-Ext45, Web-Asp-Net, NET-WCF-HTTP-ion45
Windows Server 2016
Install-WindowsFeature Web-Server, Web-Windows-Auth, BITS
Install-WindowsFeature Net-Framework-Features
Install-WindowsFeature Web-Net-Ext45, Web-Asp-Net, NET-WCF-HTTP-Activation45
It may be necessary to utilize the Source switch to specify the Sources directory on your installation media depending on your OS setup. For additional information, please read the following article: https://support.microsoft.com/en-us/kb/2913316.
When performing a migration interfacing with Exchange Online or on-premises either directly as a target or in support of post-processing operations, Application Impersonation permissions are frequently required. This section discusses how to use PowerShell to validate these settings and how you can set them if you have sufficient permissions to do so.
Remote connection via Powershell
To execute a PowerShell command in an Exchange Online environment, you will need to establish a remote PowerShell session with the Exchange server. This is also possible with local deployments of Exchange. The following will provide an example using Exchange Online.
1.Launch PowerShell from a local computer and execute the following command: $Cred = Get-Credential
2.This will produce a Windows authentication prompt for credentials to be securely stored for the remote session. Populate the prompt with appropriate credentials.
3.Initialize the remote session by issuing the following command: $ExOnline = New-PSSession -ConfigurationName Microsoft.Exchange -ConnectionUri https://outlook.office365.com/powershell-liveid/ -Credential $Cred -Authentication Basic AllowRedirection
4.Import the connection to Exchange Online with the following command: Import-PSSession $ExOnline
Verifying Permissions
Once connected, it may be useful to validate that the correct permissions are associated with an account. To verify that an account has the required role association use the following Command: Get-ManagementRoleAssignment -Role ApplicationImpersonation
If permissions are validated as expected, make sure to close your PowerShell connection to prevent future issues. Instructions to do so are found below.
Assigning Permission
If required, run the following PowerShell command to assign application impersonation rights to the account(s) used for ingestion: New-ManagementRoleAssignment Name Mig Import User User User@ExampleDomain.local Role ApplicationImpersonation
Closing the Session
Once your work in the remote PowerShell session has concluded, you should close the open session using the following command: Remove-PSSession $ExOnline
For additional information about connecting to Exchange Online using remote PowerShell, please read the following document:
http://technet.microsoft.com/en-us/library/jj984289(v=exchg.150).aspx
For information on how to remotely connect to PowerShell on an Exchange server, please read the following document:
https://technet.microsoft.com/en-us/library/dd335083(v=exchg.160).aspx