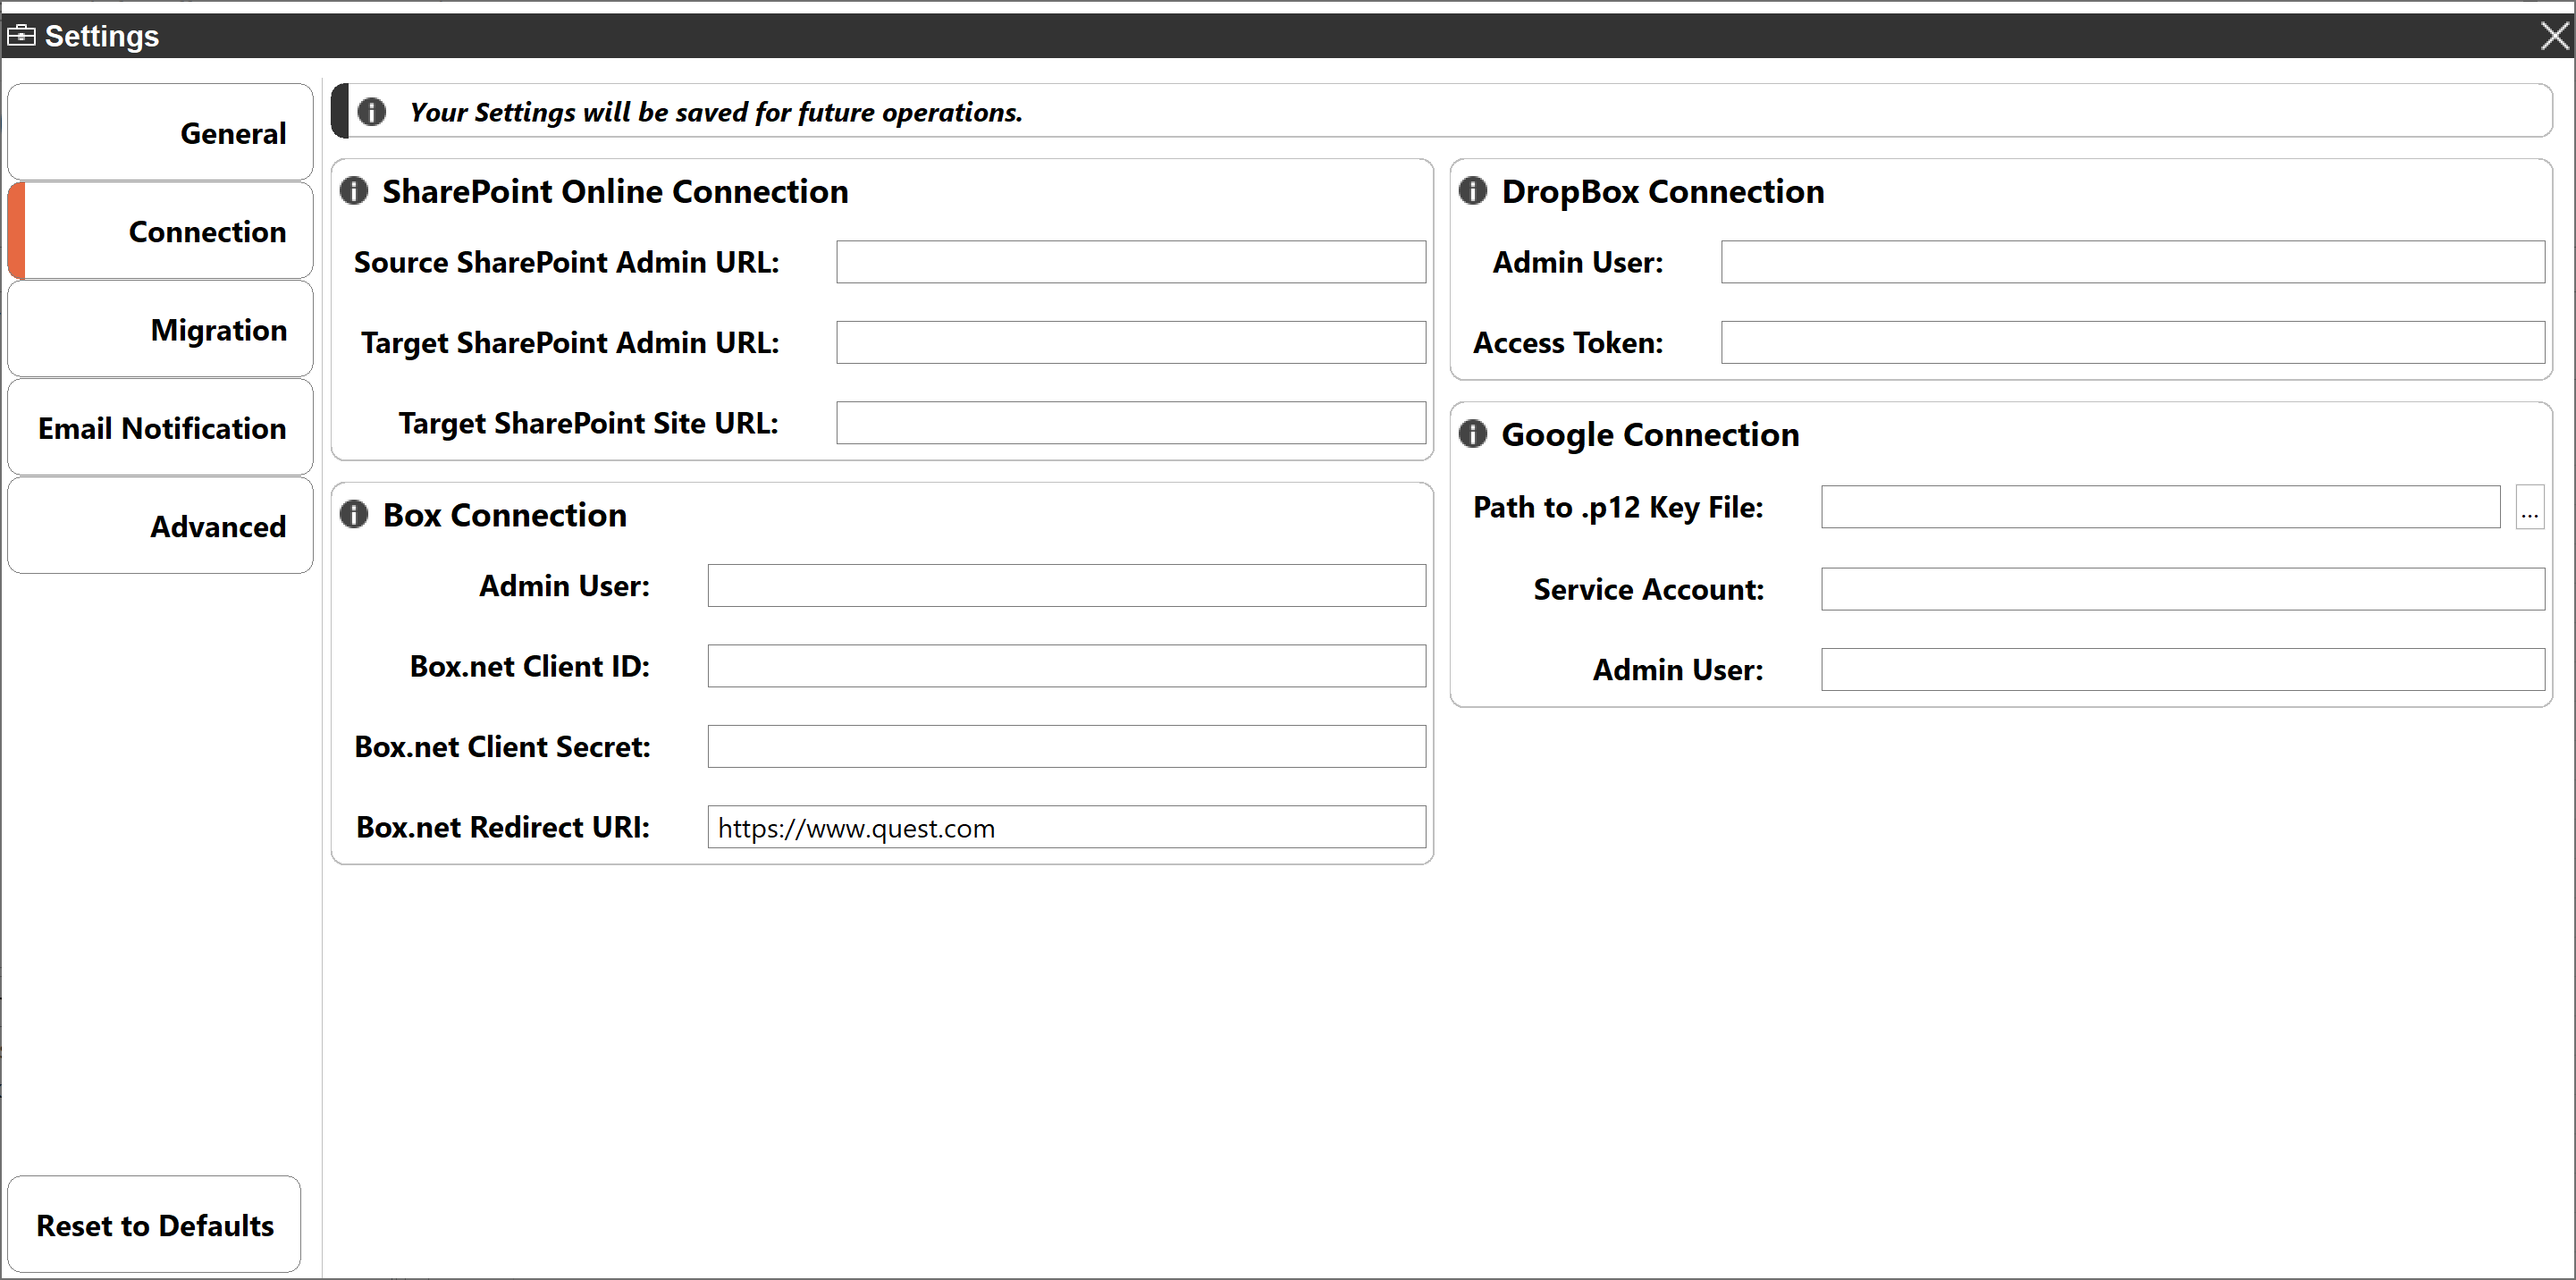
This tab contains all of your connection credentials. You can enter them here so that you do not have to manually enter them in the wizards.
SharePoint Online Connection - URLs for SharePoint Online connections
Box Connection - Credentials and URLs for connecting to Box tenants
Dropbox Connection - Credentials and access tokens for Dropbox tenants
Google Connection - Credentials and .p12 key file for connecting to Google tenants
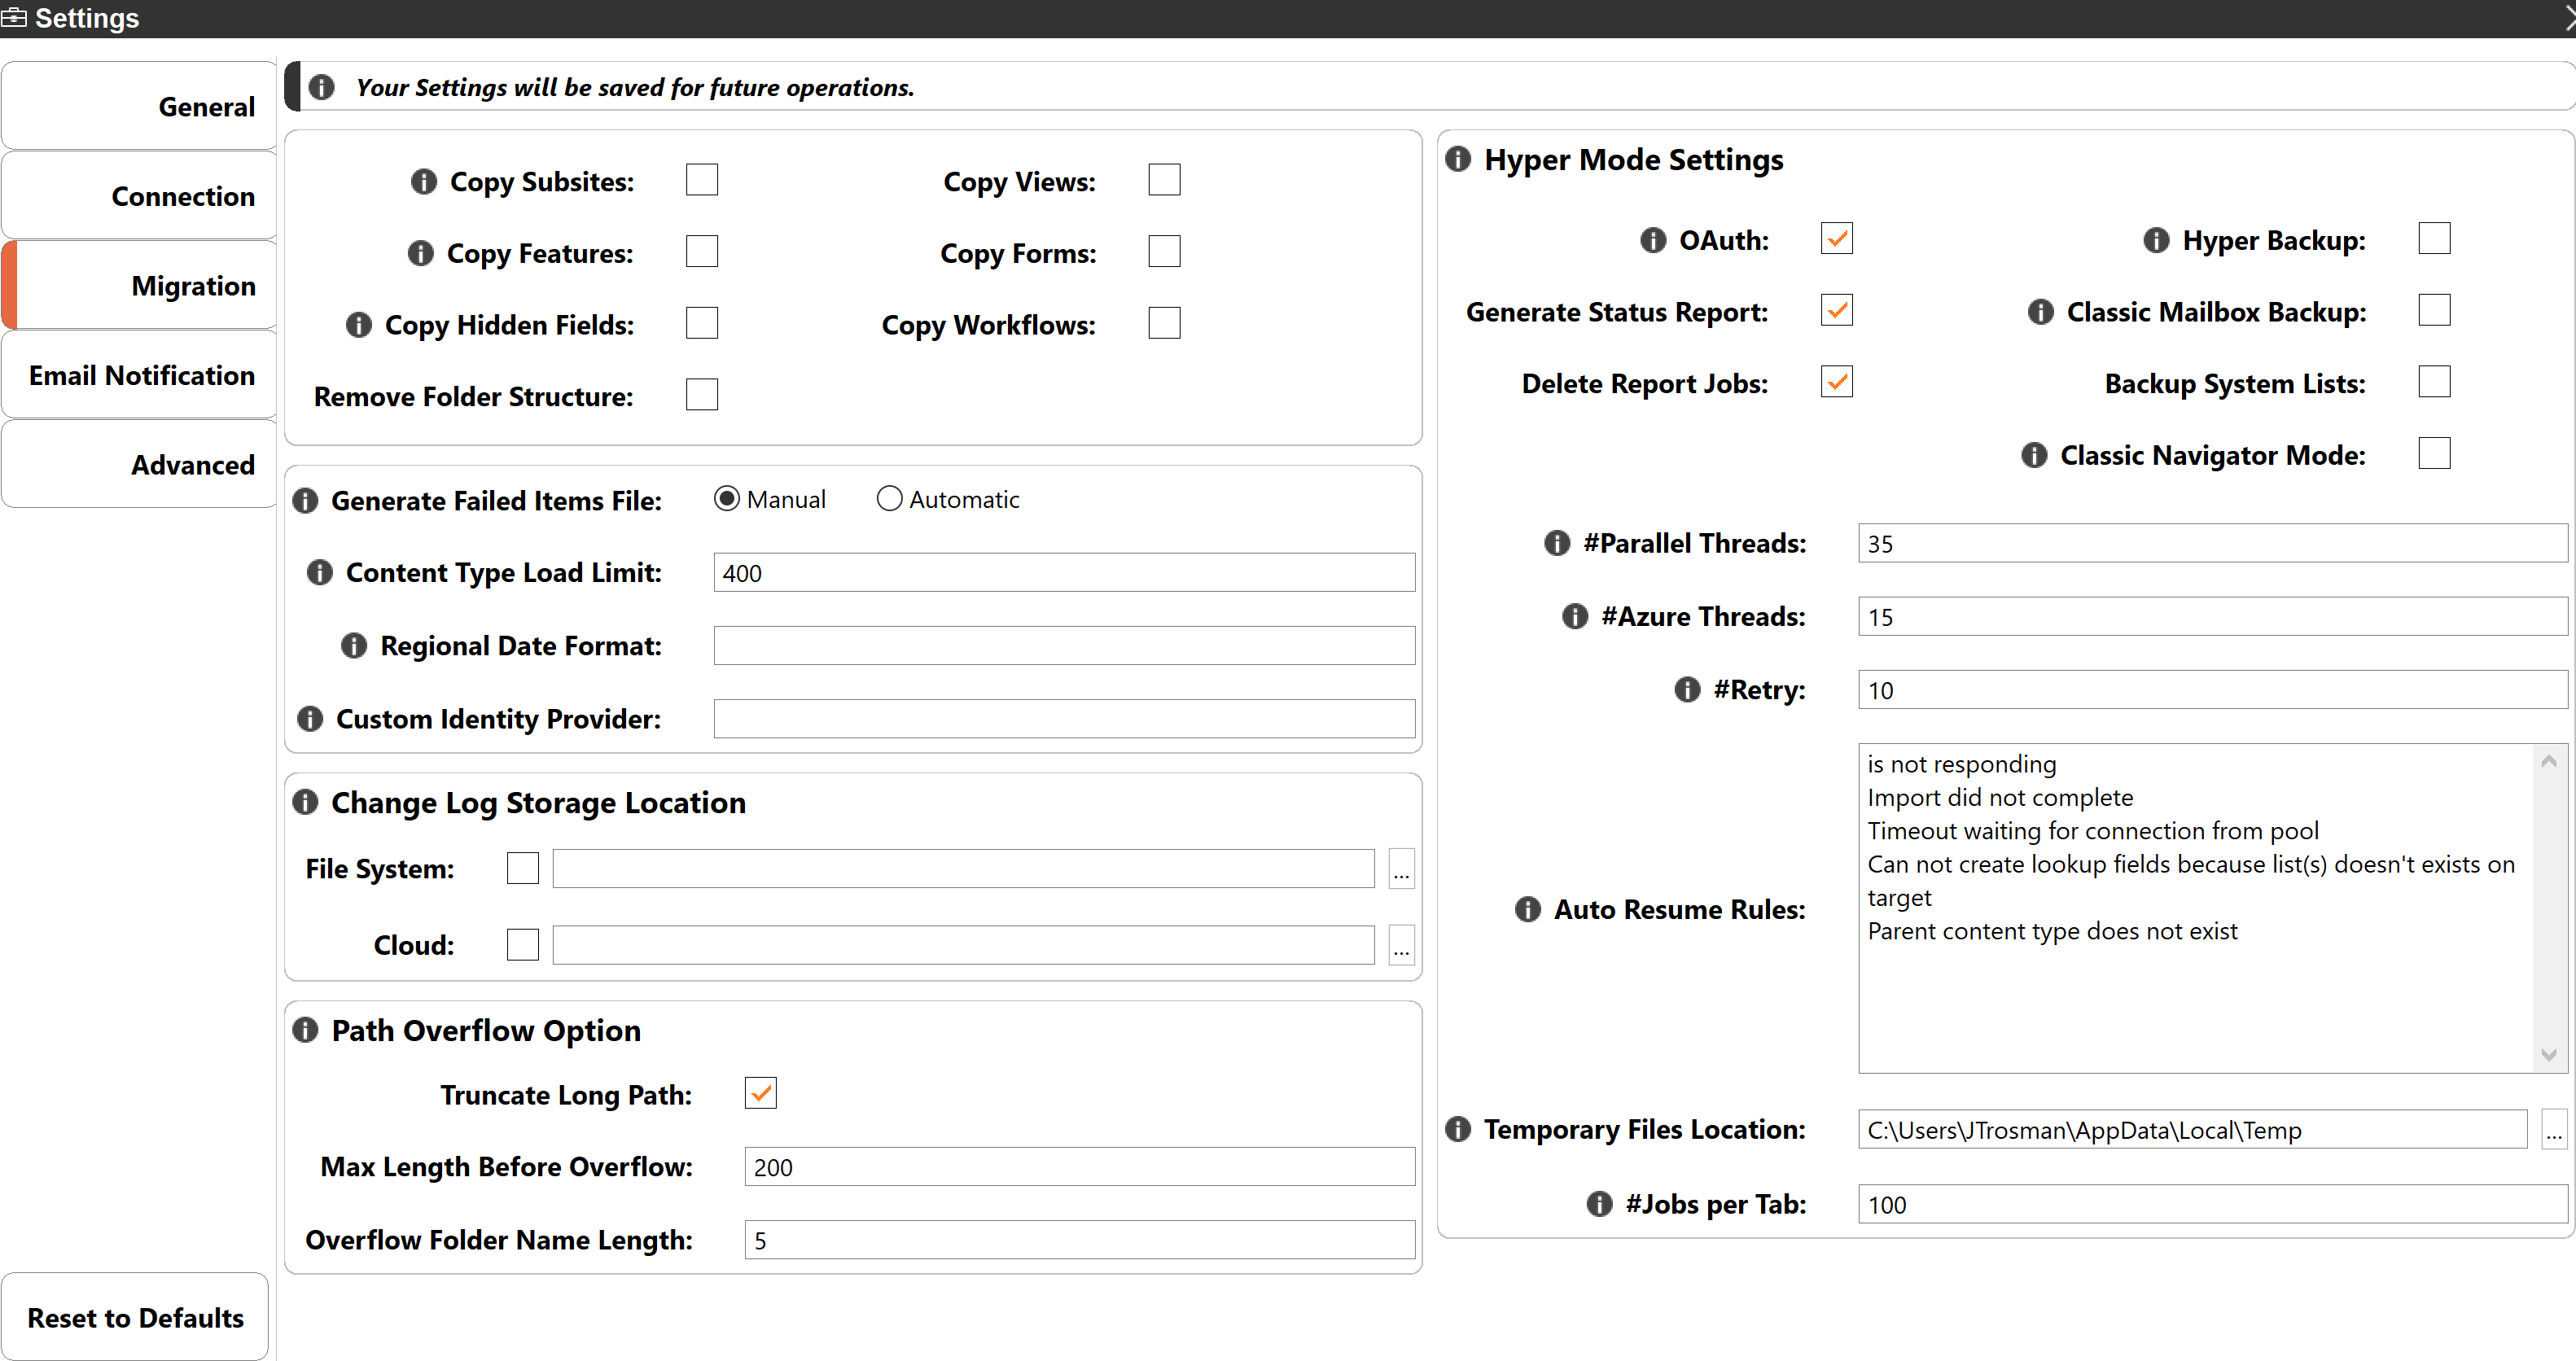
The Migration tab contains all the available Migration settings.
Copy Subsites - enable this option to include all sub-sites of the current site in this operation.
Copy Features - this option will transfer site level feature settings from the source to the target site.
Remove Folder Structure - enable this option to remove folder structures when copying.
Copy Views - enable this option to copy site level views from the source to the target.
Copy Forms - enable this option to copy forms from the source to the target.
Copy Workflows - enable this option to copy workflows from the source to the target.
Generate Failed Items Files - This option controls behavior of Failed Items Reports. Manual mode generates and stores Failed Items Report for the last copy job only. Automatic mode creates unique Failed Items Reports for every copy job and stores these reports in the application workspace attached to the historical operation logs. Note that Failed Items Reports can be large for some copy operations.
Content Type Load Limit - The system will bypass loading site content types into cache when the total number of content types in a site exceeds this number. This is implemented to avoid lengthy load times for some sites.
Regional Date Format - Regional Date Format allows user to specify the date format of the source SharePoint site in the case the system could not detect it automatically because of security or some other reasons. Regional date format could be important during copying of the item or document versions because dates are reported in the regional format by SharePoint APIs.
There are a couple of examples of the regional date format
MM/dd/yyyy hh:mm:ss a
dd/MM/yyyy hh:mm:ss a
yyyy-MM-dd HH:mm
Custom Identity Provider - Custom Identity Provider setting is a comma-separated list of case sensitive cookie names used by custom identity provider to authenticate client. If the value is not specified then default values are used for major identity providers. Groups of comma separated cookies could be separated with semi-column to indicate that several groups of cookies could be used to authenticate with different servers.
Change Log Storage Location - This setting allows users to change their log storage location. They can choose between File System and Cloud.
Path Overflow Option - (Bulk Google Drive, Box Enterprise and Dropbox Business to OneDrive for Business migrations only)
SharePoint Online and consequently OneDrive for Business has a series of restrictions or limitations that all users (and software) must abide by, a few of which are the total URL length of the content and file/folder names. As defined, this total URL length cannot exceed 260 characters and file or folder names may not exceed 250 characters. More information can be found here: https://support.microsoft.com/en-us/kb/2933738
When migrating to OneDrive for Business from a source system like Box or Google Drive, both of which do not have such limitations, you may find yourself in a situation where your content will simply not fit. Due to this scenario, we have implemented logic into specific migration scenarios (bulk Google Drive, Box, and Dropbox Business to OneDrive for Business only) to better process these unfortunate situations and ensure that all content is migrated to OneDrive for Business, regardless of the path or name length.
Truncate Long Paths (Boolean) Check the box to enable the option, uncheck to disable. If disabled, you may receive errors post migration related to long folder paths and/or names.
Max Length Before Overflow (Number, default 200) This determines the folder path length that when reached, will trigger the overflow logic processing. You may adjust this value, but we recommend not increasing it to greater than 200.
Overflow Folder Name Length (Number, default 5) This determines the number of characters (from the first position) that will be used from each source folder name to construct the folder name in the Overflow. You may adjust this value, however be careful as you do not want to exceed the 250 character folder name length maximum for OneDrive for Business.
Hyper Mode Settings
OAuth - Enables or Disables OAuth Authorization in Hyper Migration and Hyper Backup Modes. The setting is automatically applied in connection dialogs from migration wizards and cannot be disabled. Disable this setting here to turn it off on connection dialogs.
Generate Status Report - Select this option to generate status reports for your hyper jobs.
Delete Report Jobs - Select this option to delete report jobs.
Hyper Backup - Hyper Backup mode is used as the default way to create, update and restore SharePoint Online Sites and Onedrive Sites. If you want to use the Classic backup functionality, deselect this checkbox. Note it's not recommended to turn this feature off and on in order to avoid problems between switching modes.
Classic Mailbox Backup - Classic Mailbox Backup option allows you to enable the creation of new Office 365 Mailbox and Office 365 Mailboxes backups, as well as updating and importing of existing Mailbox backup projects.
Backup System Lists - this option when selected turns on the backup of system lists for Migrations. It is disabled if it is deselected.
Classic Navigator Mode -selecting this option will turn off hyper migration for the copy-paste method.
#Parallel Threads - This is the number of parallel threads that the tool will run to read from the source and then upload to the target. Note that this value is used for both 'Read from source' and 'Write to target' operations while in CSOM mode, while only for Read operations when in Azure Turbo mode. It is critical that resources are allocated appropriate (CPU, RAM and Internet speed) to match an increase of thread count since the content size increases rapidly as each thread load is multiplied by the Chunk Size settings.
#Azure Threads - This value is used for 'Write to target' operations while in Azure Turbo mode. This number dictates how many parallel threads are to be uploaded to Azure Storage. Again, this value will change depending on CPU, RAM and Internet speed.
#Retry - Set the number of copy rounds to make the tool automatically retry to process objects failed during backup or migration. By default the number of rounds is 1, which means that auto-resume will not be applied.
Auto Resume Rules - Set the type of error message displayed for Auto Resume to automatically retry the process of objects failed during backup or migration. By default the message is "is not responding" and "Import did not complete".
Temporary File Location - Set a new location for temporary files when doing large migrations or for systems with a small default temporary location.
#Jobs per Tab - This parameter is intended to specify page size on the Hyper Tab view.
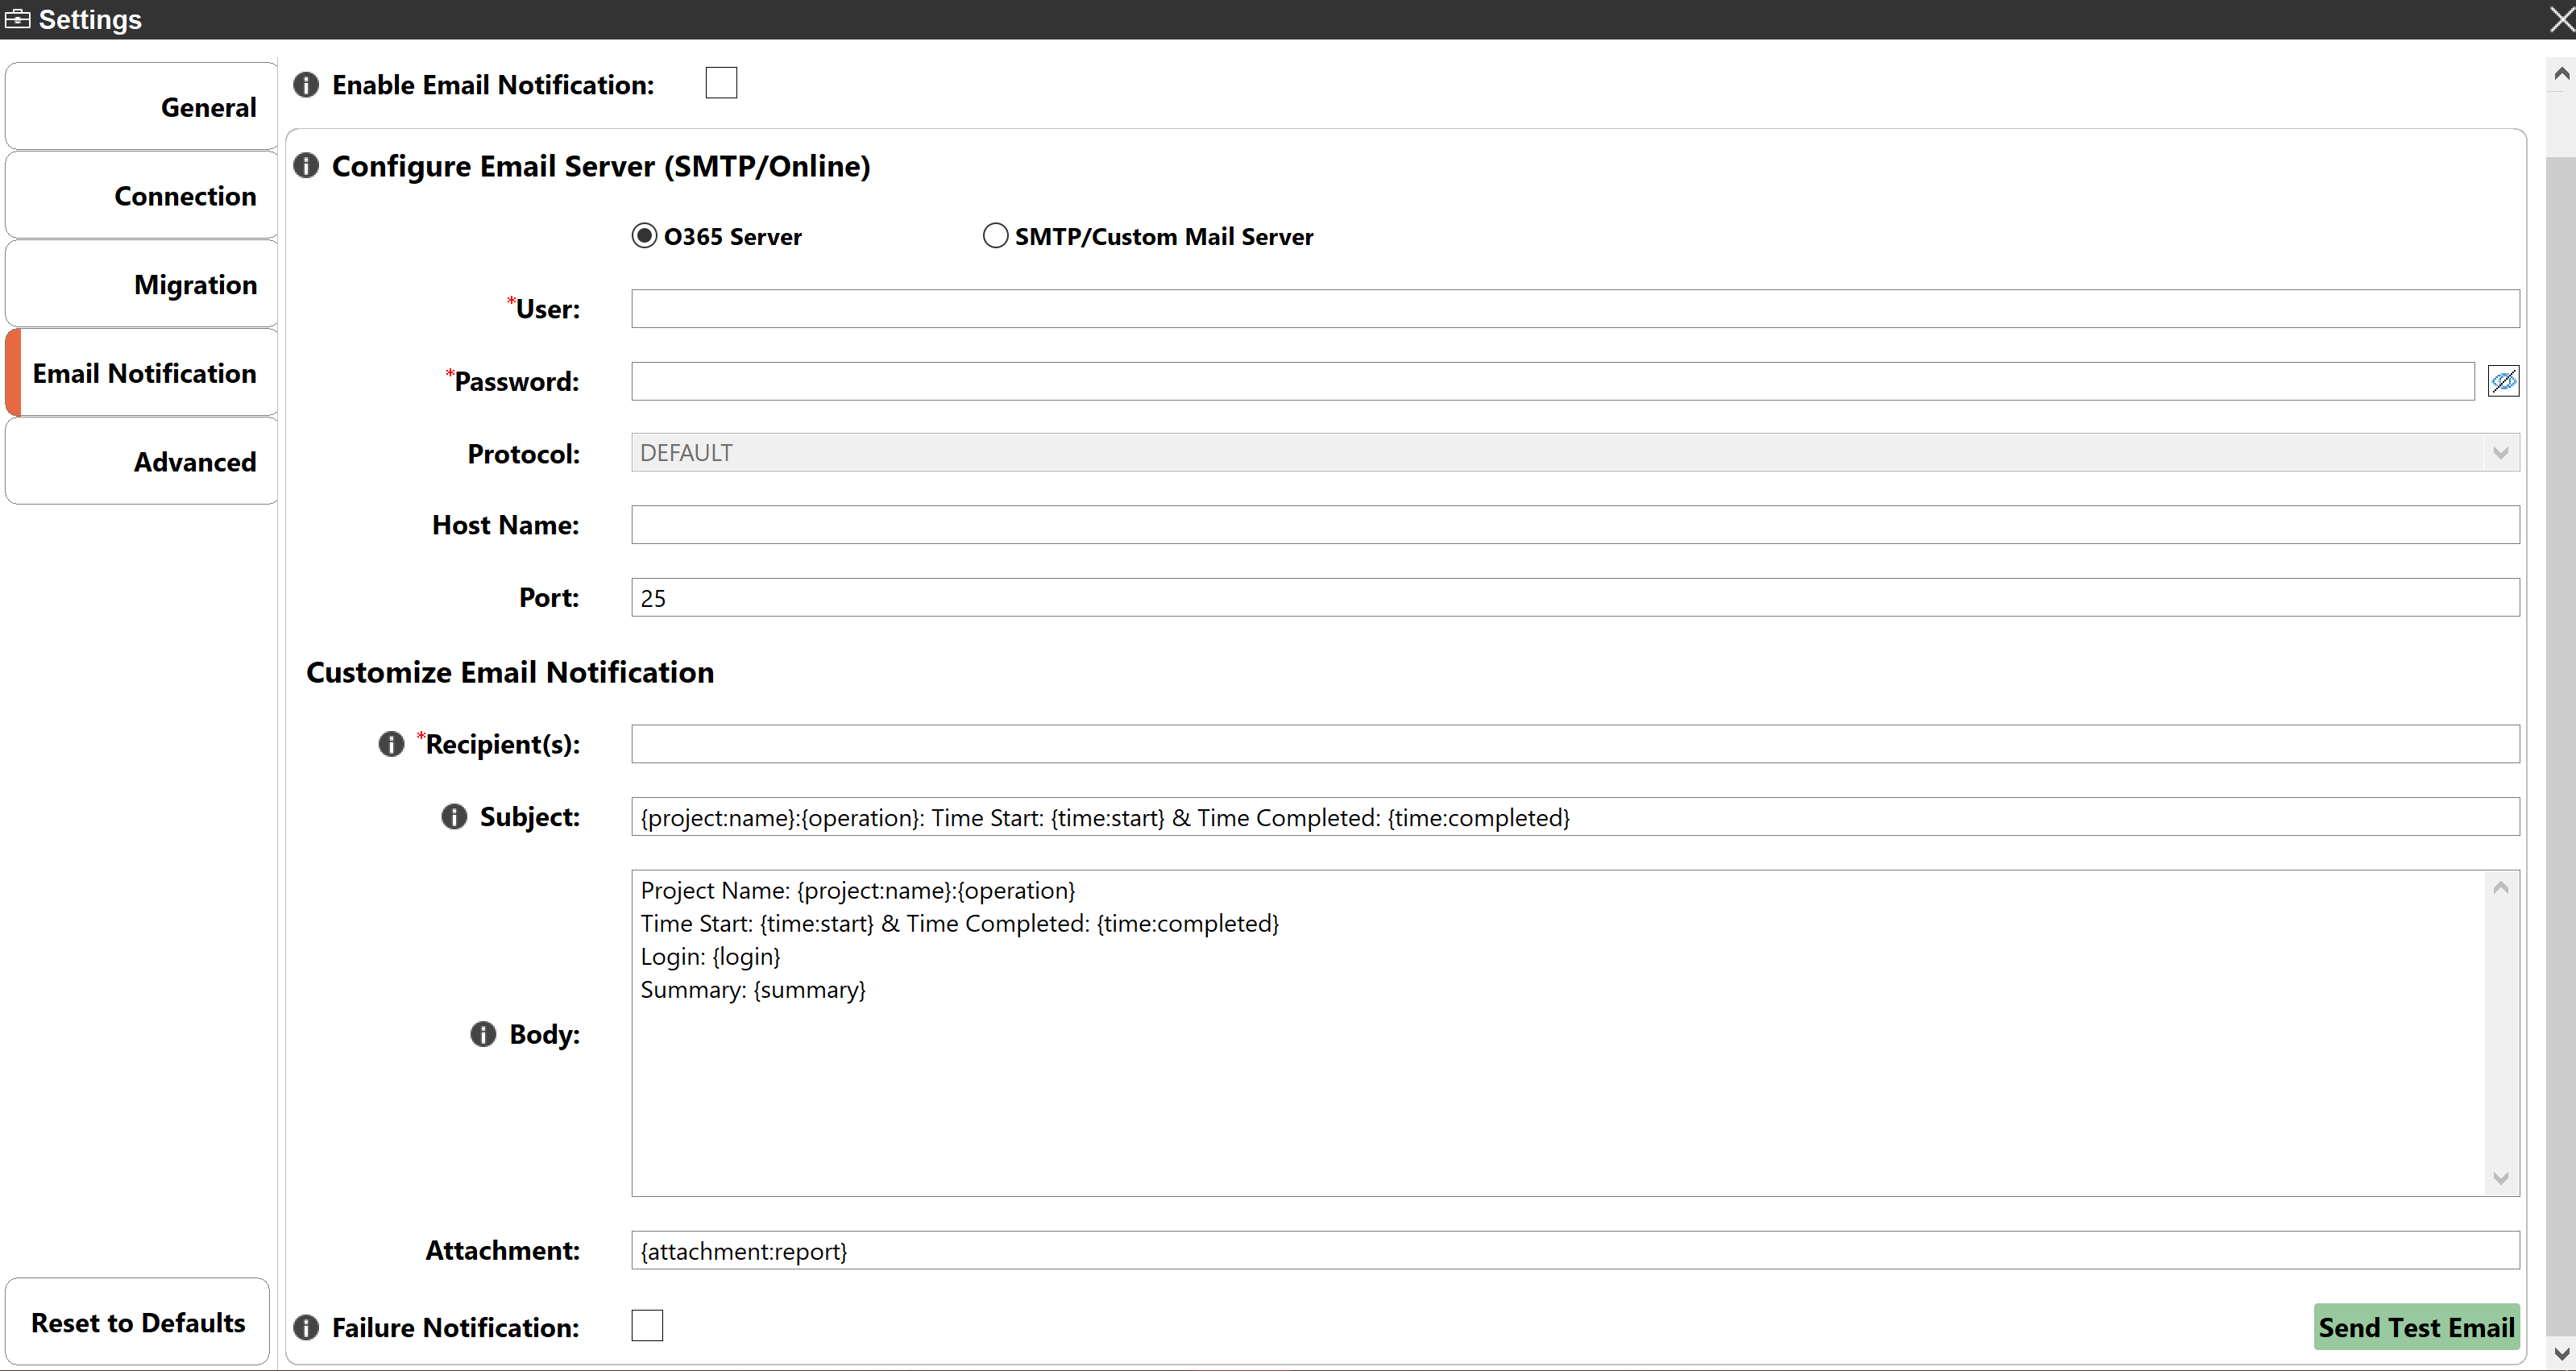
This section of the Profile Manager contains all the options for managing the Email Notifications settings.
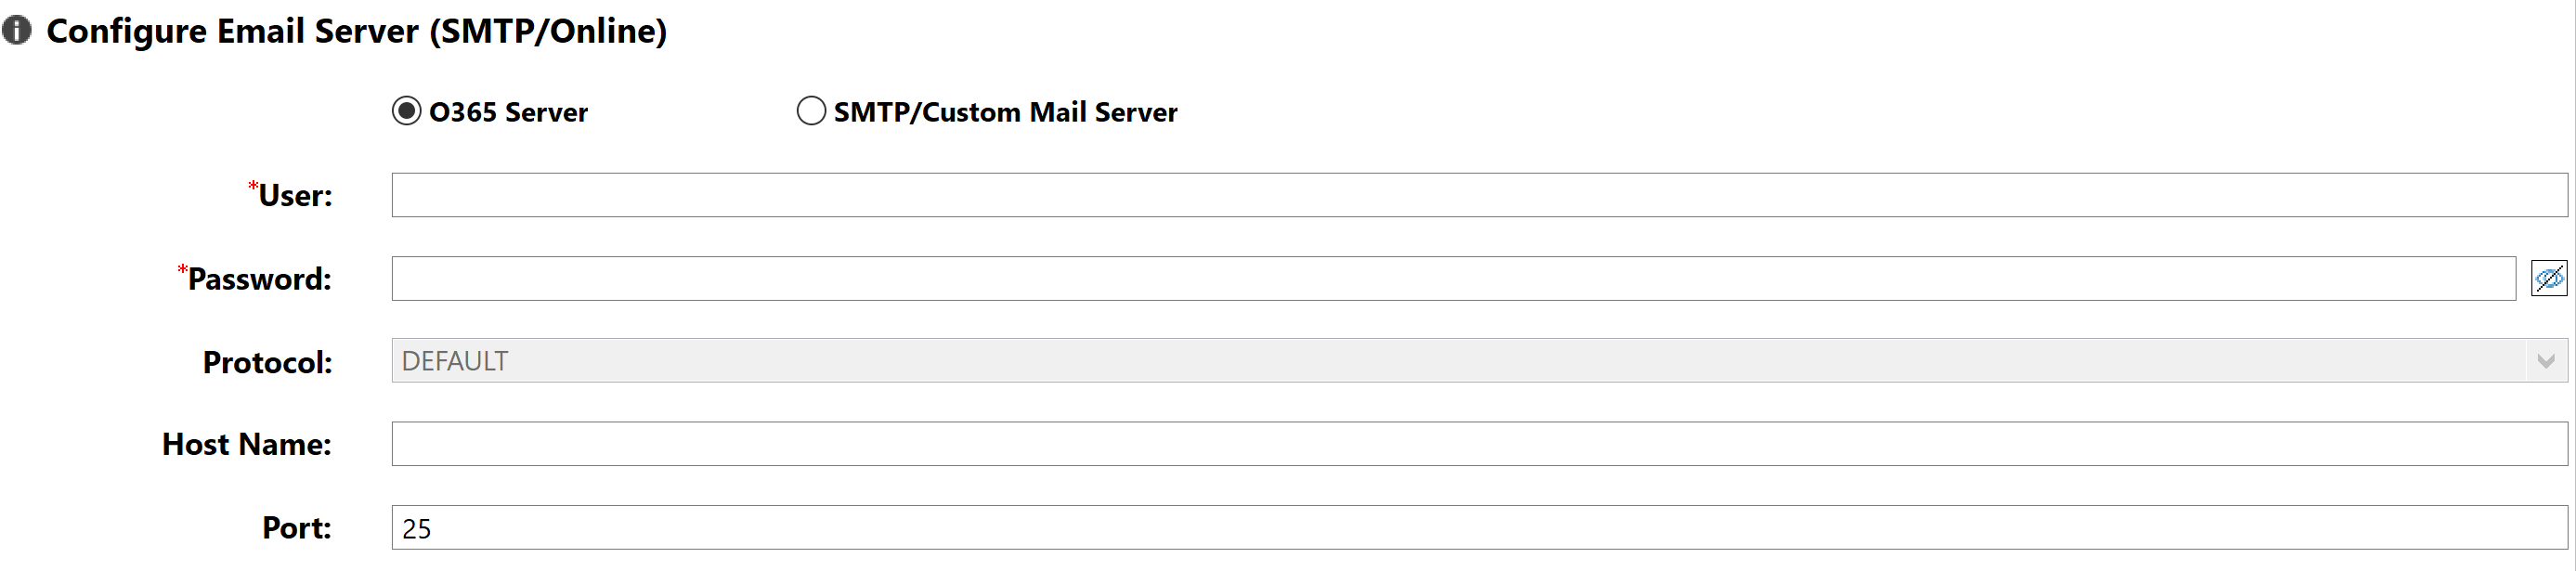
This section provides the necessary parameters for Essentials to connect to and send emails using your server. Email notifications work with both Exchange on-premise as well as Exchange Online (Office 365).
To use your Exchange Online in Office 365:
1.Select the "0365 Server" option.
2.Enter the login credentials of a valid Office 365 user (Exchange Online license in Office 365 is required)
If you are unsure of your Exchange parameters, please contact your Administrator.
To use your Exchange on-premises:
1.Select the "SMTP/Custom Mail Server" option
2.Enter the Host Name of your Exchange server
3.Select the Protocol to be used (DEFAULT, SSL or TLS)
4.Enter the Port Number (default is 25)