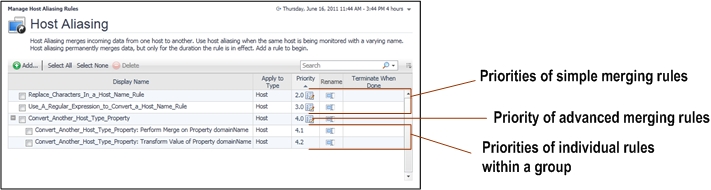
Simple merging rules can consist of a single rule. Advanced merging rules consist of a group of individual rules that are executed in a pre-defined order. It is possible to change the group priority, but not the priority of an individual rule within the group. For example, an advanced rule has the group priority of 4.0, and it consists of two individual rules, with their priorities set to 4.1 and 4.2 by default. While the priority of the rules within the group cannot be changed, increasing the group priority to 3.0 automatically increases the priority of the rules it contains to 3.1 and 3.2.
|
1 |
On the navigation panel, under Dashboards, click Administration > Tooling > Manage Host Aliasing Rules. |
|
IMPORTANT: You can only edit the priority of a simple merging rule or an advanced merging rule consisting of individual rules. The priorities of individual rules with a group (advanced merging rules) are assigned automatically and as such cannot be changed. A priority action icon appears on the right of an editable priority |
|
3 |
In that row, click the Priority column. |
|
• |
|
IMPORTANT: This value must be a valid integer number. |
|
1 |
On the navigation panel, under Dashboards, click Administration > Tooling > Manage Host Aliasing Rules. |
|
3 |
|
1 |
On the navigation panel, under Dashboards, click Administration > Tooling > Manage Host Aliasing Rules. |
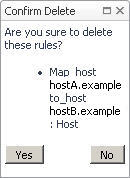
The merging process is in effect only while the merging rules exist and are active while the data consolidation resulted from a merging rule is permanent. For example, creating a rule that merges a source host with a target host results in the source host’s data being consolidated with the target host’s data, which is not only reflected in the data collection model, but also in any dashboards that display host-related data such as the Agents dashboard. When the rule is deleted, the data collected from the source host before the rule deletion still appears as collected by the target host, while the data collected after the deletion is stored under each individual host. For more information on how to delete rules, see Deleting host aliasing rules.
Based on their complexity, there are two types of host aliasing rules:
|
1 |
On the navigation panel, under Dashboards, click Administration > Tooling > Manage Host Aliasing Rules. |
|
3 |
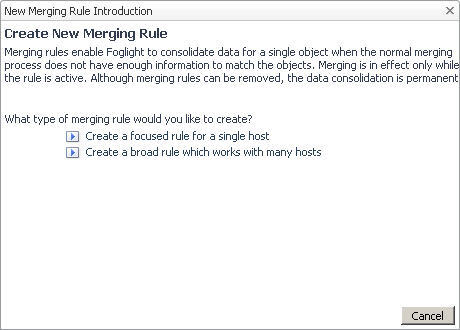
Choose the type of the rule that you want to create by clicking one of the following options in the New Merging Rule Introduction dialog box: |
Selecting the Create a focused rule for a single host option in the New Merging Rule Introduction dialog box invokes the Specify Target Host workflow for creating a host merging rule.
|
a |
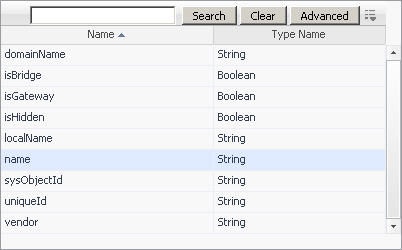
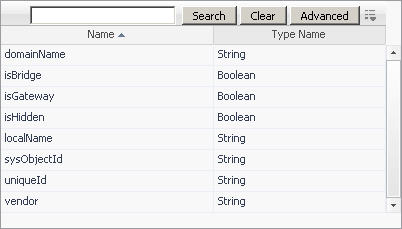
Ensure that the property you want to use for matching the host is selected. By default, in the Host Aliasing dialog box, the name property appears selected. |

|
IMPORTANT: The list that appears shows only a subset of the entire property set for the selected object type. This is because property matching filters can only reference certain types of properties such as String or Boolean properties. To see a full set of properties that exist in the Host type, view the Schema Browser dashboard; for more information about this dashboard, see the Foglight User Guide. |
|
c |
|
a |
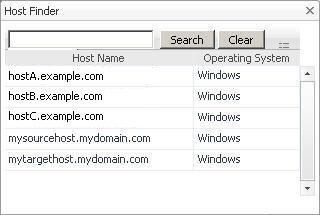
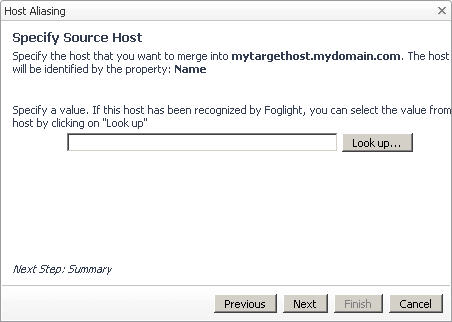
In the Host Aliasing dialog box, on the Specify Source Host page, type the value that you want to search for in the host objects that exist in the data collection model. For example, to look for a host object whose name is mysourcehost.mydomain.com, with the name property selected (Name: String, see Step 1, sub-Step a), type mysourcehost.mydomain.com into the box. |
|
b |
|
c |
|
d |
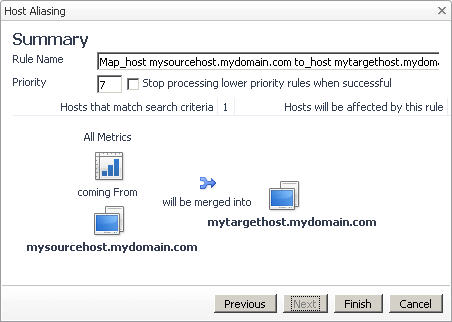
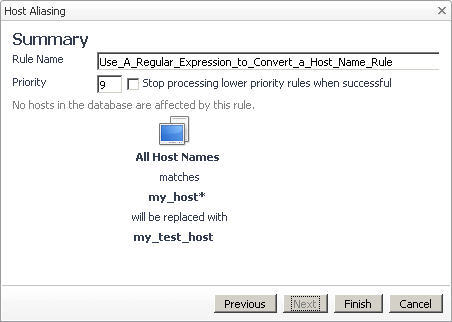
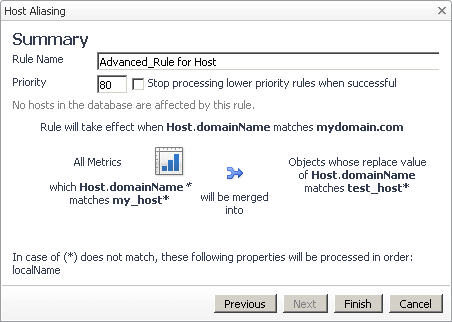
In the Summary page, review the overview of the merge process. |
|
e |
|
f |
Click OK to close the message box. |
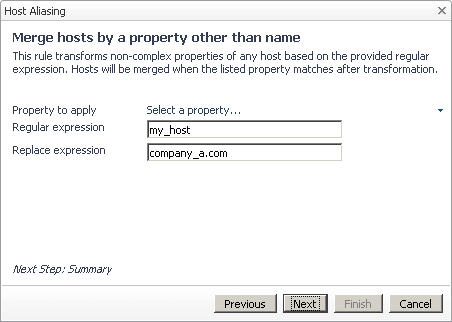
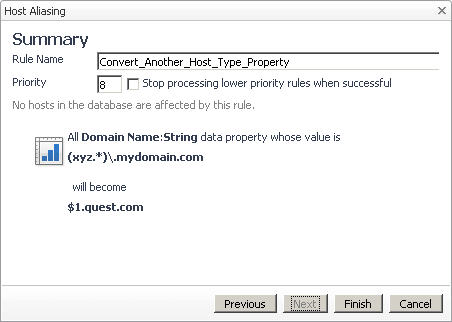
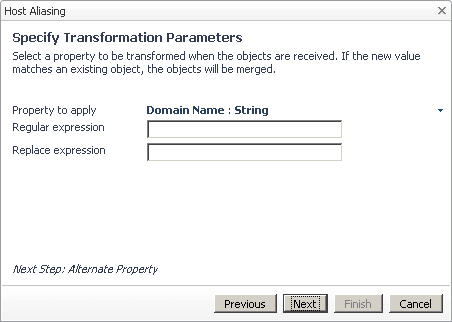
Selecting the option Create a broad rule which works with many hosts in the New Merging Rule Introduction dialog box invokes the Specify Matching Parameters workflow for creating a rule that changes the names or other host properties. The Host Aliasing dialog box includes several options that simplify the process of renaming host properties.
From there, specify the current and target names, and review the summary of the merge process.
|
1 |
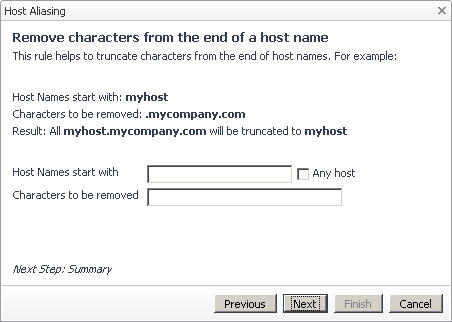
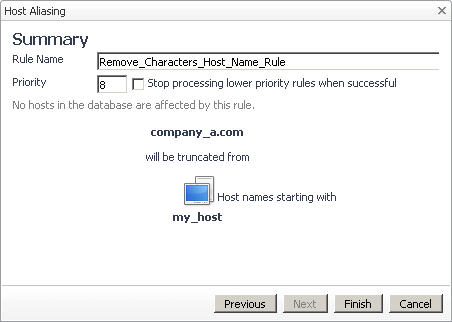
In the Specify Matching Parameters page of the Host Aliasing dialog box, select the option Remove characters from the end of a host name, followed by clicking Next. |
|
TIP: To use a different type of matching parameter, click Previous to return to the Specify Matching Parameters page. |
|
CAUTION: Host aliasing rules include a system-level rule, adjustHostName, that automatically restores host names if the entire domain name is removed. This rule is hidden and as such does not appear in the browser interface. The rule includes a default priority of one '1', while newly created rules have a default priority of two '2' or lower, causing adjustHostName to override the removal of domain names. For example, if you have a host called example.mydomain.com, and want to remove the domain name, .mydomain.com from that host name, adjustHostName reverts the removal of the domain name. To successfully remove the entire domain name from the host name, you must prevent adjustHostName from executing. This can be done by selecting the Stop processing lower priority rules when successful option. |
|
TIP: To use a different replacement text or to select different hosts, click Previous to return to the Remove Characters from the End of a Host Name page. |
|
4 |
|
5 |
Click Ok to close the message box. |
|
1 |
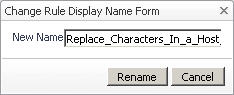
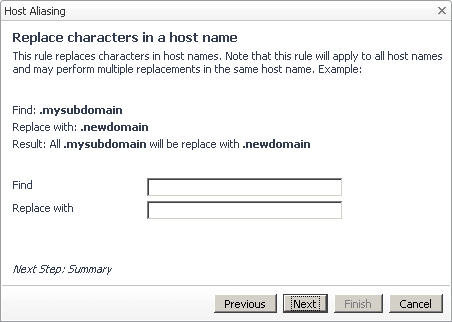
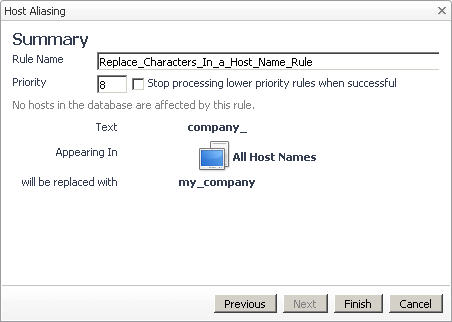
In the Specify Matching Parameters page of the Host Aliasing dialog box, select the option Replace characters in a host name, followed by clicking Next. |
|
TIP: To use a different type of matching parameter, click Previous to return to the Specify Matching Parameters page. |
|
TIP: To use a different type of matching parameter, click Previous to return to the Specify Matching Parameters page. |
|
4 |
|
5 |
Click Ok to close the message box. |
|
1 |
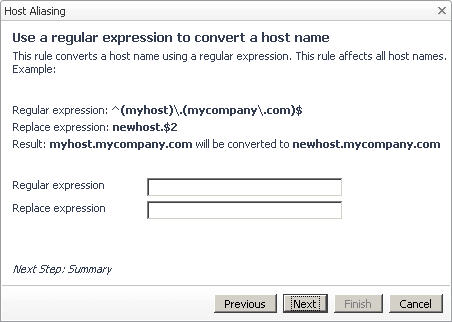
In the Specify Matching Parameters page of the Host Aliasing dialog box, select the option Use a regular expression to convert a host name, followed by clicking Next. |
|
TIP: To use a different type of matching parameter, click Previous to return to the Specify Matching Parameters page. |
|
TIP: To use a different type of matching parameter, click Previous to return to the Specify Matching Parameters page. |
|
4 |
|
5 |
Click OK to close the message box. |
|
1 |
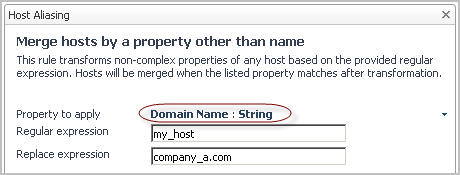
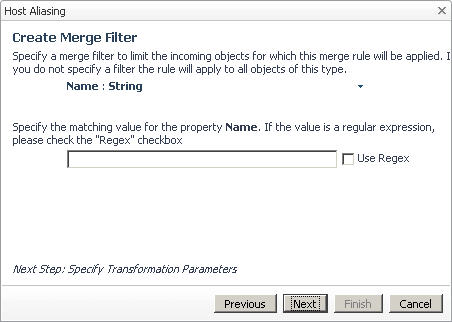
In the Specify Matching Parameters page of the Host Aliasing dialog box, select the option Merge hosts by a property other than name, followed by clicking Next. |
|
TIP: To use a different type of matching parameters, click Previous to return to the Specify Matching Parameters page. |
|
a |
|
IMPORTANT: The list that appears shows only a subset of the entire property set for the host object. This is because property matching filters can only reference certain types of properties such as String or Boolean properties. To see a full set of properties that are exist in the Host type, view the Schema Browser dashboard; for more information about this dashboard, see the Foglight User Guide. |
|
5 |
|
6 |
Click Ok to close the message box. |
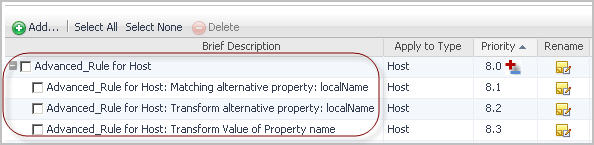
The range and type of simple rules in an advanced rule depends on the nature and complexity of the advanced rule. Each simple rule is assigned a priority number that illustrates the order in which they are executed. These priorities cannot be changed for the simple rules, however, changing the advanced rule priority affects each individual rule. For more information abut changing rule priorities, see Changing the priorities of host aliasing rules .
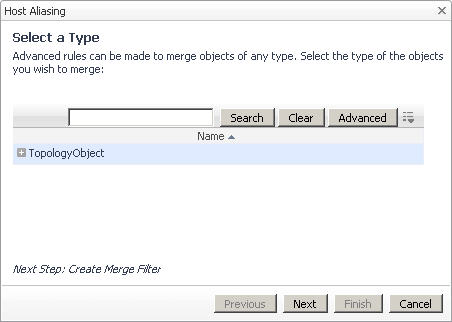
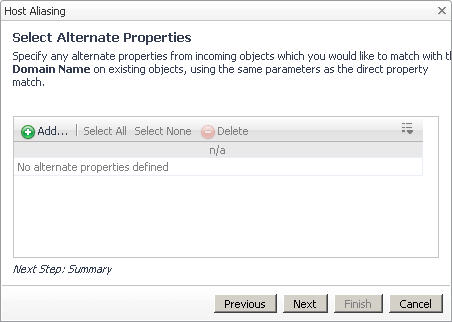
Selecting the option Create an Advanced Rule in the New Merging Rule Introduction dialog box invokes the Select a Type workflow for creating a rule that merges two or more topology objects.
|
a |
In the Host Aliasing dialog box, on the Select a Type page, use the TopologyObject node to select the desired topology type. |
|
a |
Ensure that the property you want to use for matching the objects is selected. By default, in the Host Aliasing dialog box, the name property is selected. |
|
c |
|
d |
|
4 |
|
a |
|
b |
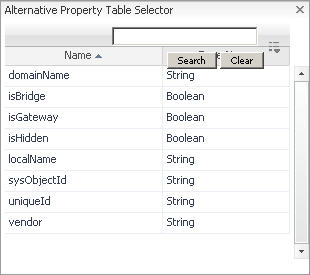
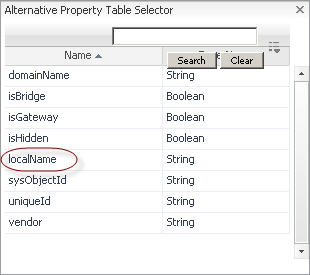
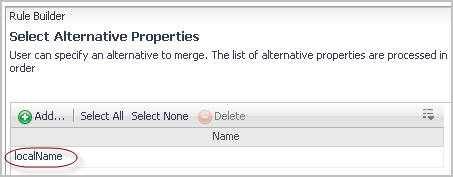
In the Alternative Property Table Selector dialog box, select the row containing the property that you want to add as an alternative property. |
|
c |
|
5 |
|
6 |
Click OK to close the message box. |
There are two types of scripts:
|
• |
Type 1 scripts. The Foglight collector calls these scripts every time they need to collect data. In Type 1 scripts, the collector executes the script, then stands by for a time period specified in the agent properties. When the standby period ends, the collector becomes active and reruns the script. Type 1 scripts are useful for collecting data that does not require calculations from multiple collection periods. |
|
• |
Type 2 scripts. These scripts control their own collection frequency cycle. In Type 2 scripts, the Foglight collector executes the script and remains open. The script controls the standby period instead of the agent properties. Type 2 scripts perform data calculations before the data enters the database and measure changes between collection periods. |
The following is an example of a Type I script:
|
Sample Type 1 scripts are also available from the Foglight Management Server installation directory: |
The following is an example of a Type 2 script:
|
NOTE: A Windows version of the Type 2 script is also available from the Foglight Management Server installation directory: <foglight_home>/scripts/agent/Type2_NT_Script.bat |
When writing a script to create a custom agent, use the following syntax:
A Canonical Data Transformation (CDT) dynamically converts the output data into the appropriate format (such as topology types and observations) that exist in the collection model. This mechanism dictates the syntax of the line of the code that specifies the field data immediately following the START_SAMPLE_PERIOD command, as shown in the above syntax block:
|
Sends the current collection sample to the database and completes the transaction. | |
|
Contains the name of the field under which to store the observation. | |
|
Indicates that the property should be treated as an identity. | |
|
LOG message |
Sends a status message to Foglight Agent Manager logs with message specifying the message. |
|
LOG severity message |
Sends an error message to Foglight Agent Manager logs with message specifying the message and severity set to one of the following values: FATAL, WARNING, or CRITICAL. |
|
Indicates that the specified topology type is an observation (such as StringObservation). | |
|
NOTE: In NT operating systems, use the rapssleep command, as those systems do not have a sleep facility: rapssleep %sample_freq% | |
|
Opens the table with table_name specifying the name of the table. If an identity field is declared, append it to the table name. | |
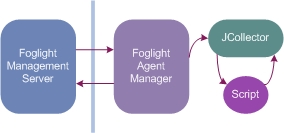
Custom script agents interact with the Agent Manager through the Foglight collector executable. Script-based custom agents output data to standard output (STDOUT). The Foglight collector reads this data and retransmits it to the Agent Manager.
Script agents work by running a prescribed script and processing the output. The actual agent is called JCollector. This agent runs the script, parses the output, and sends the resulting data table samples to Foglight.
There are two ways to make a script run:
|
• |
Let JCollector call the script on the sampling interval (Type 1 scripts). |
|
• |
Allow JCollector to call the script once (Type 2 scripts). The script controls the sampling interval. |
Type 2 scripts are more complex because the script author must handle looping and honour the sampling interval from the server. This might be necessary if the length of the loop is important for doing things like calculating rates. For the purposes of getting started, use Type 1. This will minimize the complexity. Switch to Type 2 once you have a reason for hand-coding the loop. For more details about Type 1 and Type 2 scripts, see Script types.
As mentioned before, JCollector runs the script and parses the output sent to STDOUT. It then sends that output back to the Management Server in the form of tables. There is a special Canonical Data Transformation (CDT) that interprets the data that is sent back. That CDT knows how to deal with the table elements, mostly by parsing the field/column names.
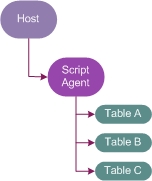
The standard model for a script agent is an agent containment model. An agent containment model means that the tables you send from your script agent are contained in an instance of your agent, and that agent is contained inside a host. This is usually good enough for getting started.
The output format is easy to understand:
The TABLE directive instructs the Collector to start a new table of data with the specified name. A single script agent can emit multiple tables. START_SAMPLE_PERIOD and END_SAMPLE_PERIOD allow you to insert rows into that table. One or more rows are allowed. The Field = Value entry specifies the name of a table column and its value. To find out more about syntax rules, see Script syntax.
For example, if you have a table of data with the following contents:
Then the script agent results appear as follows:
This simple example demonstrates how data tables are translated into script agent format. However, it is invalid because of non-numeric data in the Host column. This is covered later in this topic, and illustrates a classic pitfall while working with script agents in Foglight. For more information, see Script agent pitfalls: Converting string data.
Creating a cartridge from a script involves several steps. First, you write an agent script and upload it to the Management Server using the Build Script Agent dashboard. The upload process automatically builds the agent package. Next, you deploy that agent package to the host, create an agent instance, and edit its properties, if required. For complete instructions on using the browser interface to create a script agent and enable its data collection, see Uploading custom agent scripts.
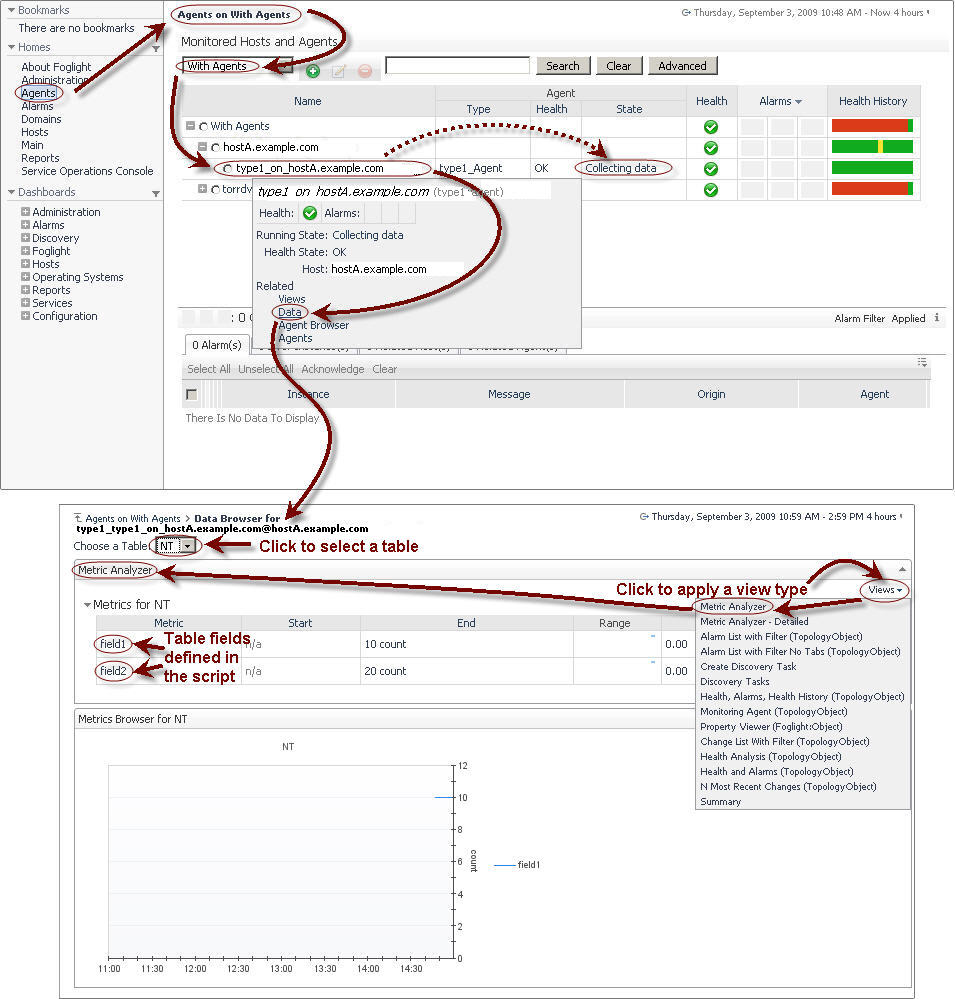
After a minute (which is the default sampling frequency), you can verify that the agent is collecting data using the Agents dashboard. The Agents dashboard can be accessed by clicking Homes > Agents on the navigation panel. On the Agents dashboard, applying the With Agents filter allows you to see monitored hosts with agents. Use that list to locate the host you deployed the script agent to, and your script agent. For more information about the Agents dashboard, see the Foglight User Guide.
If you cannot find your script agent on the Agents dashboard, you can retrieve its log from the Agent Status dashboard by selecting your script agent and clicking Get Log. For more information about retrieving agent logs, see Retrieve agent logs.
To verify that your script agent is collecting data, after locating the agent instance on the Agents dashboard, select the Data option. Choosing this option allows you to view the raw data. Applying the Metric Analyzer view allows you to see the metrics’ value and type. Then, choose the Data option to see the collected data in a selected table.
We now go back to the data example shown in Script agent format, with the contents:
Then the script agent results based on the above table are as follows:
Uploading the script to the server, deploying the resulting agent package, and creating and enabling an agent instance results in the following type of data being collected: CPU, Memory, and Disk. Note that the Host column is missing from the set of collected data.
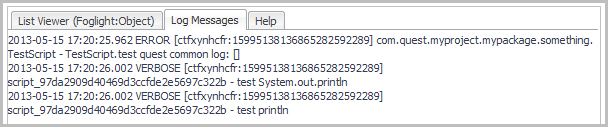
To find out what happened to the Host column, observe the contents of the server log file. You can download log files using the Log Analyzer dashboard. This dashboard is accessible through the navigation panel, under Management Server > Diagnostic > Log Analyzer. For more information about the Log Analyzer dashboard, see Monitor Server Performance. The pattern to look for with script agent errors is anything related to TopologyAdapter. The following section in the log file shows an error related to the Host entry in the script:
What does this mean in plain language? It looks like the server is trying to convert the string-based host names provided for the Host field into doubles. This is because, by default, Foglight assumes all script agent entries are numeric time series data. In other words, Foglight is trying to convert these values to numbers. It is not working as expected, which explains why the Host values are not appearing as expected.
|
Does the field uniquely identify the row of data? If it does, then we should mark it as an identity field. An identity field causes a new object instance to be created. | |
|
Does the field change frequently? If a string changes frequently, then it should be marked as an observation. That way Foglight stores a new value every sample, and does not the changes. If a string changes infrequently, then it can be a property. A property has one value stored, and changes are tracked. To determine if something changes frequently, ask the following question: Could this value change each sample period in a typical use case? To understand these concepts, we need to expand our example. |
In this example, we will assume that we are actually gathering the following data about a host:
In the above data sample, there are three string values: Host, IP Address, and State. We will now apply Question 1 and Question 2 to each of the entries:
It is clear that the Host column contains the name of a host, and therefore defines its identity. We want to see a new instance of the data for each unique value of Host.
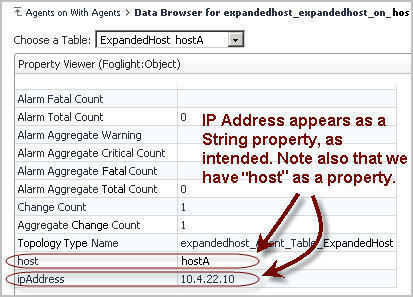
IP Address, on the other hand, is not an identity property. It is unlikely to change with each sample frequency. In most environments, IP Addresses are leased long-term. Marking IP Address as a property but not an observation makes sense.
Finally, the State column is not an identity property. However, it is possible that it could change from sample period to sample period. A host may not go down often, but when it does go down you want to know when. Tracking State as a string observation makes the most sense.
After uploading the script and re-deploying the agent package, on first look, the data you see in the Metric Analyzer for the script agent appears to be the same, consisting of cpu, disk, and memory.
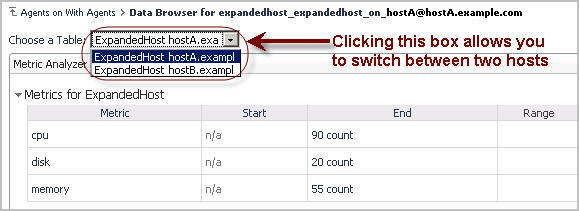
Now we actually have two sets of entries: one for hostA, and another one for hostB. What we never really noticed before is that we were getting two values of the same metrics into the same table before. Now we have two separate table entries, one for each host. So we fix at least one problem by adding Host.String.id to the script.
But where are the IP Address and State columns? IP Address should be visible as a property.
|
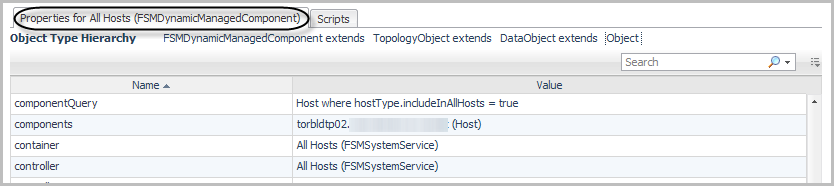
TIP: To open the Property Viewer, in the Data Browser’s upper-right corner, click Views and select Property Viewer (Foglight:Object) from the list that appears: 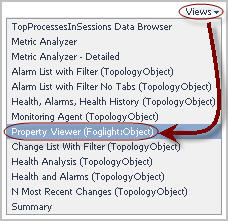 |
We have so far accounted for two of our changes. But what happened to the State column? Observations are a special class of metric. They are, by nature, harder to display. A time-series metric of type double can be graphed. But a set of values for a String appears differently. In general, observations are a little more difficult to deal with than other types. You can still display them, write rules, and so on, but you have to use special techniques. So where is State?
The following error in the server log indicates that you declared a String as Field.String.obs instead of Field.StringObservation.obs:
Next, if you see the following error:
In script agents, data is sent to the server by specifying a series of field=value pairs. The syntax is as follows:
As we work through this topic we explore how to use all elements of this syntax.
For detailed syntax description, see Script syntax.
|
echo Host = hostA
echo Host = hostB
|
echo Host.String.id = hostA
|
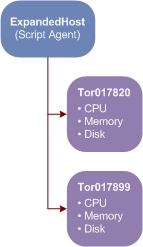
This type of table in Foglight 5 results in creation of two objects of type ExpandedHost. The Host property is the unique identifier for the object because Foglight generates a new object instance will be generated for each new Host entry in the script agent. Each object has CPU, Memory and Disk metrics attached to it.
This lead to the following script agent entries:
|
An identity property called Host is added to the object. For each new value, a new object is created. | ||||
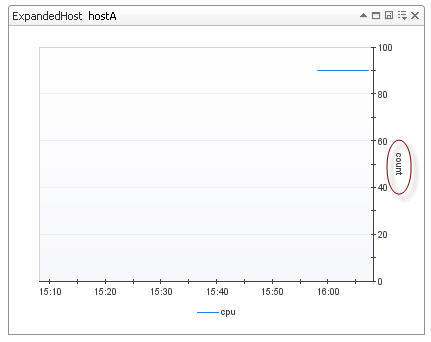
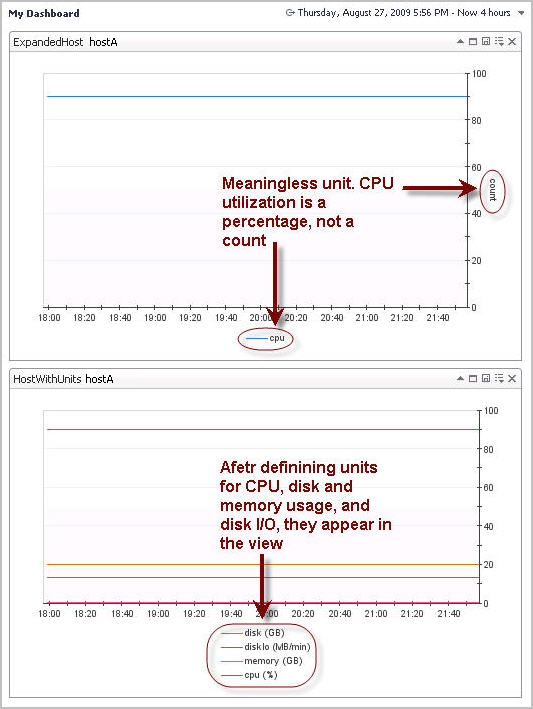
By default, any metric that comes into the system does not have a unit assigned. This means any numeric value have the unit count. This quite often does not matter early on in agent development. But without units, in the browser interface, you see this the following type of output in script agent views:
In a script agent, it is possible to set the unit using the last part of the field syntax:
The possible units are listed below:
A modified version of the script appearing in How script agent data is represented in Foglight 5 now includes units for CPU, Memory and Disk. It also includes a DiskIO metric that has a compound unit.
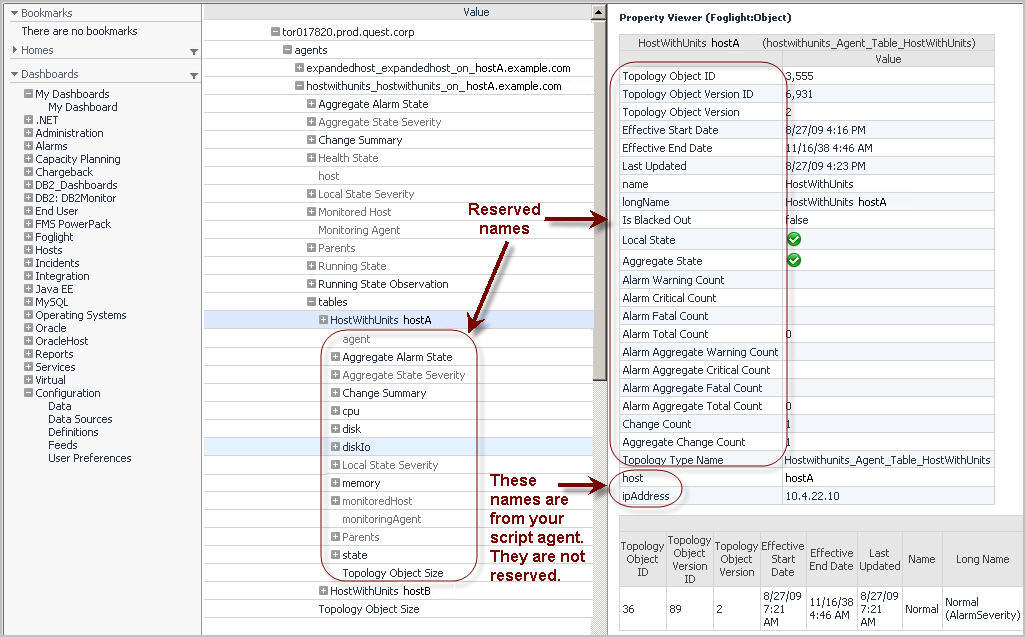
Not all field names are available. Many field names are reserved. The reason for this is that script agents create objects for each TABLE entry. These objects extend a type called F4Table. This type already has properties defined. You are not allowed to replace those properties with new ones as this causes problems with how models hold together.
It is possible to figure out exactly what property names are reserved by looking at the type definitions for F4Table and its parent classes. The type hierarchy looks like this:
Here is a sample script that includes fields that conflict with reserved names:
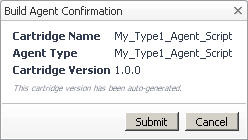
When you write a custom agent script, upload it to Foglight and build the agent package.
|
2 |
|
5 |
|
6 |
|
8 |
Click Go to Agent Status. |
To enable the script agent to collect data, follow the standard work flow for deploying agents. First, deploy the script agent package, and create and activate script agent instances. For more information, see Configuring Foglight Agents for Host Monitoring.
For more information, see the following sections:
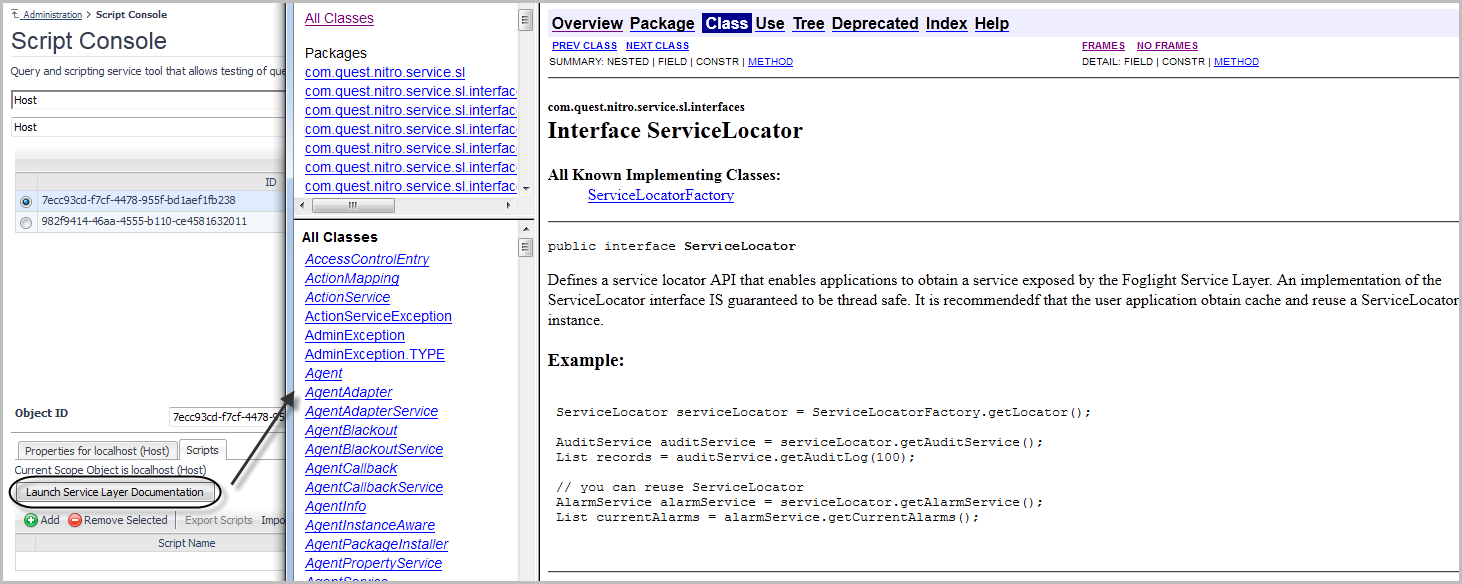
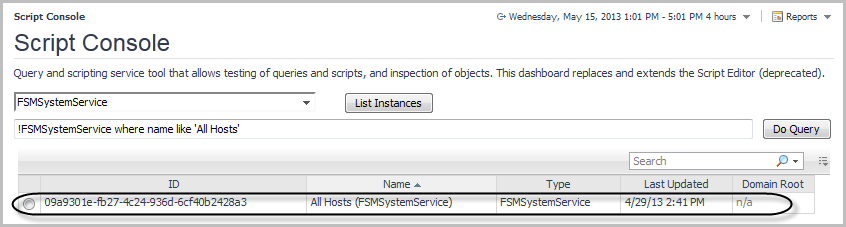
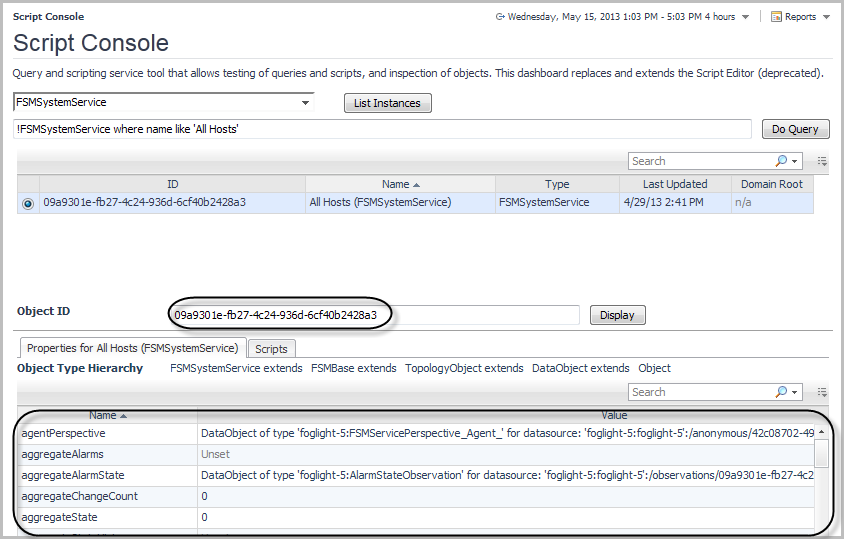
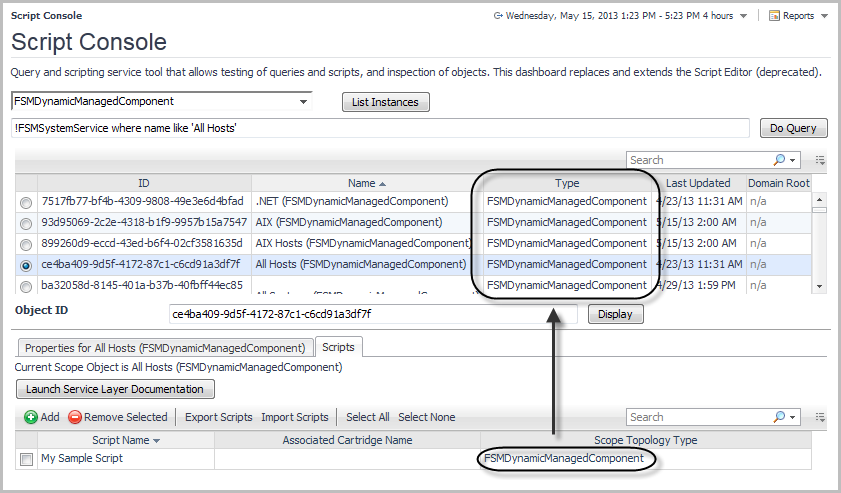
Use the Script Console to inspect collected data by selecting an object and viewing the property values of the related data. You can also use it to see the result of a scoping query whose results appear in the list of object instances. This information is displayed in the top part of the Script Console. When you specify a query, and click Do Query, the list is populated. It contains the following columns:
|
• |
ID: Contains the object ID. |
|
• |
Name: Contains the object name. |
|
• |
Type: Contains the object type. |
|
• |
Monitoring Agent: Contains the name of the monitoring agent. By default, this column is hidden. This information is important if you have monitoring agents whose definitions include objects of the same type and name, such as the legacy Cartridge for Operating Systems agents. Having this column allows you to inspect the objects from specific agent definitions. |
|
1 |
|
• |
To list all instances, click List Instances. |
|
• |
If you did not previously query the topology for object instances, but do have the object instance ID, type it in the Object ID box, and click Display. |
The Scripts tab displays the following columns:
|
• |
Script Name: The script name. |
|
• |
Cartridge Name: The cartridge name associated with the script. When you create a script, you have the option to associate the script with a cartridge for class loading. The associated cartridge classes are loaded first during script execution, improving its performance. |
|
• |
Script Topology Type: The topology type of the scoped object. This column is only populated when you scope on an object and your script references the scope. |
A note in the top-left indicates the existence of a scoped object: No Scoping Object Selected or Current Scope Object is object name (type). Scoping on an object allows you to reference the selected object in your script using the scope variable.
Clicking Launch Service Layer Documentation opens the Java API documentation for the Foglight Service Layer. If you are using Foglight services in your script, use this information as reference.
The Add button opens the Run Script dialog box that allows you to quickly write, run scripts, and save them for future use. A collection of saved scripts is user-specific: a saved script is only accessible by the user who created it.
Clicking a script name also opens the Run Script dialog box that allows you to quickly edit and run the script.
The left-most column in the table contains check boxes that allow you to select one or more scripts, and delete the selected script by clicking Remove Selected. Select All and Select None selects all scripts and clears all selections, respectively.
|
1 |
|
2 |
Optional — Scope on a topology object. You can write a script to view and manipulate an object. For example, look for an FSMSystemService object whose name is All Hosts or similar. |
|
a |
In the Script Console, in the Query view, type a query to retrieve objects of a specific type and then click Do Query. |
|
c |
|
d |
|
3 |
In the Script Console, click the Scripts tab. |
|
4 |
Click Add to start writing a new script. |
|
NOTE: If you scoped on a topology object in Step 2, this is indicated in the title of the Run Script dialog box. |
|
7 |
Optional — To associate the script with a specific cartridge for class loading purposes, click Choose an Associated Cartridge (Optional) and select a cartridge from the list that appears. Associating a cartridge with the script ensures the cartridge classes are the first to load during the script execution, improving its performance. |
|
8 |
Click Run to run the newly edited script. |

|
• |
If the script returns an object, the Help tab displays the object type and a collapsible list containing the public methods defined in the object’s class and their prototypes. For more information about this tab, see Retrieving information about named scripts, services, and classes. |
|
• |
If you scoped on a topology object in Step 2, scope appears in the script, and the scoping object is null, an Error message is logged. |
|
• |
If you scoped on a topology object in Step 2, scope appears in the script, and the scoping object is a different type than the saved scoped object type, a Warning message is logged. |
|
9 |
Exported script files use the following XML format:
The XML file name uses the following format: exportedScripts<file_ID>.xml. For example: exportedScripts988888578404711052.xml.
It is possible to export multiple scripts into a single XML file. This causes every script to be enclosed in its own <script> element. The XML can include as many <script> elements as required.
|
1 |
|
2 |
In the Script Console, open the Scripts tab. |
|
3 |
On the Scripts tab, select the check box in the row containing the script that you want to export. |
|
4 |
Click Export Scripts. |
|
1 |
|
2 |
In the Script Console, open the Scripts tab. |
|
3 |
|
4 |
In the Import Scripts from File dialog box, click Browse and navigate to the XML file containing the script that you want to import. |
|
5 |
Click Import. |
|
6 |
Close the Import Scripts from File dialog box. |
The Help tab, available in the Run Script dialog quickly provides the information you need after typing a desired help command in the Enter Script Text box and clicking Run.
Also, if a script returns an object, unless the returned object is a String, the Help tab displays the object’s type along with a collapsible list containing the public methods defined in the object’s class and their prototypes. This on-hand reference information can help you quickly write additional scripts to obtain additional information about the retrieved object.
The help command allows you to display its syntax, list named scripts, service layer methods, class methods, and to drill down on a named script, service, or service layer method. For complete information, see the following sections:
This command provides syntax information for the help command.
This command lists all named scripts, including the scripts that come with the server, and any installed cartridges. The list is alphabetically sorted and includes a search tool. Clicking or hovering over a script name on the Help tab shows the script’s syntax information, description, and argument descriptions in a separate dialog box.
The completeness of this information depends on how well the script is documented.
The script name is case sensitive and does not include script arguments. For example, to display information about the script adjustHostName(arg), type help("adjustHostName"). Typing help("AdjustHostName") or help("adjustHostName(arg)") results in an error: AdjustHostName is not a valid script name.
The completeness of the displayed information depends on how well the script is documented.
For example, scoping on a object instance in the Script Console and typing help(scope) displays the scoped object’s class name in a navigation tree. When expanded, the class node shows a list of public methods available for that class.
The Agent Manager Adapter, included with the Management Server, includes the agent_restore script that allows you to restore agents that appear disconnected after a server failure. It recreates any agent instances that are known to the Management Server that were deleted on a Agent Manager host. Use the Script Editor dashboard to run the script.
|
true or false |
NOTE: If the agents are being restored asynchronously (by setting runAsync to true), they cannot be activated. | |
|
Specifies the time in milliseconds to sleep between batch runs. The default is 30000 ms. | ||
|
true or false |
Initializes the agent’s restore operation asynchronously. The default is false. NOTE: Setting this argument to true forces the activate parameter to false. This is because an asynchronous restore operation has no means to determine when an agent is restored. | |
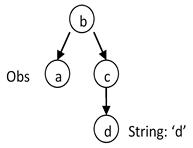
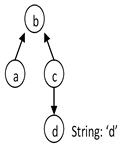
The topology can be thought of as a directed graph with nodes representing topology objects and edges representing topology property relations. This sectiontopic shows how to form queries on an abstract graph regardless of how properties are set up, or in the abstract world, edge direction. In the following graphs, it is assumed that a property of name x (lower case) is of type X (upper case).
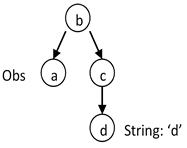
Consider a topology type B that has an observation property a and a regular property c. c has a property d that is a String.
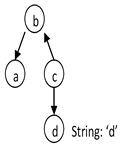
In the following queries, we retrieve a using an important filter consisting of a literal matching pattern between the d property and the d literal value (d = 'd'). In the following examples, note how the positions of the nodes in each graph are the same, while the edge directions are different.
|
|
|
|
This query filters all topology objects of B type and retrieves their a observations. | |
|
|
|
|
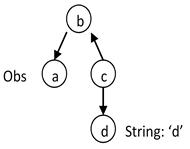
The query filters all topology objects of type C, retrieves their b properties followed by retrieving the a observations from that set of b properties. | |
|
|
|
|
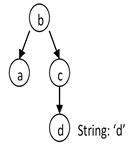
The query filters all topology objects of type B and then retrieves the a objects from that set of b properties. | |
|
|
|
|
|
|
|
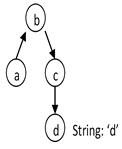
The query filters all topology objects of type C, and forms a set S of the results’ b property objects. Then it filters all objects of type A by checking that their b property is in S. | |
|
|
|
|
The query filters all topology objects of type C and uses the resulting set as the base to find the desired a properties. | |
This tutorial begins with a query for the set of all EJBInstance topology objects that exist in your environment. The syntax for this query is:
You can filter topology objects by their properties. For example, if you want just those EJBInstances who have their name property set to inst1-1, express your query in the following way.
The where is a filter, functionally similar to an SQL WHERE. If you like keeping your query compact, you can replace the where keyword with a colon. It has the same meaning.
In addition to querying properties with specific values, you can also write queries that select objects with null properties. To do that, use the null keyword preceded with a dollar sign ‘$’. Depending on the context in which the query is used, in some cases you need to escape the dollar sign ‘$’ with a backslash ‘\’. For example:
qs = server.get("QueryService")
objs = qs.queryTopologyObjects("Host where os = \$null");
When the Query Service evaluates this query, it first retrieves the set of all EJBInstance objects, checks each one to see if the name is equal to inst1-1, and finally returns the subset of objects that match.
Without knowing anything about the topology, it is impossible to say whether this query completes quickly or slowly, depending on the number of EJBInstance objects in your environment. This could be a fast query if the set of EJBInstance objects is small, or a slow query if the set of EJBInstance objects is large.
For example, let’s say you want those objects whose type contains the word Catalyst. A common first attempt would be to make a query for all TopologyObject instances whose topologyTypeName property contains Catalyst.
Another way to achieve the same goal is with this next query.
Which form of the query should you choose? The first query scans the set of all topology object, of every type, checking each object’s topologyTypeName property. In a typical system there will be hundreds of thousands of topology objects so the set is quite large.
The second query scans the set of topology types, matches them against the regular expression /.*Catalyst.*/, and finally returns all topology objects on the matching types. The scanned set here is typically only hundreds of types, so it’s relatively small. You should choose the second query.
Filters can contain multiple conditions. The following query retrieves those EJBInstance objects whose name is Alice, Bob, Carol, or Dave in an inefficient manner.
For every EJBInstance Topology object, the query engine performs the following steps:
|
1 |
Accesses the name property and checks if it is equal to Alice, returns the object if it is, otherwise goes to Step 2. |
|
2 |
Access the name property and checks if it is equal to Bob, returns the object if it is, otherwise goes to Step 3. |
|
3 |
Access the name property and checks if it is equal to Carol, returns the object if it is, otherwise goes to Step 4. |
|
4 |
Access the name property and checks if it is equal to Dave, returns the object if it is, otherwise discards the object. |
The above query assesses the name property four times, once per condition (Alice, Bob, Carol, or Dave). You can make your query faster by reducing the number of conditions, and therefore, the number times you access the name property. For example:
The second query takes the full set of EJBInstance topology objects, and for each object will perform the following operation.
|
• |
Access the name property and checks if it is equal to Alice, Bob, Carol, or Dave, returns the object if it is, otherwise discards the object. |
In this case the name property is retrieved only once per object, rather than four times.
Let’s look at each part of the form separately.
There are several ways to describe the SetOfTopologyObjects element:
|
• |
This is the basic way to define a set of topology objects.
This query element goes to the Topology Service with the ExampleType topology type, including all its sub-types, and retrieving all the topology objects of those types.
This is an advanced form of the topology type name. What it does is it builds a topology type definition and then retrieves the objects that meet that definition. There are many different options that you can use to extend and restrict the topology type definition that you are building. The general form for the $objectsbytype() element is as follows:
The $objectsbytype() element reads the list of type specifications and generates a resulting set of topology types. Once the type reading is complete, it retrieves all topology objects for each of the types it finds. Objects from the sub-types are automatically collected if a super-type makes it into the resulting set, even when the objects of the sub-type themselves do not directly meet the specification. We will see how this works soon in Multiple type specifications.
Next, you learn about the The type specification format.
The simplest type specification is just a basic topology type name.
So far, this is functionally identical to the !ExampleType syntax. The difference is that it can now be made more exact by restricting the object types to those that came from a certain cartridge and version. If you just want to just specify the cartridge, add the cartridge name with a colon:
It can be further restricted by specifying the cartridge version:
Regular expressions that use this element can also be specified without $objectsbytype. For example, both of the following expressions are valid:
Additional types can be added with a comma. For example:
This will get you all the objects of ExampleType from any ExampleCart, plus the CatalystService objects.
Besides adding on more types you can remove types from the match:
$objectsbytype(CatalystService, !/.*Data.*/)
The above query returns all of the CatalystService objects excluding those with Data in their type name. The exclamation point here means exclude.
How multiple type specifications work
This approach gives a lot of flexibility. Consider a type hierarchy A?B?C, where A is the super-type of B, and B is the super-type of C. If we want to query for objects of types A, B, and C, then we can write the following:
Let’s change it a bit. Suppose we want objects of types A and C, but not B. In that case, form the query in the following way:
As you can see, the order of the type specifications is important. For example, switching around !B and C to $objectsbytype(A, C, !B) returns a working set of types that contains only the A type ({A}).
Then, at evaluation time, the rule executes its evaluation code for each JVM object in that set. In this example, queries within that evaluation code can use the $scope variable to get their particular JVM object against which they are run.
$objectsbyid() can be used to explicitly point to certain objects by their unique IDs:
Here is an example that identifies a set of three topology objects by their IDs:
It works by directly asking the Topology Service for the latest versions of these objects.
Negation of $objectsbyid is ignored. For example, the following expressions are equivalent:
A topology model is a set of object nodes and links between them. The links are called properties, and as a whole, the set of topology objects and their properties form a model that you monitor with the Foglight Management Server. For any topology object, its properties can point to other topology objects, which in turn have properties that point to other topology objects, and so on.
The result of evaluating a property path is a SetOfTopologyObjects. The general form of the property path is:
The root of the path can be any of the forms for defining a SetOfTopologyObjects. Here are examples of each element with property path examples.
The result of walking a path is the set of objects from the end of the path. For example, the path in the first example, (JVMGarbageCollector).jvm.localStateSeverity, returns a set of AlarmSeverity objects. These are the localStateSeverities from the JVMs of all JVMGarbageCollectors that exist in the topology model.
In this query, we find every TopologyObject object whose topologyTypeName property matches the regular expression '.*GarbageCollector', and from that set of objects, we retrieve the 'jvm' property. It is very likely that every TopologyObject object whose name matches '.*GarbageCollector' does have a jvm property, but the query engine is not aware of this. Instead, while it builds the path, it looks strictly at declared types, and sees that you are trying to reference the jvm property from a TopologyObject object.
The following example results in an error:
That is because the TopologyObject type does not include a jvm property. The right way to do this query is by using $objectsbytype():
In this version of the query, we are working directly with types. The query engine finds the least common ancestor of all types that match the regular expression. If that type has a jvm property, then the query retrieves one or more values, otherwise it throws an error.
Collection properties hold more than one topology object. Usually the type of this collection property is the TopologyObject type, so that it can act as a collector of objects. Unfortunately, this makes it hard to reference properties out of them. An example collection property is a Host object’s detail property:
The detail property is a collection of TopologyObject objects. They can all be RemoteClient objects that include agentAdapterName properties, but you cannot get to that agentAdapterName property because you are trying to de-reference it from the TopologyObject type. For that reason, the following query is invalid.
The right way to perform this query is as follows.
In the above example, agentAdapterName is now referenced from the RemoteClient type. This query also introduces logical operators and the $object keyword. These are explored in Properties .
The Basic type example from A walk along a property path is actually a special case of a more general use. Instead of putting a topology type name in the parentheses, you can insert a complete topology query.
This allows you to introduce filters along the property path.
The first example finds those JVMGarbageCollector objects and filters them to obtain only those which contain the Gen sub-string for Generational collectors. It then goes from that set, off to their jvm objects, and finally to the localStateSeverity objects.
The second example starts at the scoping object, walks to its jvm objects and then filters those by names ending with a 1. After filtering, the query uses the remaining topology objects to find their localStateSeverity objects.
For sub-queries without filters, there is no need to enclose them in parenthesis. For example:
This concludes what you can do to create a SetOfTopologyObjects. The next topics cover the WHERE clause, breaking it down into two parts:
|
• |
Properties (see page 452) |
The query engine interprets properties and property paths in filters just like property paths in the definition of the SetOfTopologyObjects with some differences. The basic behaviors are described in Property typing and Collection properties .
The differences between how property paths are interpreted in SetOfTopologyObjects and those in filters are as follows:
|
• |
The root in a filter’s property path is inherited from the set passed out of the SetOfTopologyObjects, rather than defining one itself. |
|
• |
Besides ending in TopologyObject objects, the tail of the filter’s property path can also be String, Boolean, or Numeric objects. |
This means that name is a property of the EJBInstance topology type, and each topology object of the EJBInstance type includes a value for that property. In this case, the property path length is one, and the tail value is a String.
There are cases where you want to make checks against topology objects coming out of the SetOfTopologyObjects themselves, rather than one of their named properties. In this case you can use $object instead of the property name. We have an example in Collection properties that uses $object.
To simplify the example, you can drop the condition on the agentAdapterName property:
The above statement instructs Foglight to retrieve all RemoteClient topology objects, where those objects ($object) appear in Host objects’ detail property.
In a sense, there is an implicit $object prefix in all property uses. The query !EJBInstance : name = 'inst1-1' can be rewritten to use an explicit $object. There is no difference, it is just more verbose:
The $object.name property is actually a property path. There is no length limitation on property paths within the filter. The only difference from SetOfTopologyProperty paths is that you cannot introduce filtering WHERE clauses into these property paths. For example, the following query is incorrect:
Instead, re-write the above query in the following manner:
This query returns those JVMGarbageCollector topology objects whose jvm name is x and the localStateSeverity property is the scoping topology object.
This topic describes the following operators that you can use in queries:
|
• |
|
• |
|
• |
|
• |
|
• |
The in operator has two meanings. It can mean that the tail of the property path appears in:
We use the first form of in when we want to say that a property has one of a number of String values:
The above query returns those EJBInstance topology objects whose name property matches inst1-1 or inst1-2. It is preferable, to saying:
The second form of in is used to say that the tail of a walk along a property path is a member of another set of topology objects:
The like operator tests the equivalence of a property value and a SQL-type expression. For example, the following query retrieves one or more hosts whose name uses the pattern %.mydomain.com.
Similar to like, matches tests the equivalence of a property value and a Java regular expression. For example, the following query retrieves object instances of the J2EEExecuteQueue type whose name uses the pattern Nexus.*.
For more information about regular expressions and the syntax that you can use in Foglight, see the Command-Line Reference Guide.
The isa and instanceof operators check if an object instance is an instance of a particular type. For example, the following query returns all Host object instances whose detail property if of the type RemoteClient.
The topology model has a tree-like structure. In that structure, an object can contain one or more child objects, that, in turn can contain one or more child objects, and so on. The existence of these parent-child relationships can be tested using the contains and within operators. These operators are followed by an indicator that defines the number of levels in the topology model that are selected by the query, relative to target object. The indicator is comprised of the caret sign, ‘^’, followed by a number that specifies the number of levels, or inf, that stands for no limit. For example, ^2 indicates that the query is issued against two levels above (in the case of within) or below (in the case of contains) the selected object in the topology model, while ^inf indicates that all levels are selected.
The within operator checks the if an object is contained within particular a parent object. For example:
The equals operator tests the equivalence between a property value and a given literal value. For example, the following query retrieves those EJBInstance object instances whose name property is set to inst1-1:
The union operator is used to combine results of several sub-queries.
!TopologyObject where $object in union( Host, JVM )
|
NOTE: When a sub-query contains a WHERE clause, it should be enclosed in parentheses: !union( (Host where name='foo'), JVM ) |
A query can contain one or more numeric comparisons in the WHERE clause. They can be used to compare two numeric values. For example, the following query returns those Host object instances that have no existing warning alarms.
Additionally, to compare date and size values, you can use the Date and size functions.
Any of the above operators can be negated by prefixing the operator with either an exclamation mark ‘!’ or NOT. The following statements are all equivalent.
You can use the logical operators AND and OR. For example, the following says that either of the conditions is met.
If you want to write a complex condition with numerous AND and OR operators, you should use parentheses to explicitly define how the logic works. The two following examples show how different parentheses can yield different logic.
These functions create date types for comparison with date properties.
|
NOTE: The timezone parameter is the same as the time zone ID in the TimeZone class. For more information, visit: http://download.oracle.com/javase/1.4.2/docs/api/java/util/TimeZone.html |
collectionOrArrayOrStringProperty.size()
!Type where collectionOrArrayOrStringProperty.size() = 1
|
NOTE: When using the size(stringNamedParameter) format, only String-type parameters are accepted. In practice, this limitation means that instead of: !Type where prop.size = size(:collection) you should pass the collection size as the parameter: !Type where prop.size = :collectionSize |
Parameter values are set using com.quest.nitro.service.sl.interfaces.query.IQueryStatement.setParam(String, Object).
|
NOTE: Automatic collection expansion in IN {}, $objectsbyXXX: The new query engine expands collection values when appropriate for the named parameter usage. |
The above expression is equivalent to:
The use of syntax shortcuts is supported but discouraged.
The query engine supports escaping of query elements to enable backward compatibility. For example, \char is replaced by char. Additional examples:
The syntax reference described in this section uses the following conventions:
|
[ element ] |
|
|
element1 | element2 |
|
|
( grouped elements ) |
|
|
(* Comment *) |
We will now look at the following example.
You can filter the set of topology objects that you get back based on their properties. For example, if you want all EJBInstances who have their property name set to inst1-1, then you would express your query in the following manner.
Additional property conditions can be added using a comma as a separator, as follows:
Add an extra condition is with an and instead of the comma:
The query language also supports ‘or’ and precedence with parentheses.
The and/or keywords have convenient shortcuts. In place of an and you can use & or && and in place of an or you can use | or ||. There is also an alternative syntax for not equals (!=), which is <>.
So far, we have only used exact string matching. We can also use limited regular expressions with the like operator. To get all the EJBInstances where the name starts with “inst”, write the following query:
Besides the percent sign ‘%‘, the other regular expression element that you can use is the underscore ‘_‘, which is a required match to any character.
You can also ask for an exact match from within a set of strings.
You can specify the negation of a condition. For example, if we want only those EJBInstances whose name does not start with inst we can change the above query as follows:
Equivalently, we can write any of the following.
Note that if a not is put before a comparison, then the entire comparison must be enclosed in parenthesis.
Property conditions can express programmatic relationships. For example, if you want all EJBInstances where the name property of the EBJInstance’s application property is set to app1-1, write the following expression:
When a query is made, it can be made within a scope. A scope is simply a handle to some known topology object and is represented in the query by the keyword: $scope. If you want to find all siblings of the current EBJInstance according to their ejb, write the following expression:
There is one more way to do filtering, and that is by checking whether a topology object is a particular set of objects. For example, if you want to query for all EJBInstances on the same server (the property we are interested in) that the current scoping EJB is on, use the following expression:
(EJBInstance where server in $scope.instances.server)
Finally, a topology object query can be used as the base of a programmatic walk through object properties. For example, if you want all the EJBInstances from all EJBs that are named ejb1, you can first ask for the EJBs and then look at their instances. To do this use the following expression:
As you might expect, this query can have filtering conditions applied to it, too. If you want to retrieve only those EJBInstances from above who additionally have their names starting with inst, use the following expression:
Another way to write this query is as follows:
Foglight agents collect metrics from monitored hosts and send them to the Foglight Management Server in batches. The length of an agent's collection period for a batch is specified in the agent properties. A metric query that includes a time component retrieves the batch of data that exists on the server at the time specified by that time component, not the batch of data collected at the time specified by the query, as it may be expected. For example, the query ruletteCount at 15:00 on 2007-09-26 retrieves the batch of data for the ruletteCount metric that exists on the server at 15:00. As seen in the example below, the start and end time of the collection period for that batch indicate that the collection period started at 14:22 (startTime) and ended at 14:59 (endTime).
|
9/26/2007 14:22 | |
|
9/26/2007 14:59 | |
For example, if you want to get the collect the invocationTime for all EJBInstances over a period of 1.5 hours, write the following expression:
You can also use a registry variable (here called myDuration associated with the current scoping topology object to specify a time period.
As mentioned above, you can still use the mechanisms associated with topology queries. For example:
Also, if you have a scoping EJBInstance topology object you could query for its invocationTime in the following way:
Because this is a common idiomatic case for the Rule Engine, there is a short-hand for from $scope in the above.
In this case, the language interprets that there is no sub-query for topology objects, so it assumes that the invocationTime metric is attached to the current scoping topology object. It implies a $scope clause in the query.
The time period is optional. If you just want a current invocationTime from the current scoping topology object, write the following expression:
The first way to do this is to append an ago clause.
This statement looks at the current time, chooses the same calendar instant from week ago, and selects the 1.5 hour period immediately prior to that 1 week ago instant. For example, if it is currently Monday morning at 9:00 AM, this statement goes back to last week’s Monday morning and select the invocation time from 7:30 AM to 9:00 AM. Note that leaving off the ago clause will produce the same period of time (except on today) allowing for apples to apples comparisons with visually similar queries.
The second clause we can append is an on clause.
These clauses give wall clock equivalent comparisons, that is, they compare 9:00 am today to 9:00 am in the past. If you want to compare 9:00 am today to a different wall clock time in the past you can use a spanning clause.
And finally, you can use the relative offset with a spanning clause.
Time zones can optionally be added to a spanning clause.
Examples of acceptable formats for the time zone are:
|
• |
|
• |
In general, any of the formats supported by java.util.TimeZone.getTimeZone() can be handled here.
This query takes the most recent metric, pretending that it is 1:00 PM on Monday, May 25.
The following query retrieves the most recent metrics, pretending that it is 1:00pm, 2 days ago:
|
1 |
Click Topology Type and select a topology type from the list that appears. |
|
2 |
Click the Append button ( |
|
• |
|
4 |
In the box immediately below the Topology Type and Property boxes, edit the logical expression that matches the rule scope. |
|
a |
In the above expression, select property. |
|
b |
Click Property and select the property name from the list that appears. |
|
c |
|
1 |
In the box immediately below the Topology Type and Property boxes, place the cursor where you want to insert the new segment of the scoping query. |
|
3 |
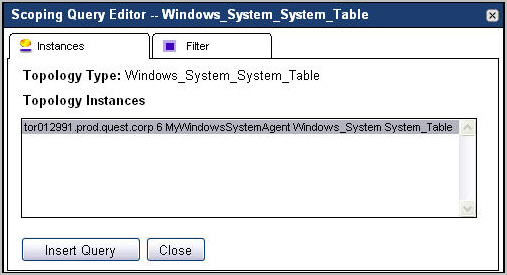
Ensure that the Instances tab is open. |
|
5 |
|
1 |
In the box immediately below the Topology Type and Property boxes, place the cursor where you want to insert the new segment of the scoping query. |
|
3 |
|
a |
|
b |
Click is equal to on the right and select a logical operator from the list that appears: is equal to, is not equal to, is like, or is not like. |
|
5 |
If you do not want to add more comparison expressions to the filter, click and on the right and select the blank entry. |
|
6 |
If you want to add more expressions to the filter, repeat Step 4 and set the logical operators at the end of each line as required. |
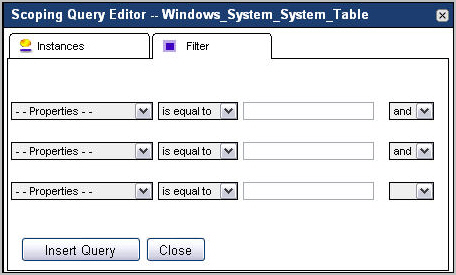
|
NOTE: If you need to define more than three expressions in the filter, you can add them after closing the Scoping Query Editor dialog box. |
|
7 |
Click Insert Query. |
You can use the syntax shown in one of the examples below to manually specify all or part of the scoping query in the box immediately below the Topology Type and Property boxes. This field is case-sensitive.
Use these examples only as guidelines with regard to the query language syntax. There are many additional ways of specifying a scoping query. For complete information about the query language syntax, see Topology query reference.
|
TIP: If you want to include an email address in a message, simply use the @ symbol twice. For example: Send email to administrator@@example.com |
|
TIP: To reference registry variables in expressions use the syntax registry("registryVariableName"). |
|
• |
You are editing a simple rule that is scoped to the topology type JVM; the condition for the rule is #threads_started#>10. You want to create a message (to use as the text of the email that is sent when the rule fires) that includes the value of the #threads_started# metric at the time when the rule fires. |
|
• |
There is a registry variable called CPUFatal whose value is 90 for the topology object to which the rule you are editing is scoped. You want to reference this variable in the alarm message for the rule’s Fatal severity level, so you create an expression called CPU whose definition is registry("CPUFatal"). You then reference this expression in the rule’s alarm message: CPU usage is at @CPU%. |
|
• |
You are configuring the Critical severity level for an existing rule that scoped to all requests with names that include the element jdbc (the rule scope is RequestType where name like "%jdbc%"). You want an alarm to be fired for this level if the average execution time (over the last hour) for a request in the rule scope exceeds the limit set by the registry variable ExecuteTimeCritical. |
|
• |
You are creating a number of rules, each of which is scoped to a different EJB instance. You know that you need to configure the conditions for many of these rules to perform the same function (rate) on the same metric (#passivationCount#). Instead of doing this manually for each rule, you decide to create a derived metric that you can use in all of these rules’ conditions. |
|
1 |
In the display area, place the cursor in the Condition box (rules) or Expression box (derived metrics) where you want to insert the variable. |
|
3 |
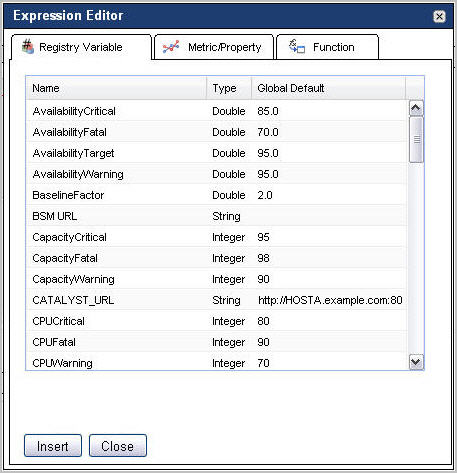
To insert a registry variable into an expression, in the Condition Editor (rules) or Expression Editor (derived metrics) dialog box, ensure that the Registry Variable tab is open. Select a variable from the list, and click Insert. |
|
4 |
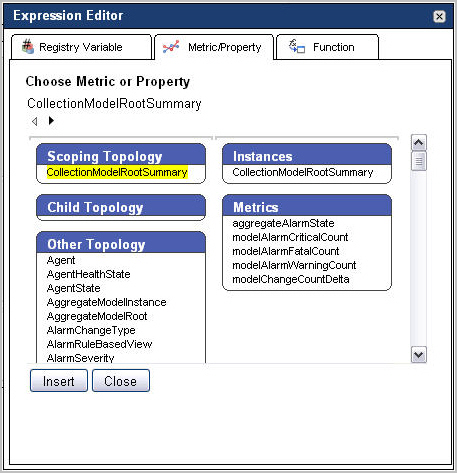
To insert a metric or a property into an expression, in the Condition Editor (rules) or Expression Editor (derived metrics) dialog box, open the Metric/Property tab. |
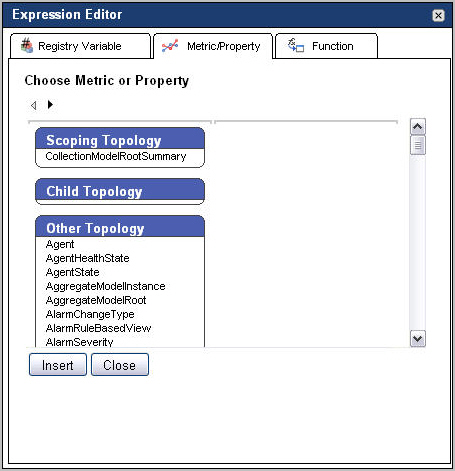
|
• |
Scoping Topology: Shows a single scoping topology type included in this category. If the rule or derived metric is not scoped, this area is empty. |
|
• |
Child Topology: Lists the descendants of the scoped topology type. |
|
• |
Other Topology: Lists the following topology types: |

|
d |
Click the Insert button. |
|
5 |
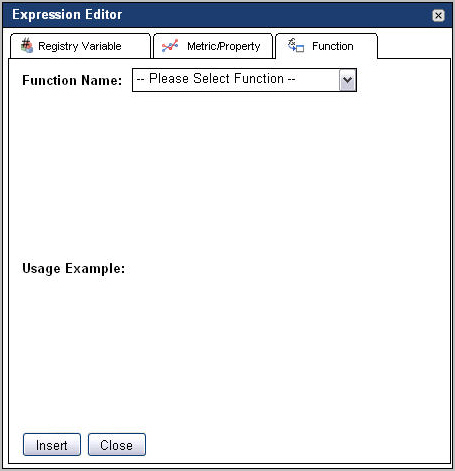
To insert a function into an expression, in the Condition Editor (rules) or Expression Editor (derived metrics) dialog box, open the Function tab. |
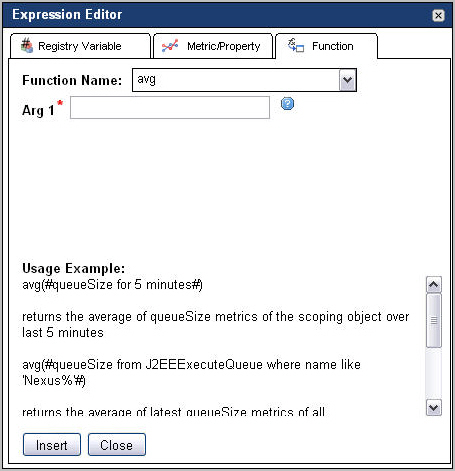
|
c |
Click the Insert button. |
|
6 |
To insert an operator into a rule condition or derived metric expression, place the cursor in the Condition or Expression box where you want to insert the operator, and click the appropriate button. |
Most of the default functions available with Foglight cause calculations to be performed on metrics. In addition, the functions alarmCount, changeSummary, descendants, findObservationEntries, getContainedObjects, and getObservationTrend cause values to be returned for topology objects (based on a specified scope). In most cases, you specify scope as the parameter for one of these functions; using the scope variable causes the function to be performed on the topology objects included in the rule or derived metric scope. However, there may be situations in which you want to specify an alternate scope. See Advanced scripting example for more information.
|
• |
alarmCount: Returns the current number of alarms for each topology object referenced by this function’s scope parameter. |
|
• |
avg: Calculates an average (arithmetic mean) from metric values. |
|
• |
changeSummary: Returns the list of topology property changes for each topology object referenced by this function’s scope parameter over the specified time period (supplied in milliseconds). |
|
• |
checkObservationAlarms: Returns a list of all log entry objects with a particular severity. |
|
• |
checkUserPermission: Check the permissions assigned to a user. |
|
• |
compareStrings: Compares two text strings. |
|
• |
count: calculates the number of observations. An observation can be either a metric or a property of a topology object. |
|
• |
createObservationAlarms: Returns a list of all log entry objects with a particular severity. |
|
• |
currentUserHasAdvancedOperationsRole: Returns True if the current user has Advanced Operator role |
|
• |
delta: calculates the difference between the maximum value of the two most recent samples of a single metric. The delta function is used with metrics whose unit of measurement is count. |
|
• |
delta_rate: calculates the rate per second of the delta. |
|
• |
descendants: returns the set of topology objects that are directly or indirectly contained by each topology object referenced by this function’s scope parameter. |
|
• |
f4registry: Returns the value of a given registry variable for the current scoping object. |
|
• |
findObservationEntries: Returns a list of log entry objects with a specified set of properties. |
|
• |
generateUUID: Returns a random Universal Unique Identifier (UUID). |
|
• |
getAlarmSeverities: Retrieves a list of alarm severities for a given object. |
|
• |
getAllMonitoredComponents: Returns all monitored components in the definition of the scoping object. |
|
• |
getContainedComponentsPropertyName: Returns the property name of the contained component. |
|
• |
getContainedObjects: Returns the set of topology objects of the specified type that are directly contained by each topology object referenced by this function’s scope parameter. |
|
• |
getImpactedServices: Returns a list of impacted services. |
|
• |
getInstalledAgentList: Returns a list of installed agent types that are compatible with and can be installed on a host, given the host’s Foglight Agent Manager ID. |
|
• |
getMonitoredComponentRuleInfoList: Returns a list of rules that are scoped to a monitored component. |
|
• |
getObservationTrend: Returns an observation trend. |
|
• |
getPropertyObject: Returns the value of property for the topology object with the given ID. |
|
• |
getPropertyValueAtGivenTimesOfGivenTopologyObjects: Returns the values of a given property for a list of TopologyObjects at a given list of times. |
|
• |
getPropertyValuesOfTopologyObjectAtGivenTimes: Returns the values of a given property for a list of TopologyObjects at a given time. |
|
• |
getRuleAlarmSeveritiesConfigured: Returns the existing alarm severities that are configured for a rule. |
|
• |
getRuleBasedView: Returns a rule-based view. |
|
• |
getRuleBasedViewInput: Returns a rule-based view input. |
|
• |
getRuleBasedViewName: Returns a rule-based view name. |
|
• |
getRuleComment: Returns a rule comment. |
|
• |
getRuleInfoUsingId: Returns a rule comment given an ID. |
|
• |
getSeverityConditions: Returns a list of severity conditions for a rule. |
|
• |
getTopologyPropertyValue: Returns the value of a topology property for a scoping object at a given date and time |
|
• |
help: Returns a list of supporting information such as scripts or methods as specified by the parameter. |
|
• |
histogram: keeps a histogram to measure the distribution of metric values (for example, for a set of topology objects or for a single object over a specified period of time). |
|
• |
isNotNull: Determines whether a given data object is set to null. |
|
• |
last: Returns a com.quest.nitro.service.scripting.ObservedDataQueryResult object which contains the latest metrics for the scoping object if there are any observations made during a given period. |
|
• |
max: Calculates a maximum from metric values. |
|
• |
metricDifference: Returns the difference percentile between two given metric values. |
|
• |
min: calculates a minimum from metric values. |
|
• |
period: calculates the total length of a period of time from a series of metrics and returns a value in seconds. |
|
• |
positive_delta: Returns the difference between the maximal values of the most recent two metric values for a scoping object. |
|
• |
positive_delta_rate: Returns the difference between the maximal values of the most recent two metric values for a scoping object divided by the time period in seconds of the more recent metric value. |
|
• |
rate: calculates the rate of a metric value per second. |
|
• |
returnIncludeOrExcludeGivenABoolean: Determines whether to include or exclude the object given a boolean value. |
|
• |
returnObjectsSatisfyingNameFilter: Returns a given number of objects whose name matches a string pattern specified by the parameter. |
|
• |
returnObjectsSatisfyingTypeNameFilter: Returns a given number of objects whose name matches a string pattern specified by the parameter. |
|
• |
stddev: Calculates the standard deviation from multiple metric values. |
|
• |
sum: Calculates the sum of metric values. |
|
• |
updateHostModel: Updates the Host Model. |
|
• |
You are creating a simple rule that applies to JDBC requests. You want this rule to fire an alarm if the metric #requestResponseTime# returns values greater than 750 milliseconds more than 10% of the time over the period of an hour. |
In most cases, you use the scope variable as a parameter for the functions alarmCount, descendants, and getContainedObjects. However, there may be a situation in which you need to create a condition or expression that uses one of these functions but want the function to be performed on an object outside of the rule or derived metric scope.
Where Server_IP is the IP address of the server. For example:
|
NOTE: In the example shown above, the exclamation point ‘!’ implies that the argument passed to the alarmCount function is a topology object property and not a metric. |
This sectiontopic provides answers to the following FAQs:
If the rule is scoped to the topology object that has that property, you can reference the property using the scope variable. This variable contains a reference to the topology object against which the expression runs.
For example, you are interested in the property filesystemName, you can use the following in an expression to obtain the property value:
If you want to reference the topology object from within a string or embedded query, you must prefix the scope variable with the dollar sign ‘$’. For example:
The fglcmd tool includes a command that allows you to export metric observations to a file using a metric query. The metricexport command can be used to export metrics to a CSV or XML file.
For example, the following command exports the values of the Process metric collected in the past two hours to a CSV file.
For complete details on how to configure fglcmd, and about the util:metricexport command, see the Command-Line Reference Guide.