Chat now with support
Chat with Support

NetVault 12.3 - Installation Guide

Introduction Deploying NetVault Backup Reviewing pre-installation requirements Installing NetVault Backup Reviewing post-installation requirements Upgrading NetVault Backup Licensing NetVault Backup Removing NetVault Backup Troubleshooting

Installing NetVault Backup in GUI mode

The graphical mode is available on all supported operating systems that provide a graphical environment. This mode requires GTK packages or X Window System libraries on Linux- and UNIX-based systems.

After the installation completes, you can unmount the disk image from the Finder window by clicking the Eject icon next to the virtual drive icon. Alternatively, you can click the virtual drive icon on the desk top, and press CMD+E.

3
In the Language Selection dialog box, select the language for your NetVault Backup installation.
Standard: This option allows you to use the NetVault Backup Server in standalone mode.
Managed Service Provider: This option allows you to use NetVault Backup Server and provide backup as a service to clients or customers.
6
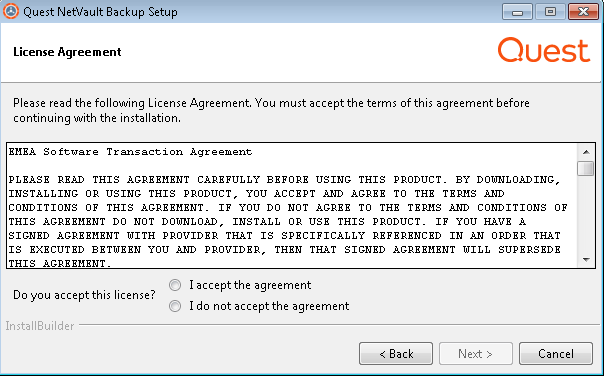
In the License Agreement dialog box, select the I accept the agreement option if you accept all the terms.
Click Next to continue.
7
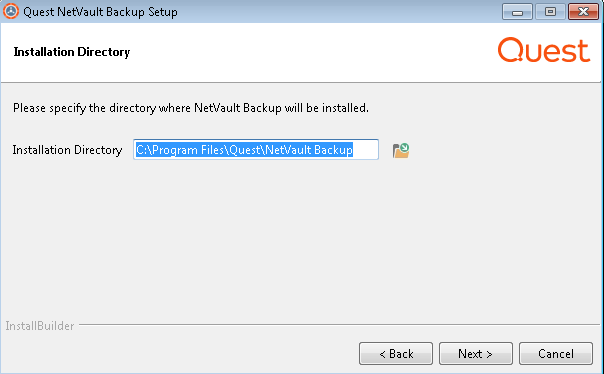
In the Installation Directory dialog box, specify the installation path.
On Linux: /usr/netvault
On Solaris: /opt/netvault
On Windows: C:\Program Files\Quest\NetVault Backup or C:\Program Files (x86)\Quest\NetVault Backup
To change the location, type the new path, and click Next. If the specified path does not exist, it is automatically created during installation. You can also click Browse, and select the target directory from the Explorer window.
Select the Yes option, and then click Next to continue.
8
In the Machine Name dialog box, specify a unique name for the NetVault Backup Server. Click Next.
9
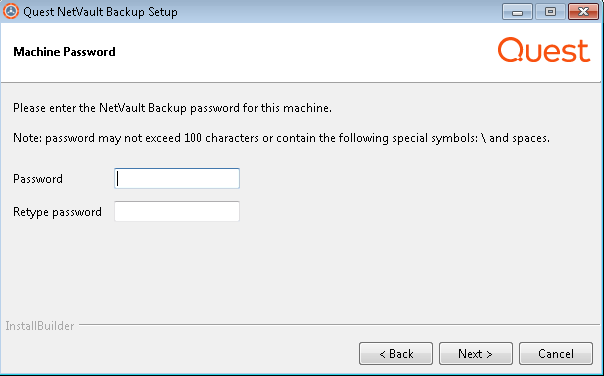
In the Machine Password dialog box, specify a password for the NetVault Backup machine.
In the Retype password box, type the password again for confirmation. Click Next.
10
When installing the NetVault Backup Server, the NetVault Backup Database Directory dialog box is displayed next. This dialog box is not displayed during client installations.
In the Database Directory box, specify the installation path for the NetVault Database.
On Linux: /usr/netvault/db
On Windows: C:\Program Files\Quest\NetVault Backup\db or C:\Program Files (x86)\Quest\NetVault Backup\db
To change the location, type the new path, and click Next. If the specified path does not exist, it is automatically created during installation. You can also click Browse, and select the target directory from the Explorer window.
Allow NetVault Backup to create PostgreSQL Linux user: By default, this option is selected.
Linux user name: Select this option if you want to use the already existing Linux user account.
Click Next to continue.
In the Password box, specify a password for the PostgreSQL database super user.
In the Retype password box, type the password again for confirmation.
13
In the Ready to Install dialog box, review the installation parameters, and click Next to begin installation.

Installing NetVault Backup in text mode

The text mode is available on all supported operating systems, except Windows.

NOTE:  
When running the installer on Mac OS X from a remote terminal (SSH or telnet), it may be necessary to use the --mode text option. Otherwise, the installer may run in full graphic mode without showing any output in the console.
Select the language for your NetVault Backup installation. To select English, press 1 or Enter. To select a different language, press the corresponding key.
4
The License Agreement screen is displayed next. Press Enter to read through the agreement.
Press y to accept the license agreement and continue.
On Linux: /usr/netvault
On Solaris: /opt/netvault
To change the location, type the new path, and press Enter. If the specified path does not exist, it is automatically created during installation.
Press y to continue.
To change the location, type the new path, and press Enter. If the specified path does not exist, it is automatically created during installation.
Press y to continue.
Press Enter if you want to select the default option.
11
In the Ready to Install screen, review the installation parameters, and press Enter to begin installation.

Installing NetVault Backup in unattended mode

The unattended mode is supported on all operating systems. When performing unattended installations, you can specify the installation options at the command line or in an option file.

An option file is a text file that provides answers to the questions that would be asked during the installation process. Each answer is stored as a value for a variable identified in the option file. You can save the option file in any directory and assign it any valid filename.

The installer uses the default values for options that are omitted (except for the password for PostgreSQL Database Superuser, which does not have a default value).

Example warning messages:

unaligned access to 0x6000000005642f7c, ip=0x2000000004dbe520

To suppress these warning messages, start the installer by running the following command:

prctl --unaligned=silent ./<Name of the installation file> --mode unattended <options>

— or —

prctl --unaligned=silent ./<Name of the installation file> --mode unattended --optionfile <filename>

You can specify the following parameters at the command line or in the option file.

On Linux and UNIX: ./<Name of the installation file> --help

On Windows: <Name of the installation file> --help

--unattendedmodeui <interaction level>

Specifies the interaction level for the unattended installation.

The allowed values are:

none: This is the default mode for unattended installations. In this mode, the installer does not display any prompts or progress information.
minimal: In this mode, the installer does not display any prompts, but it provides the progress information through pop-up windows.
minimalWithDialogs: In this mode, the installer displays some prompts, and it provides the progress information through pop-up windows.

--optionfile <filename>

Specifies the name of the option file. Provide the full path if the file does not reside in the current directory.

--installer-language <NetVault Backup language>

Specifies the language for your NetVault Backup installation. The supported languages are:

en: English
zh_CN: Simplified Chinese
fr: French
de: German
ja: Japanese
ko: Korean

The default is English (en).

--setup-type <setup-type>

Specifies the setup type for NetVault Backup Server. The setup type can be:

Standard: This is a default option and enables you to use the NetVault Backup Server in standalone mode.
MSP: This option enables you to use NetVault Backup Server and provide backup as a service to clients or customers. The Managed Service Provider (MSP) option is supported on the Windows and Linux Server pure 64-bit versions.

--prefix <installation directory>

Specifies the installation path for NetVault Backup. If the path contains spaces, enclose it in quotation marks (“ ”).

The default path is as follows:

On Linux: /usr/netvault
On Windows: “C:\Program Files\Quest\NetVault Backup” or “C:\Program Files (x86)\Quest\NetVault Backup”

--logical-name <NetVault Backup machine name>

Specifies the NetVault Backup machine name.

By default, NetVault Backup uses the OS-assigned machine name. For more information about machine names, see Determine NetVault Backup name and password.

--password <password>

Specifies the NetVault Backup machine password.

The machine password is used while adding a NetVault Backup Client to the server. The password can contain a maximum of 100 characters. It cannot contain the following characters:

\ and spaces

For more information about passwords, see Determine NetVault Backup name and password.

If no password is set during installation, NetVault Backup uses the system’s root or administrator password.

--db-dir <NetVault Database installation>

Specifies the installation path for NetVault Database. This parameter can only be specified for NetVault Backup Server installations.

If the path contains spaces, enclose it in quotation marks (“ ”).

The default path for NetVault Database is as follows:

On Linux: /usr/netvault/db
On Windows: “C:\Program Files\Quest\NetVault Backup\db” or “C:\Program Files (x86)\Quest\NetVault Backup\db”

--pg-linuxuser-option <pg-linuxuser-option>

Specifies the option for PostgreSQL Linux user account. For more information about NetVault Backup PostgreSQL Linux user account, see Determine NetVault Backup PostgreSQL Linux user account. The default option will be selected if you do not provide the input here.

Default: auto

Allowed: auto custom

--pg-linuxuser-name <pg-linuxuser-name>

Required only when --pg-linuxuser-option is set to custom.

Default: netvault-pgsql

--pg-su-passwd <password>

Specifies the password for PostgreSQL Database Superuser. This parameter can only be specified for NetVault Backup Server installations.

The password can contain a maximum of 100 characters. It cannot contain the following characters:

\ and spaces

For more information about specifying a password for the PostgreSQL database super user, see Determine NetVault Backup name and password.

This section provides some examples of using the NetVault Backup installer in unattended mode.

./<Name of the installation file> --mode unattended --pg-su-passwd MyDbPassword
./<Name of the installation file> --mode unattended --installer-language ja
--pg-su-passwd MyDbPassword
./<Name of the installation file> --mode unattended
./<Name of the installation file> --mode unattended --installer-language ja

This section provides some sample option files.

Installing NetVault Backup Client on Windows using Group Policy

This section includes the following topics:

In an Active Directory (AD) Domain, you can create a Group Policy Object (GPO) to install the NetVault Backup Client software on multiple machines in the domain.

a
Click Start, point to Administrative Tools, and then click Group Policy Management.
b
Right-click the domain, and click Create a GPO in this domain, and Link it here.
d
In the left pane of the Group Policy Management Console, open the applicable nodes, and select the GPO. In the right-pane, go to the Security Filtering section.
e
By default, the policy is not applied to any client machines. To add a machine, click Add. In the dialog box that appears, click Object Types, and select Computers (if not already selected).
a
In the Group Policy Management Console, select the policy, and click Edit. Under Computer Configuration, expand Software Settings.
b
Right-click Software installation, point to New, and then click Package. In the Open dialog box, type the full UNC path of the shared installer package (for example, \\<file server>\<share>\<installation file name>), and click Open.
NOTE: Verify that you use the UNC path; do not use the Browse button to access the shared location.
c
In the Deploy Software dialog box, leave the Assigned option selected, and click OK.
d
Close the Group Policy Management Editor and the Group Policy Management Console.
1
Click Start, point to Administrative Tools, and then click Group Policy Management.
2
Select the Group Policy Object that you used to deploy the package, and then click Edit.
3
In the Group Policy Management Editor, expand Software Settings.
4
Open the Software installation node.
5
In the right-pane of the Group Policy Management Editor, right-click the entry for NetVault Backup, point to All Tasks, and then click Redeploy application.
7
Close the Group Policy Management Editor and the Group Policy Management Console.
1
Click Start, point to Administrative Tools, and then click Group Policy Management.
3
In the Group Policy Management Editor, expand Software Settings.
4
Open the Software installation node.
5
In the right-pane of the Group Policy Management Editor, right-click the entry for NetVault Backup, point to All Tasks, and then click Remove.
Click Immediately uninstall the software from users and computers, and then click OK.
Click Allow users to continue to use the software but prevent new installations, and then click OK.
7
Close the Group Policy Management Editor and the Group Policy Management Console.
Related Documents

The document was helpful.

Select Rating

I easily found the information I needed.

Select Rating