With SharePlex, you can put a replica database to work as a reliable, continuously updated alternate database that can be used in many different ways. The following strategies enable you to get the right data to the people who need it, when they need it.
Note: Support for these topologies may vary depending on the type of database involved.
Figure 1: SharePlex replication strategies at a glance
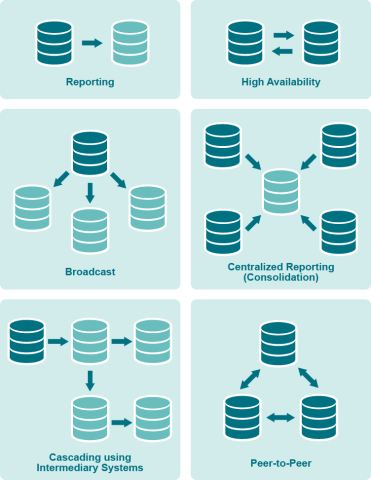
Reporting instances
Targets maintained by SharePlex are ideal for offloading report and query processing because they are accessible while being kept up-to-date, and they can be optimized with keys and indexes designed for optimal query performance. You can run reports all day long, without complaints about performance from your OLTP users. Even during busy reporting times such as the end of the month or quarter, application response time will be unaffected by heavy reporting. And, your organization’s decision-makers will appreciate the accuracy of the data reflected in the reports. For more information, see Configure replication to share or distribute data.
Broadcast and cascade
When many remote users access or use data stored in a primary database, you can move their processing to one or more secondary databases that are kept current through SharePlex replication. That way, you can keep the primary database and system optimized for transactions. SharePlex also can cascade data through an intermediary system to remote systems, providing access for remote users who have no direct network connection to the primary database. For more information, see Configure replication through an intermediary system
Data warehousing
SharePlex can replicate from numerous source systems to one target system. This configuration is ideal for consolidating data in a data warehouse or a data mart so that information is available enterprise-wide for queries and reports. You have control over the data that is replicated and the option to transform any data to conform to a different target structure. These capabilities enable you to populate your data warehouse with the specific, timely information that users need to make good decisions. For more information, see Configure replication to maintain a central datastore.
High availability and disaster recovery
SharePlex can be used to maintain duplicate databases over local or wide-area networks. Production can move to the alternate sites in an emergency or in a planned manner when routine maintenance is performed on the primary server. SharePlex replication enables the secondary database to be used for queries and reporting. For more information, see Configure replication to maintain high availability.
Peer-to peer
SharePlex supports replication among multiple source databases where applications on each system can make changes to the same data while SharePlex maintains synchronization. In this strategy, the databases are usually mirror images of each other, with all objects existing in their entirety on all systems. Although similar in benefit to a high-availability strategy, the difference between the two is that peer-to-peer allows concurrent changes to the same data, while high availability permits changes to the secondary database only in the event that the primary database goes offline. A few ways to use peer-to-peer replication are to maintain the availability and flexibility of a database by enabling access from different locations or to distribute heavy online transaction processing volumes among multiple access points. For more information, see Configure peer-to-peer replication.
Test before you deploy
Before you implement SharePlex on production systems, make certain to perform tests in a mirror of the production environment to ensure that you configured SharePlex properly to support your requirements. Testing can uncover issues such as configuration errors and unexpected environmental issues, for example network or resource issues that affect replication performance or availability.
Additionally, it is assumed that your organization has in place an infrastructure that supports the use of enterprise applications such as SharePlex. These include, but are not limited to, the following:
- Availability and use of the database and SharePlex documentation
- Training programs for users
- Rollout and upgrade plans that ensure minimal interruption to business. When SharePlex is implemented as part of an application’s infrastructure, it is strongly recommended to test new application functionality in conjunction with SharePlex in a non-production environment.
- Database or system maintenance procedures that consider SharePlex dependencies, such as the proper shutdown of SharePlex processes and the preservation of unprocessed transaction records and replication queues to accommodate system or database maintenance.
- Sufficient security that prevents unauthorized persons from accessing SharePlex data records or making configuration changes.
The SharePlex Professional Services team can help you prepare for, install, and deploy SharePlex in your environment.
On Windows, SharePlex runs as a service named SharePlex port#, where port# is the port number that is used by a particular instance of SharePlex. The service can be installed during the installation of SharePlex or at a later time by running the SharePlex SpUtils progam. See the SharePlex Reference Guide for more information about SpUtils.
Note: When directed in the documentation or other instructions to start or stop sp_cop on the Windows platform, it means to start or stop the SharePlex service.
Startup Sequence
When you start systems that are involved in replication, start the components in this order:
- Start the system.
- Start the source and target databases.
- Start the NuTCRACKER service in the Windows Administrative Tools control panel. This starts the MKS Toolkit® operating environment, which must be running in order to run SharePlex. See the SharePlex Installation Guide for more information about the MKS Toolkit.
- Start the SharePlex port# service.
- Start sp_ctrl from the bin sub-directory of the SharePlex product directory.
-
Verify that the SharePlex processes are started by issuing the lstatus command in sp_ctrl.
sp_ctrl> lstatus
Start and stop SharePlex
On Windows, the only way to start or stop SharePlex is by starting or stopping the SharePlex service. To control the service, you can use the SpUtils utility or the Windows Administrative Tools control panel.
Note: Starting the SharePlex service automatically starts the SharePlex replication processes (Capture, Read, Export, Import and Post). If you do not want those processes to start when the service starts, they must be stopped with the stop command in sp_ctrl before you shut down the SharePlex service. They will remain stopped until you issue the start command for each process that you want to start.
To control the SharePlex service with SpUtils
You can use SpUtils to install, start, stop, and check the status of the SharePlex service.
- Log onto Windows as a SharePlex Administrator. Your user name must be assigned to the SharePlex admin group. For more information, see Assign SharePlex users to security groups.
- View the Windows services to make certain the NuTCRACKER service is running. Start it, if needed.
- Run the SpUtils utility from the desktop shortcut or the Programs menu.
- Click the SharePlex Services tab of the utility.
- Select the port number of the SharePlex instance that you want to control.
-
Do one of the following:
- Click Install to install the service. If Install is not shown, the service exists.
- Click Start to start the service. When Current State shows that the service is running, you can close the utility. If Start is not shown, the service is either running already or not installed.
- Click Stop to stop the service. If Stop is not shown, the service is either stopped already or not installed.
Note: You can also use the shutdown command in sp_ctrl to stop the SharePlex service.
To control the SharePlex service from Windows
The SharePlex service appears as an entry named SharePlex port# in the Services console of the Administrative Tools control panel. Right-click the service name to start or stop the service.
Set SharePlex startup status
You can change the timing of SharePlex startup. By default, it is Automatic, meaning the service starts when the system starts. You may need to contact a System Administrator to perform this task.
- Open the Services console of the Administrative Tools control panel.
- Right-click the SharePlex service name, then click Properties.
- From the Startup type list, select the desired startup option. For assistance, click the Help link in the dialog.
Set SharePlex process priority
Important! Do not use the standard Windows Task Manager to set process priority for SharePlex.
On Windows systems, the NuTCRACKER operating environment controls the SharePlex processes. The SpUtils utility has an option that enables you to run the Windows Task Manager with the required elevated privileges to set the process priority. This procedure must be performed by a SharePlex Administrator. Consult with the System Administrator to select an appropriate value based on the requirements of all software running on the system.
To set SharePlex priority
- Run SpUtils.
- Select the TaskMgr tab.
- Right click the SharePlex instance that you want to prioritize.
- Select Set Priority, then select the desired priority level.
Identify SharePlex processes
In the Windows Task Manager, SharePlex appears as Sp_Copsrv.exe, representing the SharePlex sp_cop process. The operating system controls the parent Sp_Copsrv.exe service. The parent Sp_Copsrv.exe process spawns child Sp_Copsrv.exe processes — one for each replication process (Capture, Read, Export, Import, Post, sp_ctrl, and so forth.).
For a standard uni-directional configuration replicating through default queues to one target system, there are following processes on a Windows system:
On the source system:
- One parent Sp_Copsrv.exe process.
- One Sp_Ocap or Sp_capture (Capture) process plus one child Sp_Copsrv.exe process.
- One Sp_Ordr (Read) process plus one child Sp_Copsrv.exe process.
- One Sp_Xport (Export) process plus one child Sp_Copsrv.exe process.
- If there are any additional SharePlex processes running, such as sp_ctrl, there is an additional Sp_Copsrv.exe process for each one.
On the target system:
- One parent Sp_Copsrv.exe process.
- One Sp_Mport (Import) process plus one child Sp_Copsrv.exe process.
- One Sp_Opst_Mt (Oracle Post) or Sp_Xpst (Open Target Post) process plus one child Sp_Copsrv.exe process.
- If there are any additional SharePlex processes running, such as sp_ctrl, there is an additional Sp_Copsrv.exe process for each one.
If there are no active replication configurations, the SharePlex processes do not start when you start the service, and just the parent Sp_Copsrv.exe will be running.
To identify the parent Sp_Copsrv.exe process in the Windows Task Manager, look for the one that is using the largest amount of memory. The child Sp_Copsrv.exe processes consume less memory than the parent process.
To identify which replication process is associated with a child Sp_Copsrv.exe process, look in the SharePlex Event Log for the message stating when the replication process started. This entry provides the PID for that process and the PID of the associated Sp_copsvr.exe process.
Shutdown Considerations
You can safely shut down SharePlex for a short time while there is still transactional activity. The next time you start SharePlex, replication resumes at the correct place in the redo logs or the archive logs, if needed. However, the best practice is to leave SharePlex running while there is transactional activity. Otherwise, SharePlex may need to process a large volume of redo backlog when you start it again, and there will be latency between the source and target data.
If the redo logs wrap and the archive logs cannot be accessed, resynchronization of the source and target data may be the only option. Take this possibility into account whenever you stop SharePlex while redo is still being generated.
Note: If you want to shut down both SharePlex and the database, shut down SharePlex first. Otherwise, SharePlex will interpret that the database is failing and generate a warning message.
As an alternative to stopping SharePlex, you can use the stop command in sp_ctrl to stop individual SharePlex replication processes as needed. See the SharePlex Reference Guide for more information about this command.
Run multiple instances of SharePlex
