Step 2: Restore the extracted AD LDS (ADAM) database
-
In the right pane, select the list entry that represents the AD LDS (ADAM) database you extracted in Step 1: Extract and register AD LDS (ADAM) database.
-
On the main menu, select Action | Online Restore, and step through the Online Restore Wizard for AD LDS (ADAM).
-
On the Wizard Operation Mode page, select the Compare, restore, report changes in AD LDS (ADAM) option, and click Next.
-
On the AD LDS (ADAM) Instance Selection page, select the AD LDS (ADAM) instance you want to restore, and click Next.
-
On the Backup Selection page, select the list entry that represents the AD LDS (ADAM) database you extracted in Step 1: Extract and register AD LDS (ADAM) database.
-
Step through the wizard to complete the restoration of the selected AD LDS (ADAM) instance.
Selectively restoring Active Directory object attributes
The Online Restore Wizard allows you to restore particular attributes of Active Directory objects, leaving all the other attributes intact. This feature allows you to keep the valuable changes made in Active Directory since the backup time.
Note that some AD LDS (ADAM) object attributes cannot be restored by using RMAD. For more information on these attributes, see Quest Knowledge Base Article 59039 “AD DS and AD LDS Object Attributes That Recovery Manager for Active Directory Cannot Restore” at support.quest.com.
To select the attributes to be processed by the Online Restore Wizard
-
Start the Online Restore Wizard and follow the instructions in the wizard.
-
On the Processing Options page, click Process no child objects, click Process selected attributes, and then click Select Attributes.
-
In the Select Attributes to Be Processed dialog box, select the check boxes next to the attributes to be processed.
-
Click Next, and follow the instructions in the wizard to complete the operation.
The entries in the upper part of the Attributes list allow you to select groups of attributes. For example, when you select Account Information, all account-related attributes are selected.
Restoring objects in an application directory partition
Application directory partitions are used to store application-specific data. When restoring Active Directory from a backup, RMAD allows you to selectively restore objects and object attributes in application directory partitions, in the same way as it restores objects and attributes in domain directory partitions.
To restore objects in an application directory partition
-
Start the Online Restore Wizard and follow the instructions in the wizard.
-
On the Objects to Be Processed page, click Add, and then click Find.
-
In the Find and Select Object in Backup dialog box, do the following:
-
Select Any type from the Find list.
-
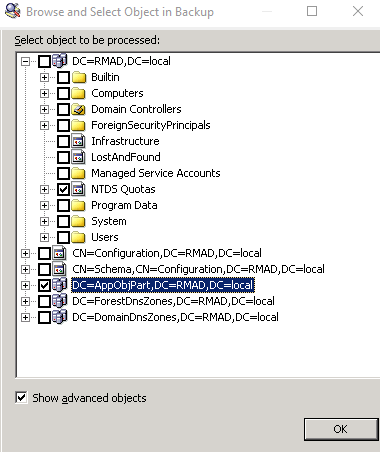
Click Browse and use the Browse and Select Object in Backup dialog box to select the application directory partition to search:
-
Ensure that the Show advanced objects check box is selected: otherwise, the dialog box displays only the domain directory partition.
-
Click OK.
-
-
In the Name box, type the name of the objects, or part of the name.
-
Click Find Now.
-
Click Select All or select individual check boxes in Search results. When finished, click OK.
-
Follow the instructions in the wizard to complete the operation.
| Note |
The Find option is used here as an example. You can also select an object by clicking Browse. Or, you can specify the names (DNs) of objects in a text file and open that file by clicking Import. If you click Browse, ensure that the Show advanced objects check box is selected. Otherwise, only the domain directory partition is displayed in the Browse and Select Object in Backup dialog box. |
Restoring object quotas
Object quotas are used to determine the number of objects that can be created in a given directory partition by a given administrator. Object quotas help prevent the denial of service situations that can occur if an administrator accidentally or intentionally creates so many objects that the domain controller runs out of storage space.
Object quotas are specified and administered separately for each directory partition. On a directory partition, object quotas can be assigned to any user or group.
Object quotas for a directory partition are stored as objects in the partition's child container called NTDS Quotas. With RMAD, you can use the Online Restore Wizard to restore selected objects in the container NTDS Quotas, or restore the entire container NTDS Quotas.
To restore an object in the container NTDS Quotas
-
Start the Online Restore Wizard.
-
Follow the instructions in the wizard. On the Objects to Be Processed page, click Add, and then click Browse.
-
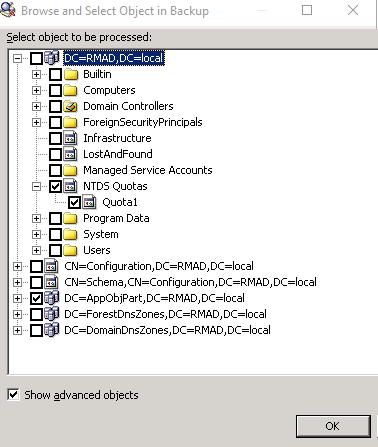
In the Browse and Select Object in Backup dialog box, expand the directory partition that contains the object quotas you want to restore, expand NTDS Quotas, and select the object to restore.
-
Ensure that the Show advanced objects check box is selected. Otherwise, the NTDS Quotas container will not be displayed.
-
Click OK, and follow the instructions in the wizard to complete the operation.