With Quest Nova, reporting on your Microsoft 365 environment is simple, with over 100 built-in reports on operations such as Microsoft 365 workloads (Exchange, Teams, OneDrive, SharePoint Online), licensing, security, mobile devices and more, as well as options to create your own reports. You can build reports that scope your entire environment, or narrow it down to select countries, departments, roles etc. There is also the ability to share your reports to others in a variety of formats, and you can schedule them so your team gets updates and insights on key Microsoft 365 data in a time frame that you choose.
This guide is to help you get up and running with Quest Nova Reporting. This includes:
·how to set-up with the on-boarding wizard
·the importance of the dashboard
·how to use the Report Center
If you need a more in-depth guide on using Quest Nova, please click here to view the Nova technical documents. In the Quest Nova User Guide, you will see more information on:
·how to create your own reports, including step-by-step examples
·the Schedule and Notification Center
·how to's, including adding a logo, creating a stacked graph, combining charts, setting currency symbols and more.
To access Nova Reporting, you will need a subscription to Nova that includes support for management, and support will provision your organization during the on-boarding process.
Before you begin using Nova Reporting, you need to connect your tenant to the platform. This is completed through the on-boarding wizard. The steps to complete this are below.
Step 1: Connecting your tenant
Before proceeding, make sure to read the Microsoft permissions that you will need to accept in point 6 below.
1.Accept the invitation in your email to join the Quest Platform.
2.Check the 'Consent on behalf of your organization' box and click 'Accept'.
3.Go back to your emails, and follow the link to start using the platform.
4.Once you are within Nova, click 'My Organization'. This will direct you to the wizard.
|
|
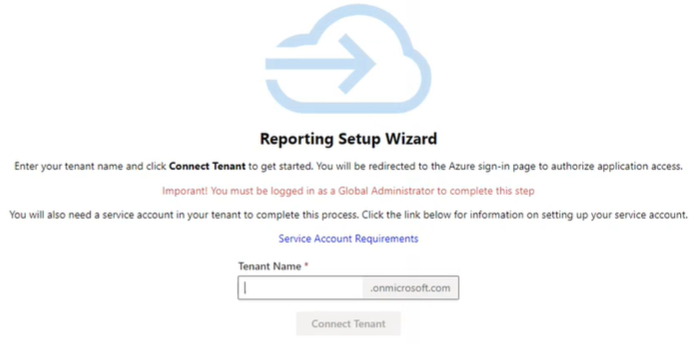
NOTE: The following steps (5 and 6) must be performed by a Global Administrator. |
5.Enter your tenant name and click 'Connect tenant'.
6.Click 'Accept'. Nova will then begin to connect your tenant. Click 'Next'.
To be granted access to Nova Reporting, you need to accept Microsoft permissions during the on-boarding process of connecting your tenant.
|
Permission |
Permission Description |
|---|---|
|
Microsoft Graph | |
|
Directory.Read.All |
Read directory data |
|
Member.Read.Hidden |
Read all hidden memberships |
|
Policy.Read.All |
Read your organization's policies |
|
Azure Rights Management Services | |
|
Content.DelegatedReader |
Read protected content on behalf of a user |
|
Content.SuperUser |
Read all protected content for this tenant |
|
Intune | |
|
get_data_warehouse |
Get data warehouse information from Microsoft Intune |
|
get_device_compliance |
Get device state and compliance information from Microsoft Intune |
|
Microsoft Graph | |
|
AccessReview.Read.All |
Read all access reviews |
|
AdministrativeUnit.Read.All |
Read all administrative units |
|
AuditLog.Read.All |
Read all audit log data |
|
Calendars.Read |
Read calendars in all mailboxes |
|
ChannelMessage.Read.All |
Read all channel messages |
|
Contacts.Read |
Read contacts in all mailboxes |
|
DeviceManagementApps.Read.All |
Read Microsoft Intune apps |
|
DeviceManagementConfiguration.Read.All |
Read Microsoft Intune device configuration and policies |
|
DeviceManagementManagedDevices.Read.All |
Read Microsoft Intune devices |
|
DeviceManagementRBAC.Read.All |
Read Microsoft Intune RBAC settings |
|
DeviceManagementServiceConfig.Read.All |
Read Microsoft Intune configuration |
|
Directory.Read.All |
Read directory data |
|
EduAdministration.Read.All |
Read Education app settings |
|
EduAssignments.Read.All |
Read all class assignments with grades |
|
EduAssignments.ReadBasic.All |
Read all class assignments without grades |
|
EduRoster.Read.All |
Read the organization's roster |
|
Files.Read.All |
Read files in all collection sites |
|
Group.Read.All |
Read all groups |
|
IdentityProvider.Read.All |
Read identity providers |
|
IdentityRiskEvent.Read.All |
Read all identity risk event information |
|
IdentityRiskyUser.Read.All |
Read all identity risky user information |
|
IdentityUserFlow.Read.All |
Read all identity user flows |
|
InformationProtectionPolicy.Read.All |
Read all published labels and label policies for an organization |
|
Mail.Read |
Read mail in all mailboxes |
|
Mail.ReadBasic |
Read basic mail in all mailboxes |
|
MailboxSettings.Read |
Read all user mailbox settings |
|
Member.Read.Hidden |
Read all hidden memberships |
|
Notes.Read.All |
Read all OneNote notebooks |
|
OnlineMeetings.Read.All |
Read online meeting details |
|
OrgContact.Read.All |
Read organizational contacts |
|
People.Read.All |
Read all users' relevant people lists |
|
Place.Read.All |
Read all company places |
|
Policy.Read.All |
Read your organization's policies |
|
PrivilegedAccess.Read.AzureAD |
Read privileged access to Microsoft Entra ID roles |
|
PrivilegedAccess.Read.AzureADGroup |
Read privileged access to Microsoft Entra ID groups |
|
PrivilegedAccess.Read.AzureResources |
Read privileged access to Azure resources |
|
ProgramControl.Read.All |
Read all programs |
|
Reports.Read.All |
Read all usage reports |
|
RoleManagement.Read.Directory |
Read all directory RBAC settings |
|
SecurityActions.Read.All |
Read your organization's security actions |
|
SecurityEvents.Read.All |
Read your organizations security events |
|
ServiceHealth.Read.All |
Read service health |
|
ServiceMessage.Read.All |
Read service messages |
|
Sites.Read.All |
Read items in all site collections |
|
TeamsActivity.Read.All |
Read all users' teamwork activity feed |
|
ThreatIndicators.Read.All |
Read all threat indicators |
|
TrustFrameworkKeySet.Read.All |
Read trust framework key sets |
|
User.Read (Delegated) |
Sign in and read user profile |
|
User.Read.All |
Read all users' full profiles |
|
Microsoft 365 Exchange Online | |
|
Calendars.Read |
Read calendars in all mailboxes |
|
Calendars.Read.All |
Read calendars in all mailboxes |
|
Contacts.Read |
Read contacts in all mailboxes |
|
Exchange.ManageAsApp |
Manage Exchange As Application |
|
Mail.Read |
Read mail in all mailboxes |
|
MailboxSettings.Read |
Read all user mailbox settings |
|
Place.Read.All |
Read all company places |
|
ReportingWebService.Read.All |
ReportingWebService.Read.All |
|
Tasks.Read |
Read user tasks in all mailboxes |
|
User.Read.All |
Read all users' full profiles |
|
User.ReadBasic.All |
Read all users' basic profiles |
|
Office Management APIs | |
|
ActivityFeed.Read |
Read activity data for your organization |
|
ActivityFeed.ReadDlp |
Read DLP policy events including detected sensitive data |
|
ServiceHealth.Read |
Read service health information for your organization |
|
OneNote | |
|
Notes.Read.All |
View notes for all users |
|
Power BI Service | |
|
Tenant.Read.All |
View all content in tenant |
|
SharePoint | |
|
Sites.FullControl.All |
Have full control of all site collections |
|
Sites.Read.All |
Read items in all site collections |
|
User.Read.All |
Read user profiles |
Here, you will see a variety of widgets already pre-built into Nova.
Dashboards give you a high level insight into your Microsoft 365 data. Here is an example of a dashboard that shows information about an Microsoft 365 tenant:
See dashboards in action in this video by clicking here.
|
|
NOTE: The initial look of your dashboard will depend on your role within Nova. For more on roles, read the Quest Nova User Guide. |