We assume that you are familiar with Migration Manager concepts described in the Migration Manager Installation Guide, and that you have already installed the product, following the instructions provided in that guide. It is also recommended that you read the release notes for the current version of Migration Manager. The release notes contain information about specific product behavior, limitations, known issues, and workarounds that may be useful for planning and performing your migration.
Migration Manager for Active Directory is an efficient, flexible, and comprehensive solution for restructuring your Active Directory. The restructuring is performed by migrating objects between forests or domains. Migration involves moving Active Directory objects (users, groups, and resources) from a source domain to a target domain.
Depending on the environment and the goals of the migration, the migration scenario may vary. The Migration Manager Tips and Tricks document contains common migration scenarios and considerations for choosing the one that best fits your requirements.
While the migration is underway (and some large-scale migrations can last for years), the source and target domains must coexist and stay in synch. Migration Manager eases the administrative burden during this period by providing synchronization capabilities, such as synchronization of account properties, group membership, and passwords: administrators simply make necessary changes in one environment and those changes are automatically replicated to the other environment.
Migration Manager also allows delegation of migration tasks to other people. Delegated administrators are able to migrate and process only the resources you specify.
This guide describes most of the migration process, including pre-migration activities, the migration itself, directory synchronization, and delegation. The final step, resource update, is described in the dedicated Resource Processing document.
The Open Project Wizard is the central place for configuring the migration project and all its components: the ADAM/AD LDS database, the SQL/MSDE database (for Exchange migrations only), and Statistics Portal.
The wizard can be used to start a new project, connect to an existing project, or change any settings of the current project.
|
|
Caution: In most cases you need just one Migration Manager project for your whole migration, no matter how many domains you have. Normally, you would use a separate project only for lab testing before you start migration in the production environment. |
We assume that you became familiar with the Open Project Wizard while carrying out the procedures described in the Opening a Migration Project topic of the Migration Manager Installation Guide. Refer to that document for a full description of the wizard steps.
To briefly review, the Open Project Wizard steps are as follows:
|
|
Caution: We recommend that you avoid managing the Properties setting of the same objects within the same migration project from several Migration Manager Console computers simultaneously. Note also that having several parallel Remote Desktop connections to the same console computer is not supported. |
Migration of simple environments where accounts and resources are centralized in one major location can be accomplished from that location using a single Migration Manager console.
However, this method is not appropriate when you need to migrate a large distributed environment where accounts and resources reside in different geographic locations (sites), particularly if the sites are connected by slow links that limit the amount of data that can be transferred effectively. In this case, the migration must be performed in each site locally.
Migration Manager provides for effective project implementation and management when migrating large distributed environments.
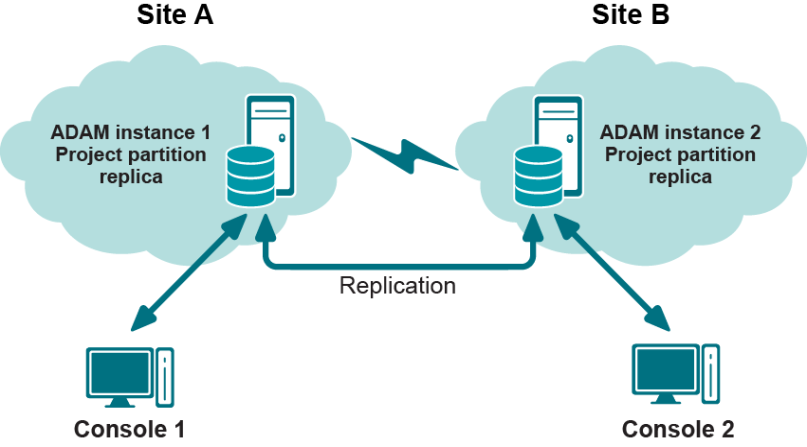
Figure 1. Managing a migration project in a distributed environment
If a number of administrators from multiple locations are going to perform migration, it is recommended to have local ADAM/AD LDS installations in each major location with a replica of the project partition. To avoid excessive traffic over slow links, administrators should work with the nearest ADAM or AD LDS server that contains a replica of the project.
In this case, you will need to delegate responsibility for migration tasks, as explained in the Delegating Migration Tasks topic.

