In this section we will cover the difference between User and Computer Management. We will also discuss how to decide if a specific configuration belongs in a User Management profile or a Computer Management profile.
Computer Management supports configurations of the computer operating system and options that apply to all users of the machine. These settings are configured whether there is a user logged on the system or not. Computer Management settings are applied during a workstations Startup, Shutdown, Refresh, and/or Scheduled events.
User Management objects are used to apply settings that are specific to the User environment and occur only when a user is logged on to the computer. These settings are applied at user Logon, Logoff and Refresh intervals. Note: The Computer and User Refresh intervals are separate from each other (two separate timers).
The User and Computer Management containers each have their own set of profile objects.
Table 1: User and Computer Management profile objects
| Computer Management | User Management |
|---|---|
|
|
|
|
|
|
|
|
|
|
|
|
| |
| |
| |
| |
| |
| |
| |
| |
| |
| |
| |
| |
| |
| |
| |
| |
| |
| |
| |
| |
| |
| |
| |
| |
| |
| |
| |
| |
|
You will notice by looking at these categories, most of them are under either User Management or Computer Management. However, for a few of them, they appear in both User and Computer Management.
First determine if the setting to be configured belongs to User, Computer or both. If it only belongs to one of them, then the decision is easy. When the setting belongs to both User and Computer Management you must use further deduction to determine the correct placement.
You must now ask yourself a few questions:
As with most things, since Desktop Authority is such a flexible tool, there will be some configurations that can be configured in more than one way. If you are not exactly sure how to configure a setting, use common sense and test the setting with a test user first.
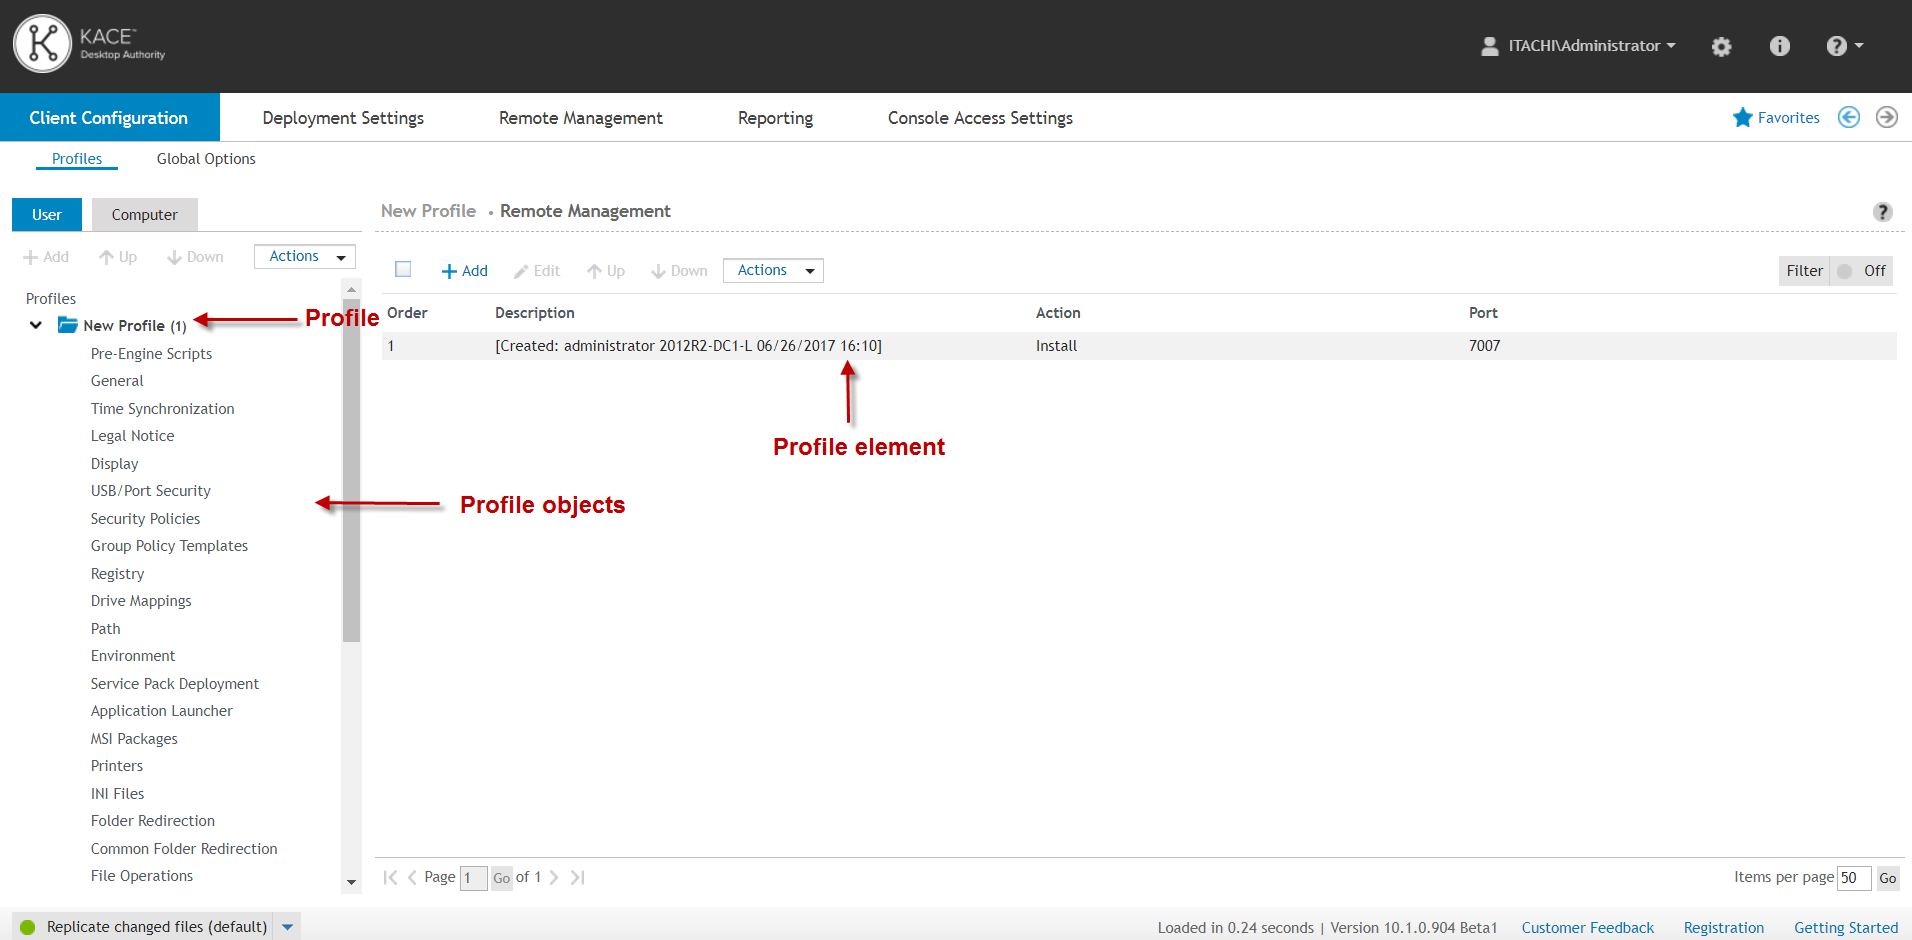
A Profile is a collection of elements that define a set of configurations and default profile settings, including definitions (used to create custom variables), default descriptions, Validation Logic, default Validation Logic settings (default Validation Logic settings are used when new profile elements are created).
Profile objects are the individual types of settings that can be configured within a profile (i.e. Drive Mappings, Microsoft Outlook, Registry, Printers, etc.) A Profile element is the actual configuration setting within each profile object.
Figure 4: Detailed view of Profiles, Profile objects and Profile elements
In order for profiles and configuration elements to be processed for users or on computers, Desktop Authority must qualify whether a profile or a profile element should be applied to a workstation and/or user. Validation Logic is used to determine this. A set of rules is created for every profile and profile element setting within the Manager. This set of rules includes the definition of connection types, class types, operating systems, virtual environment and many other types.
For every profile and profile element setting there is a Validation Logic tab. Select this tab and configure who or what type of computer the profile and/or setting should be applied to.
|
|
Note: User based Validation Logic type rules are not available for use within Computer Management Validation Logic. |
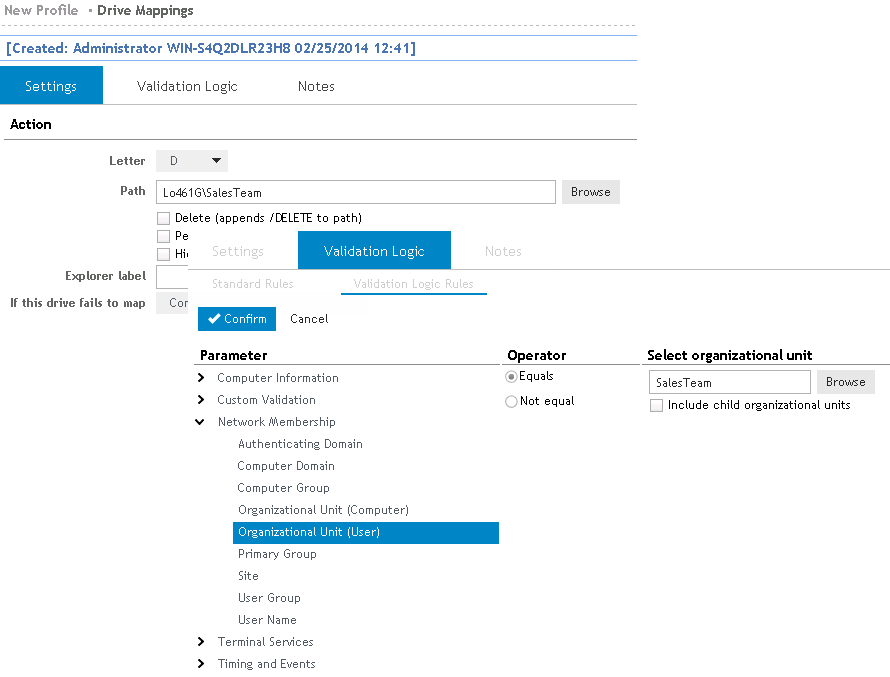
Here is an example of how validation logic might be used:
Let’s say there is a share that you want to configure for the Sales department and you want to use Drive F:\. Using the Drive Mappings profile object, you will create an element and use Validation Logic to determine who is in the Sales department and therefore who will validate for this drive mapping. The Validation Logic for this element can use either Organizational Unit or User Group validation logic type, depending upon the OU and User setup in Active Directory.
Figure 5: Example of Validation Logic usage
Desktop Authority elements are configured to be applied to the User and/or Computer at specific times during the logon, logoff process of the user or startup and/or shutdown process of the computer. Timing allows elements to be applied at the appropriate event.
Computer Management elements can be set to configure during a computer startup event, computer shutdown event, refresh interval or based on a specific schedule. Refresh is an event that occurs every 60 minutes following the computers startup event. A scheduled event can be set to occur one time, daily, weekly or monthly.
User Management elements can be configured to be applied to the User environment on a computer during the client logon process and client logoff process and/or refresh interval. A refresh event occurs every 60 minutes following a client logon.
|
|
Note: A User Management refresh interval is entirely different from the Computer Management refresh timing interval. They are two separately timed events. The Computer Refresh timer begins following the computer startup. The User Refresh timer begins immediately following a user logon. |
There are a million and one ways that profiles can be created and used within Desktop Authority. There is not really a right or wrong way, and it will vary based on the organization’s needs. Most often, you will want to use more than one profile to hold all of the organization’s configurations.
A smaller organization might not have as many Profiles as a larger one, but this still varies based on the company’s needs.
Using more than one profile enables greater manageability and control over client configurations. Using multiple profiles also allows the individual profiles to process faster. Multiple profiles will break down a large number of configurations into smaller groups of configurations, where not all settings will need to be validated at logon time. If a profile is deemed to be invalid for the client, all elements in the profile are bypassed thus saving the processing time it would have normally taken to validate each of the elements separately.
It also makes management of the profiles easier. For instance, if there is a specific profile for the Sales department, you know that when making any changes, it is the only profile that must be touched.
User Management and Computer Management are two separate entities in the Profile tree. They each have their own parent profiles, child profiles, profile objects and profile elements. Keep this in mind when determining how to setup your profiles.
Be sure to give your profiles meaningful names. You may want to draw up a profile map so anyone using the manager will know where to find particular types of elements..
Example profile map:
User Management
Profiles
ACME – Main company profile (all common settings here)
Once you have decided how your profiles will be mapped, go into the Manager and create each parent and child profile.
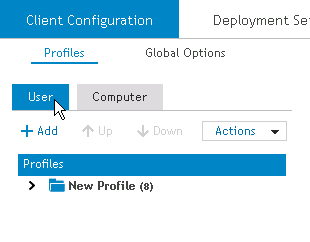
To create a profile, first choose either the User or Computer tab. Select the level of the profile tree where the profile will be created. For a parent or top level profile, select the Profiles level in the tree. For a child profile, select the parent profile it will be created within. Next click the Actions drop list and select Add. A new profile will be created at the level you selected. It will be temporarily named New Profile. Type over the profile name and give it a more meaningful name. You can then expand the profile to reveal the profile objects.
Figure 6: Creating a profile
When a profile is created, don’t forget to update the Validation Logic. The profile validation logic will affect all elements within the profile. If the workstation validates for the profile, then the elements defined within it will also go through their own validation process. However if the workstation does not validate for the profile, then NONE of the profile elements will be inspected for validity with that computer/user.
Within each profile there are profile objects. Profile elements are created within profile objects. Let’s walk through the creation of a few different types of profile elements.
The Drive Mappings object is one of the most often used profile objects. It is used to map a drive letter to a shared network resource.
Let’s first create the Drive Mapping element. It can be found within the User Management profile objects.
Let’s configure another element. This time we will configure a Registry setting. Before jumping in and creating the element. We must give this one some thought.
This new Registry setting will override the default computer refresh interval.
The Registry profile object is one of the few objects that can be configured in both the User Management and Computer Management profile object trees. It is based on the context of the registry setting. Is it user based or computer based?
Since it is the computer refresh interval we will be working with, we will use the Computer Management Registry object. Select the Computer tab in the profile tree.
While setting up Desktop Authority profiles and profile elements it is essential to think about Data Collection. Data Collection refers to the data that Desktop Authority can optionally collect about client computers and users.
Table 2: Data Collection collects the following types of data
| Computer Management | User Management |
|---|---|
| Installed hardware | Computer Startup and Shutdown events |
| Installed software | User Logon and Logoff events |
| Computer heartbeats | User session Lock and Unlock events |
| Port Security | User session heartbeats |
Data Collection is configured as a profile object in both the User and Computer Management tree. As always, validation logic can be applied to the data collection elements, allowing the administrator to collect the data as granularly as necessary.
The collected data is stored in the SQL database called DAREPORTING. It can be reported on using the Desktop Authority Reporting tool. This is a tool that can be installed to an administrator’s computer so they may run the necessary reports when needed. Reports can also be scheduled to run at certain times with the results emailed to selected recipients.
Desktop Authority provides a multitude of reports for the admin to manage the computers and users on the network. However, if there is some facet that must be reported on differently, the admin may modify a pre-defined report or create a custom report to suit their needs.
By default the reporting tool is installed to the server where Desktop Authority is installed to. However, it can be downloaded and installed to another computer in the network by selecting the Reporting tab from the menu bar within the Desktop Authority Manager.
More information on using the Desktop Authority Reporting tool can be found in the Reporting Guide which is available for download from the Support Portal.
To ensure the configurations are set on the client as you wanted, you may turn on trace file logging to check out what was set. Logging will collect specific information from the client machine as well as user information based on Active Directory, which Desktop Authority uses to determine whether or not a Profile or a Profile element validates. Logging can also be used to troubleshoot any future problems you may encounter.
The log creates a timed stamped log of each action that Desktop Authority takes based on the Profile and Profile elements created in DA Manager.
There are two places where logging should be configured. They are both found within the Global Options. Computer Management logging is always on by default. The files it creates can be found on each client computer in the “%windir%\temp\Desktop Authority” folder. However these client files can be uploaded to a central repository on the network and the file is renamed with the date, time, and computer name for uniqueness. Configure the network location by selecting Global Options > Computer Management Options > Troubleshooting.
For User Management logging, select Global Options > User Management Options > Troubleshooting. Select the “Create a detailed trace file for these specific computers and/or users” and specify the computers and/or users that you would like to create a trace file for. Wildcards can be used here to enable logging for multiple computers, for example use “*” to validate for all computers and/or users. Again, you have the option of uploading the trace files to a central folder on the network. This makes for easier access to these files if you need to do some troubleshooting. The Computer and User based log files are uploaded to the central repository using the DA Administrative User account. This account must have appropriate permissions to the central repository location so the files can be copied. The Computer based log files are uploaded to the central repository at the end of the day and user based log files are uploaded right after the event (Logon, Refresh, Logoff, or Shutdown) is complete.

