The Essentials Setup Wizard is launched once the installation process is begun.
The actual features and modules available to the user are controlled via the activation code.
Installing the Essentials console:
1.Download the Quest Essentials installer.
2.Once you have selected and downloaded the Bit version that is appropriate for your computer, run the installer by opening the downloaded package. This will open the Quest Essentials Setup Wizard.
3.Click Next to begin the installation process.
4.You will be prompted to select the path to your Java 11 installation directory. If it does not already exist, see Hardware and Software Requirements for more information.
5.Agree to the Terms in order to proceed to the next step.
6.Select the location for the product Installation. Click Next.
7.If you have the "Run Quest Essentials" option selected, then the application will automatically start once the Wizard has completed Installation. Click Finish to complete installation.
8.The next step is to activate the product. Please see the Product Activation
|
|
NOTE: The installer will download the entire application. The amount of time this takes depends on the speed of your connection and host computer. |
After purchasing Quest Essentials, you will receive an email with the link to the product download and the activation code to activate the product. If you did not receive such an email please contact us: www.quest.com/contact.
Selecting Activation from the help tab, allows users to view information about the status of their product license. This is where licenses are entered, renewed, and activated. 
After purchasing Essentials, you will receive an email with the link to the product download and the activation code to activate the product.
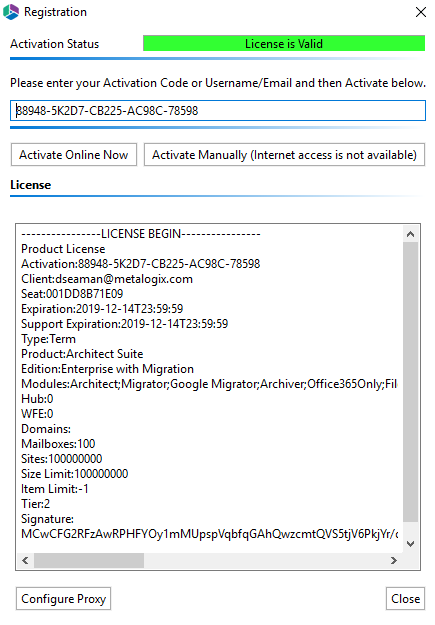
1.Once installation has been completed, upon starting the Essentials application for the first time, you will be presented with a Registration Screen. Enter your activation code in the allotted space, and select to Activate Manually.
2Use the information in the following to determine the appropriate License Validation option to select.
|
|
NOTE: Most systems can use the Online activation method as long as the system has internet access. If you are unable to use the online activation method due to security settings or lack of internet access, the Offline activation option can be used. This option will still require some internet access, but allows for the authentication to be done from another machine that is not as restricted by security or has a connection to the internet. |
|
If you want to validate the license... |
Then ... |
|---|---|
|
online |
accept the default option (Activate Online). |
|
offline |
a)Select Activate Offline. You will be presented with a window that details the instructions on how to obtain your license manually in the case that the machine on which Essentials has been installed does not have access to the internet. Upon clicking Ok, your internet browser will be opened. if you do not have access to the internet, then simply copy the URL in the address bar and paste it into the browser of a machine with an active internet connection. This will give you access to your license data. b)Follow the instructions on the Offline Activation web page to activate your license. c)Once you have copied the license data, and closed the license data window, you will be redirected to the Offline Activation page. Paste the license data into the area marked Activation Text. Click Activate. If activation was successful you will be redirected to the successful activation page. Here you must either copy the Activation Text. |
3.Return to the Essentials Registration Screen. An Enter License Data window will have opened, paste the activation text here, and select Apply.
The license should appear in the License box and the Activation Status bar should turn green and display "License is Valid". Your license has been activated, you may now click Close and use the Essentials console.
The first time the application is started, you will need to enter the supplied Activation Code.
If you have not received an activation code, please contact the sales team www.quest.com/contact.
For detailed instructions on Activating the product, please visit the Product Activation section.
After activation, a Splash screen is available with your installation version number, and links to all the documentation, the Quest Website, as well as our Support site. You can select Close and begin using the application.