サポートと今すぐチャット
サポートとのチャット

Migrator for Notes to SharePoint 7.4 - User Guide

Migrator for Notes to SharePoint Migrator for Notes to SharePoint Console
Overview Console configuration using the setup wizard Advanced configuration options Database discovery QuickPlace/Quickr discovery Domino.Doc discovery Discover directory entries Import database records Notes databases Applications Classification Rules Classification Rule Properties SharePoint Targets Scheduled tasks Reports Task history Link Analyzer/Updater/Finalizer License
Migrator for Notes to SharePoint Designer Migration jobs Appendix: Reference information

Customizing global options

To change the default Migrator for Notes to SharePoint options, click the Options button at the bottom of the tool or open the System Menu (at the top left corner). The Options dialog box that is displayed includes several tabs of options you can change.You can also apply different sets of settings (saved options files) for different migration jobs by selecting Options > Load Options. For more information, see Advanced configuration options.

If you are using the Migrator for Notes to SharePoint Console, the Options button is not available. You can get to the Global Options by selecting the Global Settings link in the Advanced tab of the Job Designer. All of these options can also be edited using the Advanced Configuration Options dialog box of the Console.For more information, see Advanced configuration options.
Normalizing multi-valued items to multiple documents

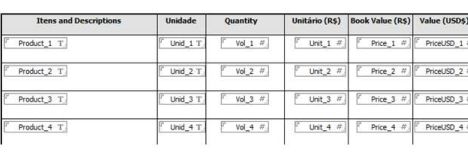
Notes forms implement detail records (the things that relational developers would have set up a one-many-relationship for) using multi-valued data fields arranged to look like a table, as shown below. Users would then fill in as many entries as needed, making sure that the values from each multi-valued item lined up properly.

Migrator for Notes to SharePoint can extract the multi-valued items as separate records. To do this, set the Multi-Value disposition option for the columns that you expect to contain arrays to "Normalize". This will cause Migrator for Notes to SharePoint to generate multiple SharePoint items for the values in the columns designated for Normalization.

If you also wanted "header" records you could first migrate those using a separate migration job. You could use lookup fields or some other mechanism to relate the "header" and "detail" columns. For example, Customer ID in the Contacts list could be set up as a lookup field that references the Customers list (where Customer Name and Category are also stored).

Finally, you may encounter Notes forms that list out each item in separate rows, instead of using multi-valued items. Migrator for Notes to SharePoint can handle that case as well, but you will need to do a little work with formulas to generate multi-valued items with Normalize on. For example, you could define a source data definition column with the formula "Product_1: Product_2: Product_3: Product_4" to generate a "Products" array.

Restrictions for normalization

The "Normalize" value is only added to the Multi-Value disposition option for columns if the following is true:

Generating links to SQL records

This section of the Advanced tab is for a SQL Server data target definition. If all the images and attachments are going to be stored in a separate table, you can control how the migrated rich text field refers to them by using this option. Here you can specify how links to images, attachments and even other documents should be formatted in the migrated rich text. This feature is optional, and only makes sense if you have designed a web application to display the images and attachment files in response to a web request.

関連ドキュメント

The document was helpful.

評価を選択

I easily found the information I needed.

評価を選択