Applies to
ApexSQL DevOps toolkit
Summary
This article explains how to set up continuous integration process with ApexSQL DevOps toolkit using a TeamCity server.
TeamCity server is a continuous integration (CI) server which can be used for running parallel builds simultaneously on different environments, keeping a history of builds, successes and failures and much more.
Basic CI flow in the TeamCity server looks like this:
In order to set up the CI process with ApexSQL DevOps toolkit using the TeamCity server, supposing that you have all ApexSQL tools installed according to your needs for the CI process, the first thing that needs to be done is to download and install ApexSQL DevOps PowerShell cmdlets.
After that, the ApexSQL DevOps toolkit PowerShell one-click scripts need to be configured. In the linked article the global configuration of the one-click DevOps script can be found, but not information about the configuration of each step separately. These steps will be explained later in this article.
The next step in the integration process is to download and install the TeamCity server. More about this can be found in the SQL database continuous integration with TeamCity article.
|
Quick tip: When selecting a Service Account for Server during the Setup, you should select the “Run TeamCity Server under a user account” option, because of the later usage of administrator privileges on the SQL Server. |
After everything is installed and ready, a new project in the TeamCity server can be created.
In the following example, a new project will consist of two steps:
Both steps will be followed by notification messages about the pipeline status:
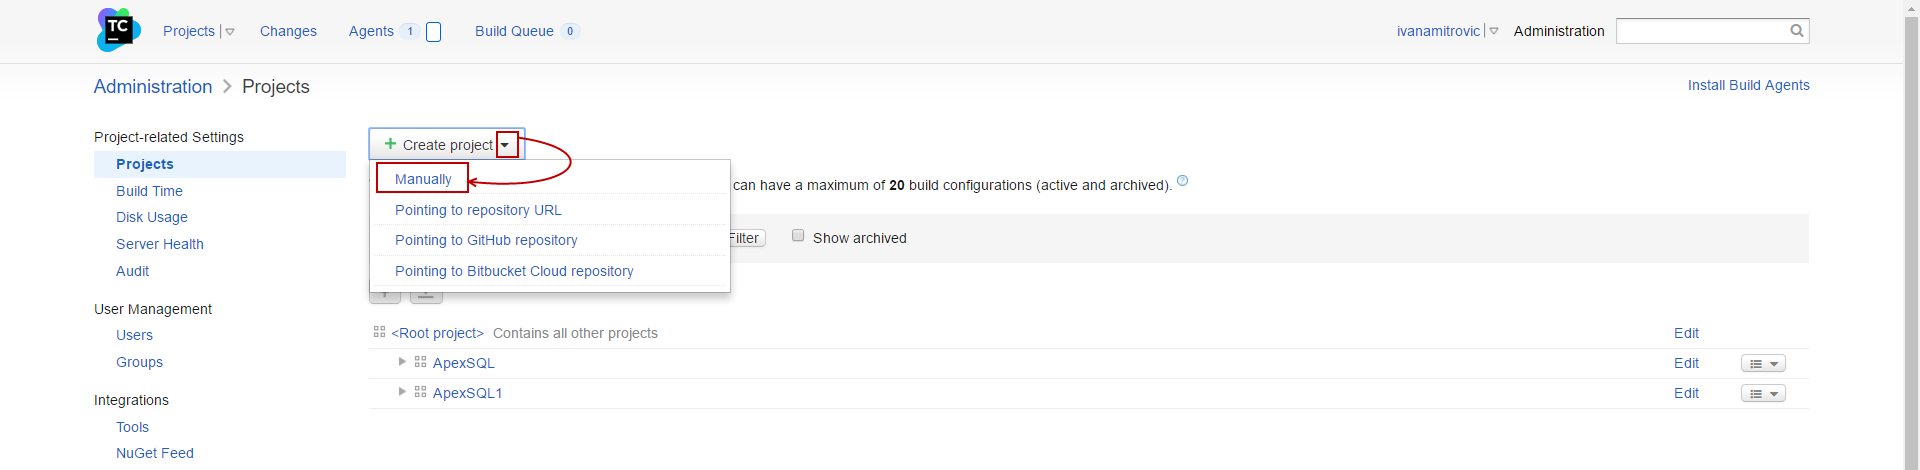
Click the Create project button in the Administration, under the Projects tab, and select Manually from the drop-down menu:
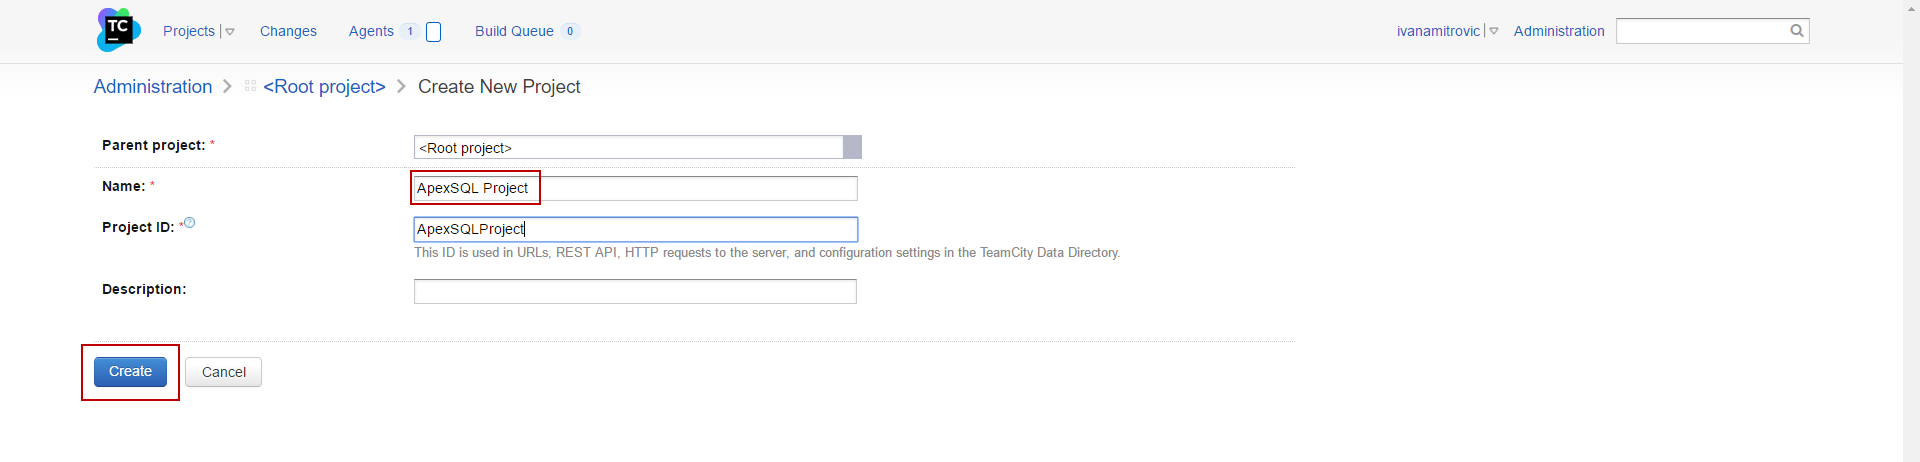
In the Create new project page, enter a name for your project (ApexSQL Project in this example). After the name has been entered, the Project ID will be created automatically:
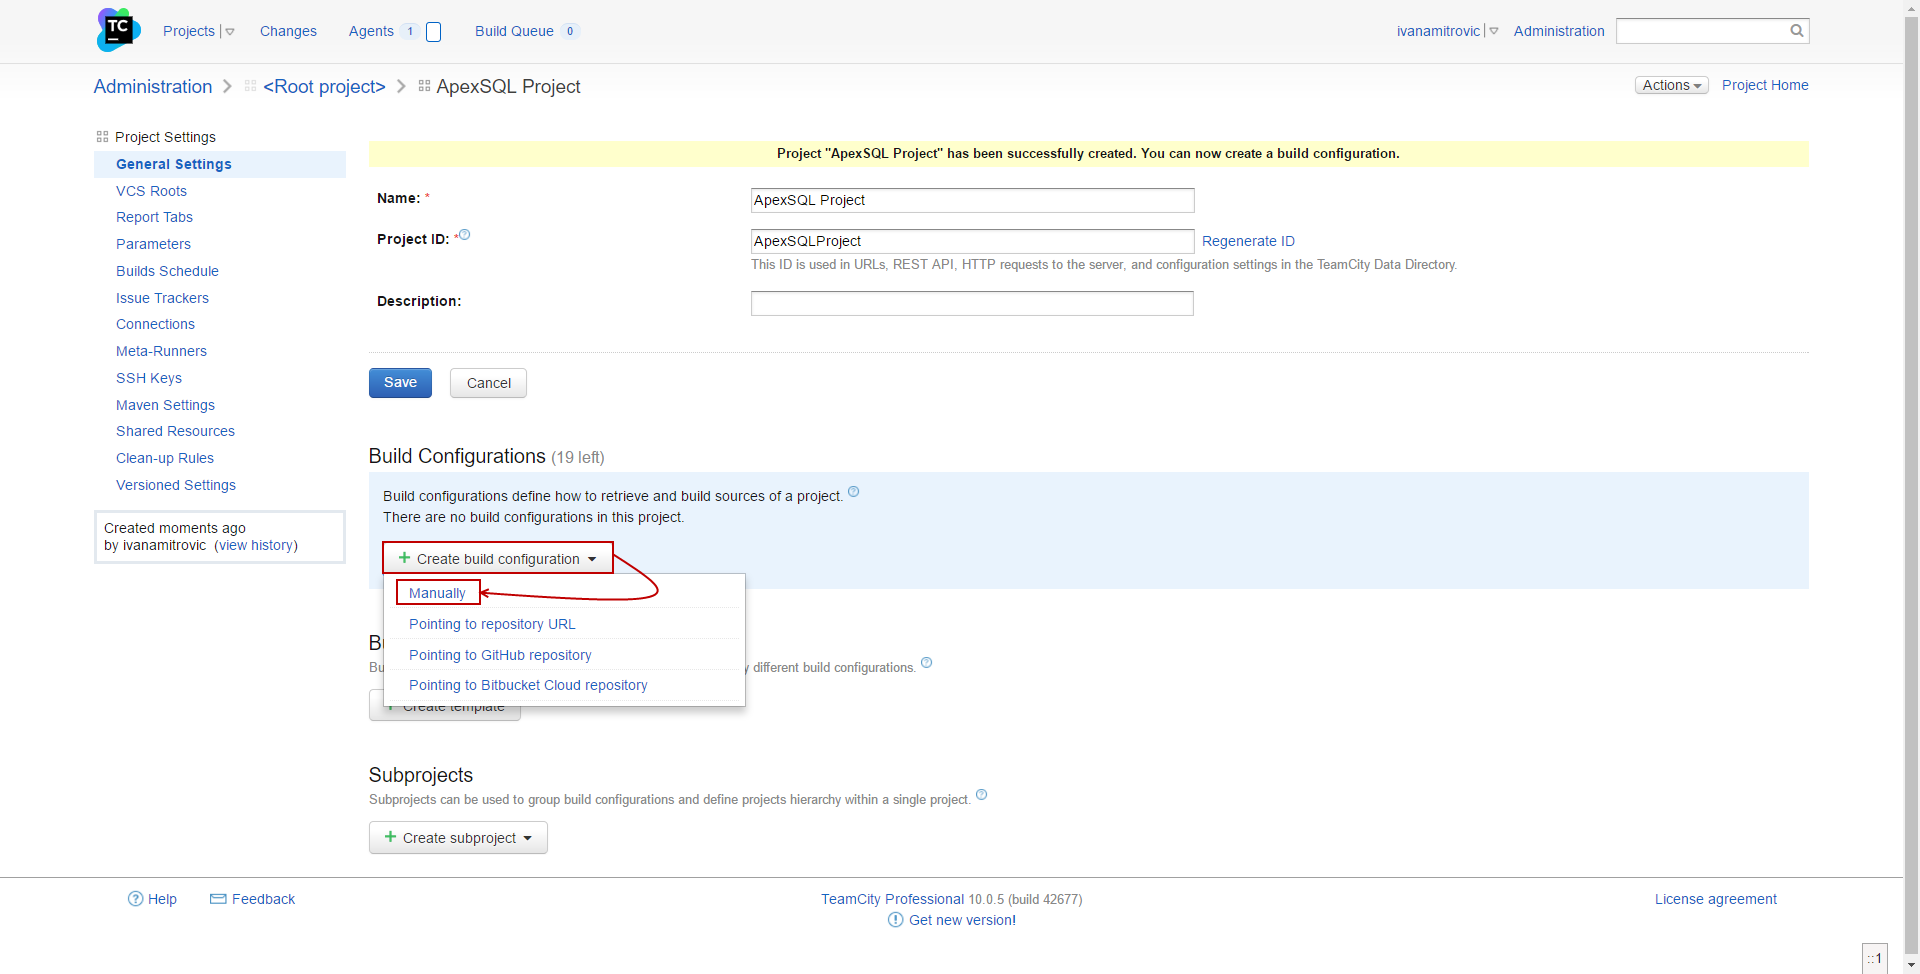
When the Create button is clicked, the General settings tab will open automatically, and, on the top of it, a yellow ribbon message can be seen that the project was created successfully. In the same window, under Build configurations click the Create build configuration button and select Manually from the drop-down menu:
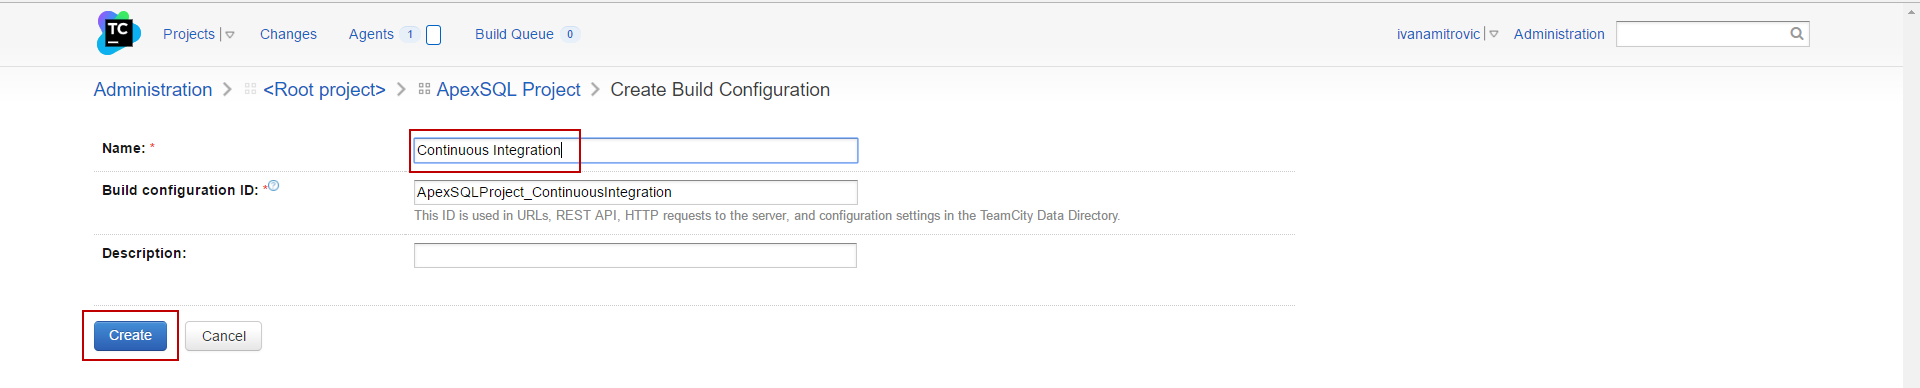
In the Create Build Configuration window, enter the name of your build configuration (Continuous Integration in this example). Build configuration ID will be created automatically when the name is entered:
Click the Create button.
The TeamCity server will prompt to create a New VCS Root. A VCS Root represents a collection of the version control settings (paths to sources, username, password, etc.) which defines a source control system to be monitored for changes, and get sources for a build. In this window the following fields should be filled:
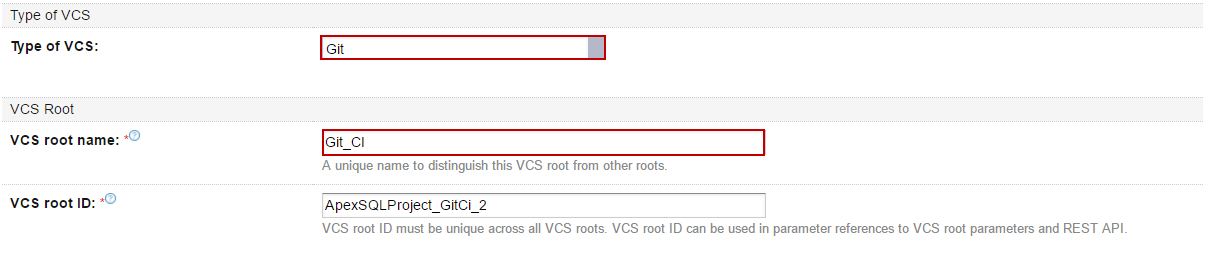
Select a type of VCS (Git in this example), and enter a VCS root name. VCS root ID will be created automatically:
Enter the URL for the repository, from which the data will be fetched, and enter a branch to be monitored:

Select the authentication method (Password in this example), and enter credentials for the selected source control server:

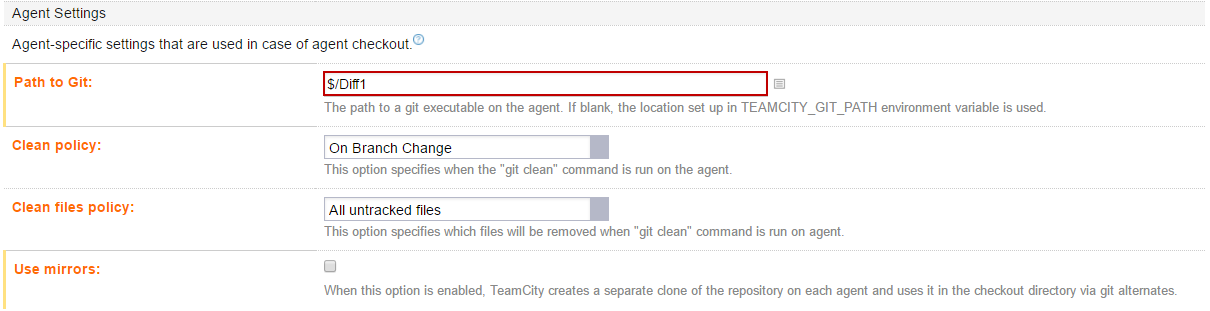
Next, you should click the Show advanced options button in the bottom left corner:

In the advanced options, enter a path to Git ($/Diff1 in this example):
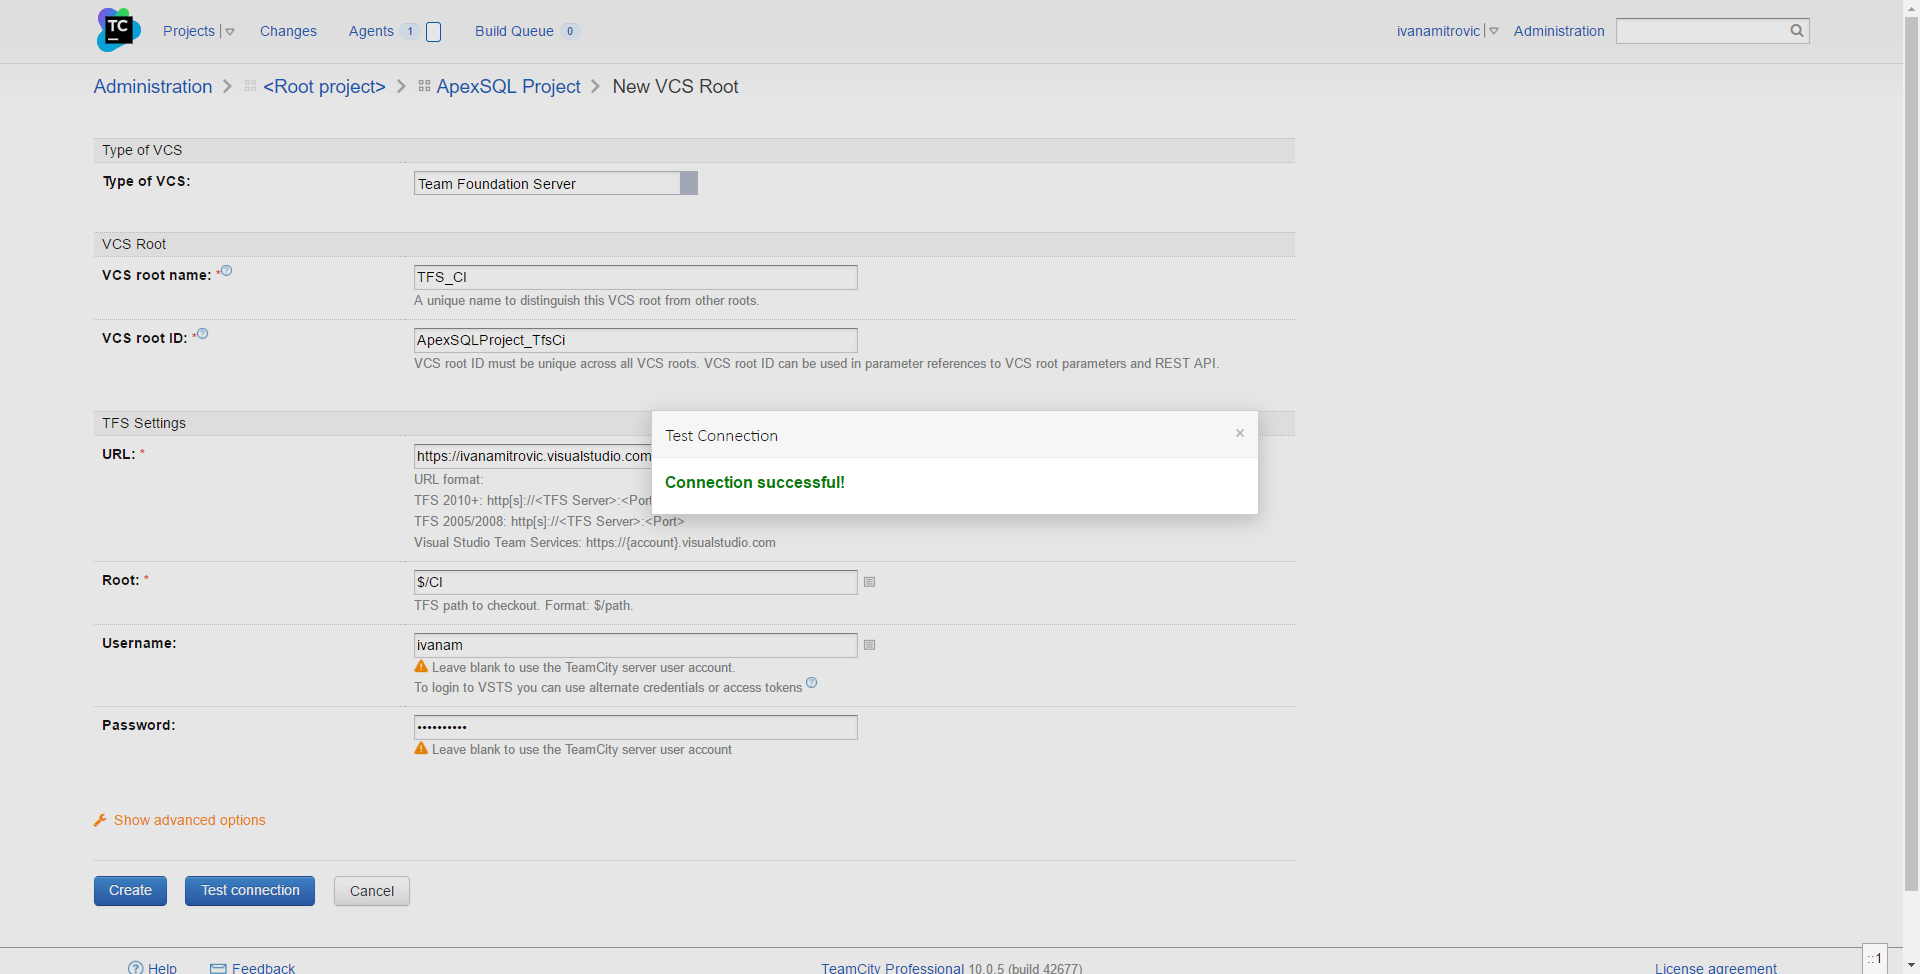
Click the Test connection button in the bottom left corner, and you will receive a message if connection was successful:
Click Create.
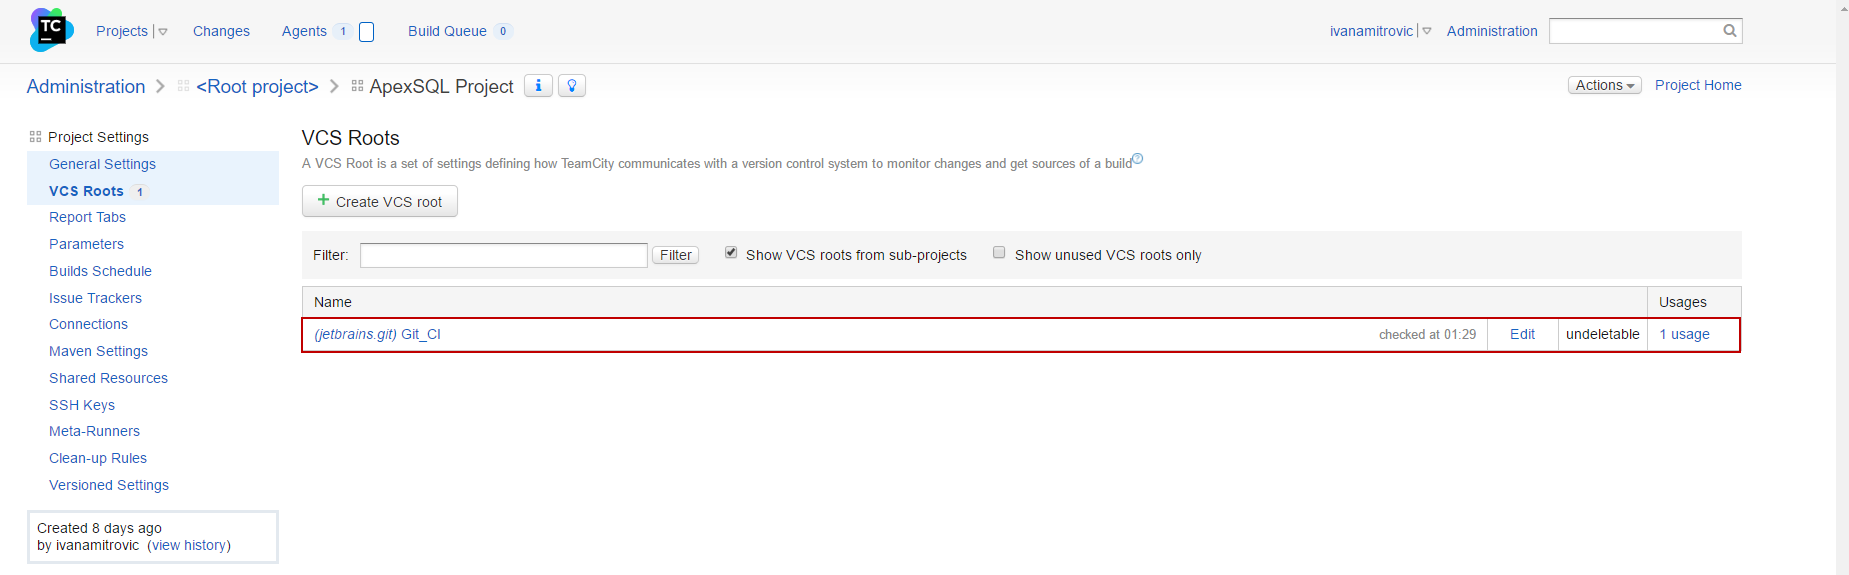
After the VCS Root has been created, it can be seen in the VCS Roots tab, and edited if needed:
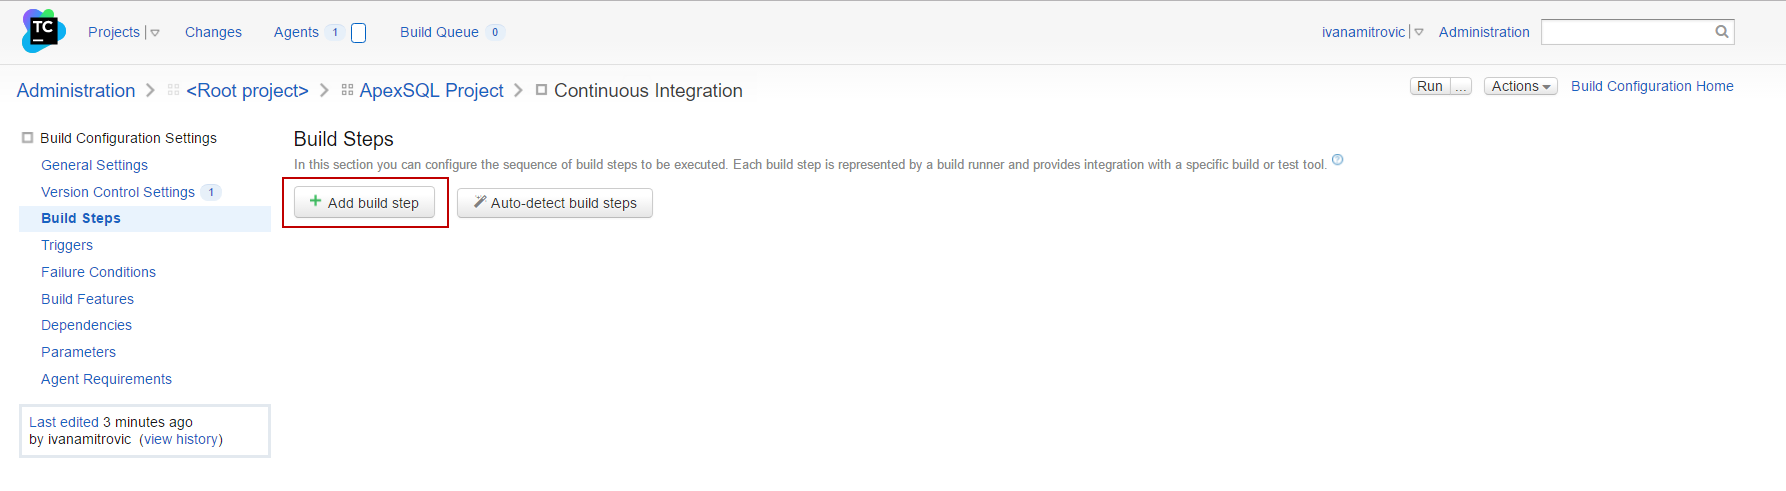
Creating a new Build step is the next step in setting the TeamCity server. In the Build steps tab click the Add build step button:
In the New Build Step window select PoweShell as runner type, enter a step name (Build and Populate in this example – a new database will be created and populated with test data).
For the Script option select the Source code (Script source text box will show, for entering the PowerShell script content), and select the “Execute .ps1 from external file” as Script execution mode:
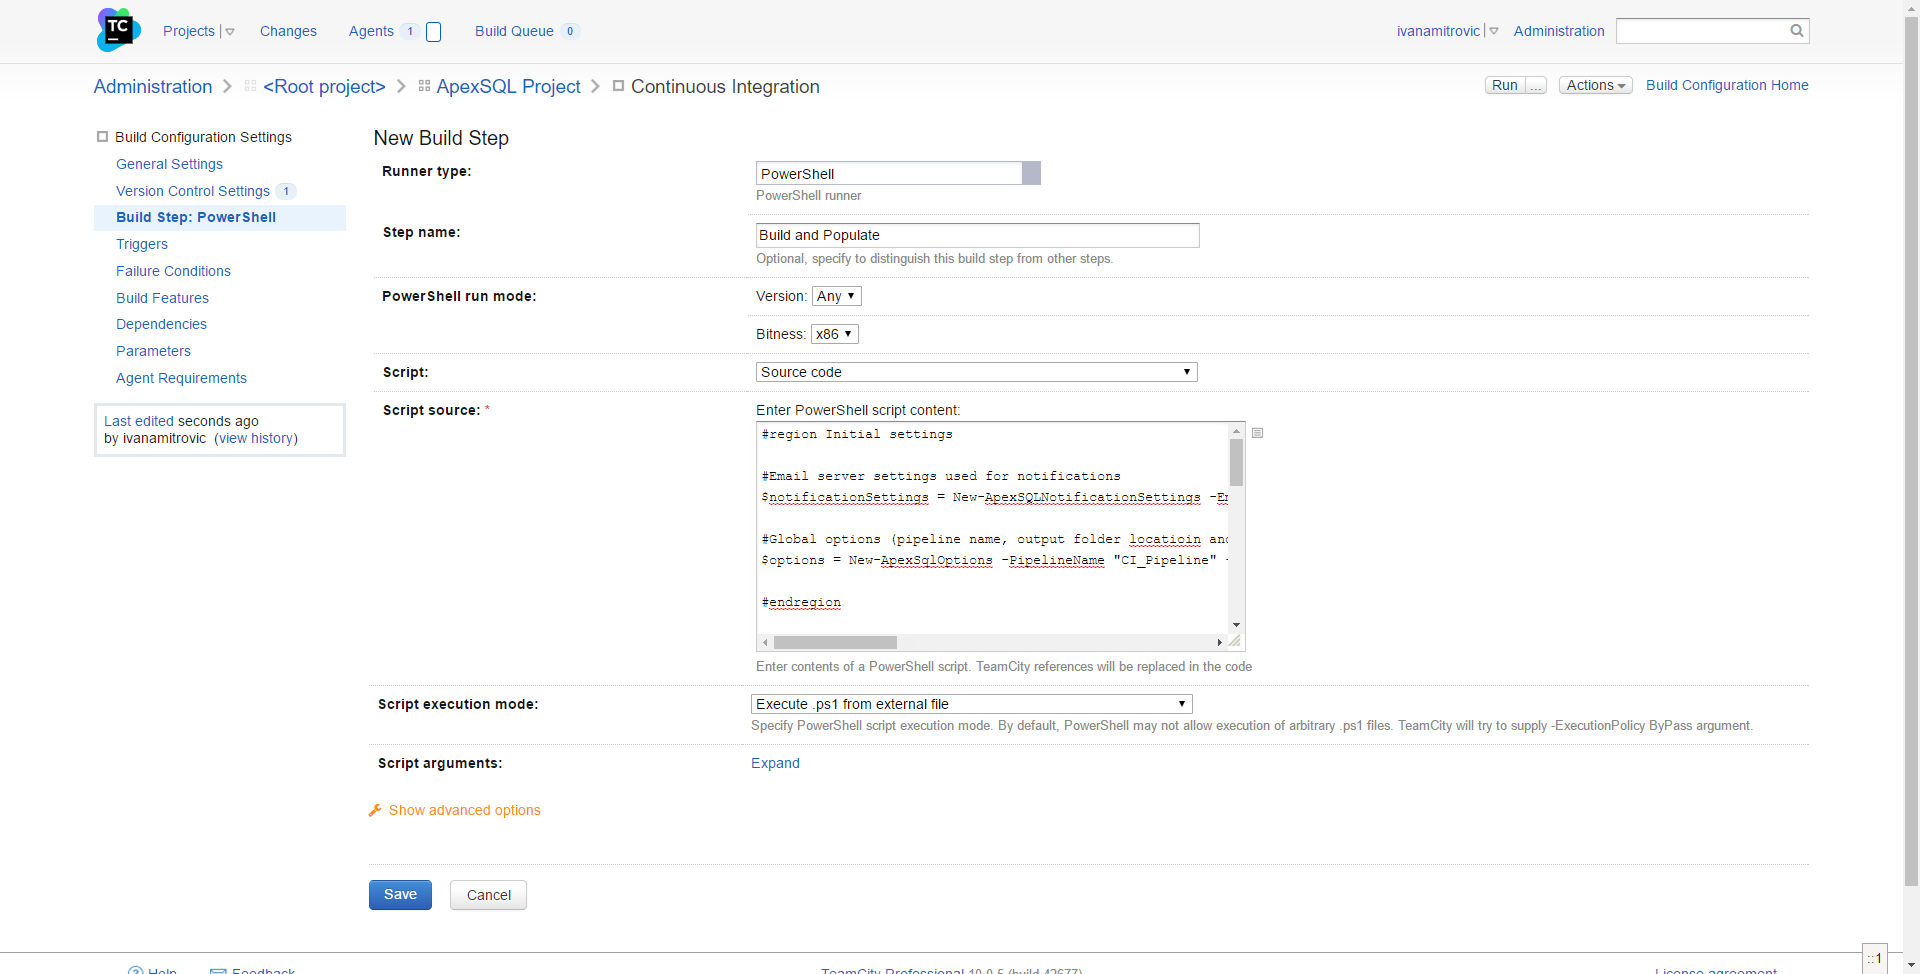
In the Script source a PowerShell script that should be entered for this example should consist of the following:
Define e-mail server settings used for notifications:
$Notification_settings = New-ApexSQLNotificationSettings -EmailAddress "example@email.com" -Password "example_password" -SmtpServer "smtp.example.com" -Port 587 -UseSSL
Define global options (pipeline name, output folder location and notification settings):
$CI_options = New-ApexSqlOptions -PipelineName "My_CI_Pipeline" -OutputLocation "C:\CICD" -NotificationSettings $Notification_settings
Define a data source which will be used as a source to start a build: We’ll use the existing Git repository created earlier, where ApexSQL Source Control will be used for establishing connection:
$Git_repo = New-ApexSqlGitSourceControlConnection -ConnectionName "Git" -Server "https://user@bitbucket.org/User/12345.git" -Project "$/MyProject" -UserName "user" -Password "password"
Define data source: new database (testing):
$QA_db = New-ApexSqlDatabaseConnection -ConnectionName "QAdb"
-Server "ServerName" -Database "QAdb$($CI_options .Timestamp)" -WindowsAuthentication
Send notification on pipeline start:
Invoke-ApexSqlNotifyStep -Options $CI_options -DistributionList "qa@example.com","dev@example.com" -Status started
Build testing database from Git repository:
Invoke-ApexSqlBuildStep -Options $CI_options -Source $Git_repo
-Database $QA_db -StopOnFail $false
Fill empty tables only in the database with 1000 rows of synthetic data:
Invoke-ApexSqlPopulateStep -Options $CI_options -Database $QA_db -RowCount 1000 -FillOnlyEmptyTables $True
Send notification with results on pipeline end:
Invoke-ApexSqlNotifyStep -Options $CI_options -DistributionList "qa@example.com","dev@example.com" -Status completed
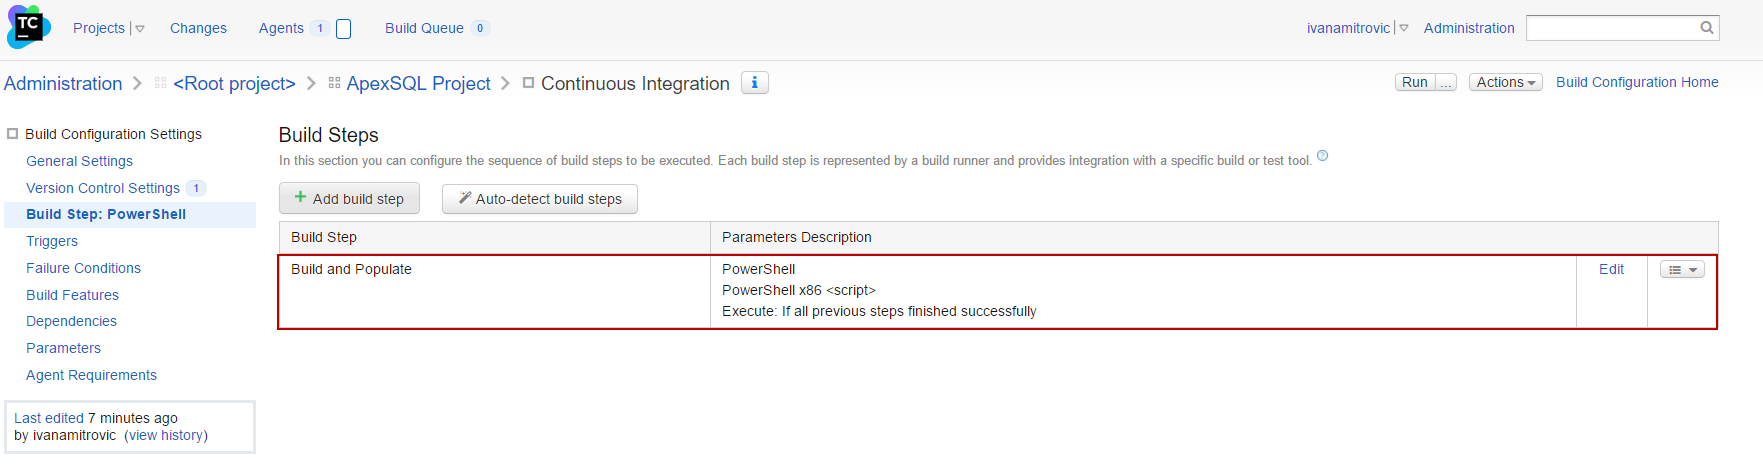
Click Save in the bottom left corner, and first Build step will be shown:
The Build step, in this example, will activate ApexSQL Build and ApexSQL Generate. Depending on the user’s needs, other steps can be added (ApexSqlAuditStep and/or ApexSqlTestStep).
Create a new Build step which will include creating a new database, to be used as a source in schema and data synchronizing (ApexSQL Build, ApexSQL Diff and ApexSQL Data Diff will be activated in this example). Everything should be done as explained before, but one additional option should be set – Execute step. In the New Build Step window click on the Show advanced option in the bottom left corner, and select a condition “If all previous steps finished successfully” as an Execute step option:
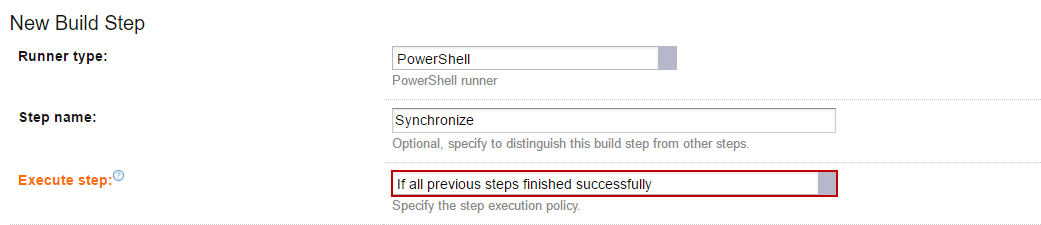
This condition will limit this Build step to begin when the condition is fulfilled.
Additionally, PowerShell script for this step, should consist of:
Define e-mail server settings used for notifications:
$Notification_settings = New-ApexSQLNotificationSettings -EmailAddress "example@email.com" -Password "example_password" -SmtpServer "smtp.example.com" -Port 587 -UseSSL
Define global options (pipeline name, output folder location and notification settings):
$options = New-ApexSqlOptions -PipelineName "CD_Pipeline" -OutputLocation "C:\CICD" -NotificationSettings $notificationSettings
Define data source: database SQL script file (result of some previous CI pipeline):
$buildFile = New-ApexSqlFileConnection -ConnectionName "buildFile"
-FilePath C:\CICD\CI_Pipeline\drop_folder\tfs_qaDb_Build_script.sql"
Define a data source: the new database (staging) – database which will be used as source for schema and data synchronizing:
$stageDB = New-ApexSqlDatabaseConnection -ConnectionName "stageDB"
-Server "ServerName" -Database "stageDB$($options.Timestamp)" -WindowsAuthentication
Define a data source: the database (production) – database which will be used as destination for schema and data synchronizing:
$productionDB = New-ApexSqlDatabaseConnection -ConnectionName "productionDB" -Server "ProductionServer" -Database "productionDB" -UserName "admin" -Password "password"
Send notification on pipeline start:
Invoke-ApexSqlNotifyStep -Options $options -DistributionList "qa@example.com","dev@example.com" -Status started
Build a staging database from a SQL script file:
Invoke-ApexSqlBuildStep -Options $options -Source $buildFile -Database $stageDB -StopOnFail $false
Create a schema synchronization script between the staging and production databases:
Invoke-ApexSqlSchemaSyncStep -Options $options -Source $stageDB
-Database $productionDB
Create a data synchronization script between the staging and production databases:
Invoke-ApexSqlDataSyncStep -Options $options -Source $stageDB -Database $productionDB
Send a notification with results on pipeline end:
Invoke-ApexSqlNotifyStep -Options $options -DistributionList "qa@example.com","dev@example.com" -Status completed
Click Save.
|
Quick tip: Second step can be created as an additional step in the existing project, or it can be created as a new continuous deployment project. |
The next step will be to add a new trigger – an action which will be executed when certain conditions* are met. In the Triggers tab click Add new trigger. VCS trigger window will pop up, and VCS trigger should be selected from a drop-down menu:
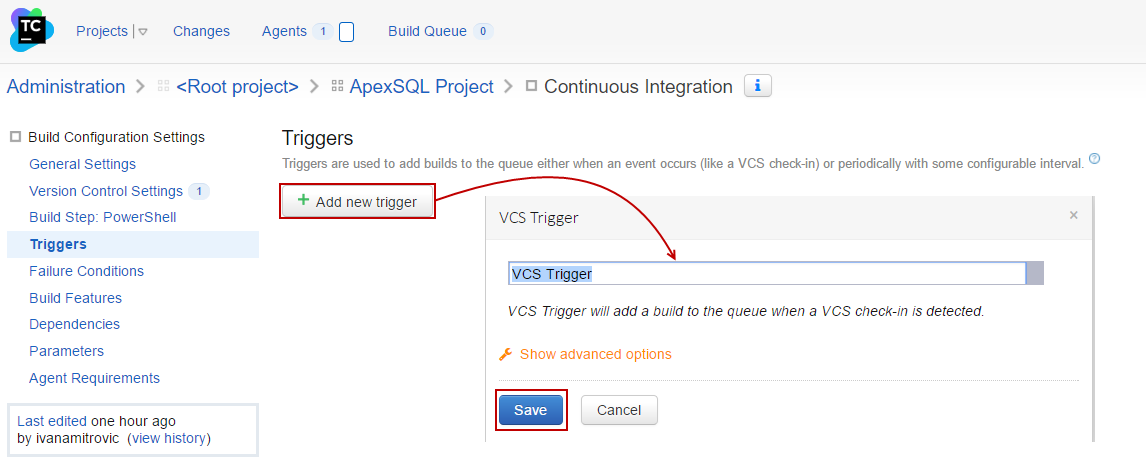
*Condition, in this case, is a change in the source control server. An action will be recognizing this change and executing Build steps. This means that VCS trigger will recognize a change in the source control server and start a Build step immediately. This allows the CI/CD process to run unattended perfectly.
After all options are set, the Run button in the upper right corner should be clicked, and build process will begin:

When the build starts, the Agents tab gets a blue mark besides, indicating that the process is running:

The “Running” information will be changed into “Step 1/2” indicating that the first step is in process:

“Step 1/2” will be changed into “Step 2/2” indicating that the second step is in process:

Green progress bar on the right side shows the time remaining until the process finishes.
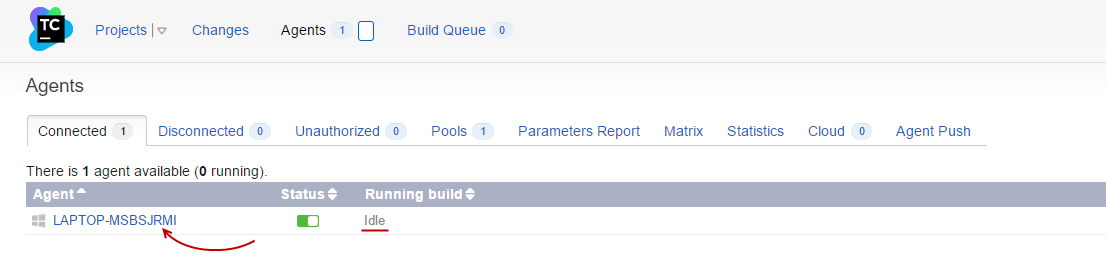
After the process has been completed “Step 2/2” will be changed into “Idle”. Then the Agent can be opened:
In the Build History tab, all information about previously finished processes can be found:
