If you have chosen not to specify the Java home, or you have set the Startup mode to jvm and Java to Use Default, complete the following procedure after an installation-only setup.
|
1 |
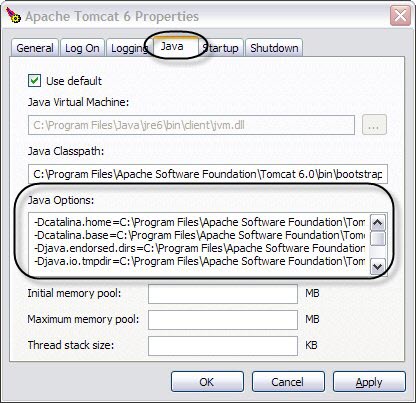
Complete a Generic installation only on Windows, as described in Creating a Generic Installation for Manual Java EE Agent Integration . Specify the JVM used by the service in the Java_Home box in the setup wizard. |
|
a |
In a command prompt, open the Tomcat installation bin directory. |
|
b |
|
d |
|
e |
Replace <VERSIONED_SUBDIRECTORY> with the absolute path of the deployment directory and the current agent directory version. |
|
f |
Replace both instances of <INTEGRATIONID> with the integrationid produced in Step 1. The integrationid can be found in the integrate scripts generated by the generic installation, which are placed in the Installation Directory. Locate the scripts corresponding to your generic installation, open the .cmd script, and look for a command similar to the following: |
|
g |
Replace <BOOTSTRAP_FILENAME> with the name of the pre-instrumentation .jar filename that was created in step 1. corresponds to the JRE/JDK that the Tomcat service uses. This name can be found in your agent machine bootstrap directory, in the <VERSIONED_SUBDIRECTORY>. |
|
h |
This section contains instructions for integrating the Java EE agent with a WebLogic® Server. You must modify your WebLogic startup script by adding lines to set the variables that the Java EE agent requires.
Review the following exceptions for variations before configuring your server.
|
• |
|
• |
You are using a customized startup script that places the WebLogic main class into an environment variable other than SERVER_CLASS, but you have not provided the name of that environment variable to the integrate integration script (which is done by setting the additional environment variable APPSERVER_CLASS_VAR to the name of your custom environment variable. |
Use the steps in this section to manually configure a WebLogic® Server or a WebLogic Express Startup for integration with the Java EE agent.
|
2 |
Complete the Generic installation only on Windows, as described in Creating a Generic Installation for Manual Java EE Agent Integration . |
|
3 |
Copy the following block of code to your WebLogic Server startup script. Insert the block just before the WebLogic startup line. |
|
4 |
Set <integrate.cmd/sh> to the name of the integration task you created in step 2. For example: integrate-Generic_installation_only_on_Windows_Install_Configs_and_pre-instrument.cmd. |
|
5 |
Set the QUEST_DEPLOYMENT_DIRECTORY variable to the Installation Directory specified by the Java EE Integration Agent instance activated on this host. This agent instance was created in step 2. |
|
IMPORTANT: The Anonymous Admin Lookup Enabled option needs be selected in WebLogic 8.1.x, to avoid the javax.naming.NoPermissionException occured during the WebLogic integration. |
|
IMPORTANT: Review the section Understanding what should be instrumented before you begin manually integrating WebSphere®. |
This section contains instructions for integrating the Java EE agent with WebSphere Server. You either need to create Windows® services that start instrumented servers, Domain agent (version 7.x only), Node agents, and WebSphere Deployment Managers; or modify the startup scripts.
Using Foglight for Java EE Technologies with your WebSphere servers requires three steps: