To create a store:
1.Open the Configuration tool from Start > Quest > Archive Manager Configuration or C:\Program Files (x86)\Common Files\PAM\PAMConfig\PAMConfig.exe
2.Select HSM from the features panel.
3.Click the Stores tab.
4.Click New Store from the Stores section. The Create a new Media Store wizard starts.
Enter the information as described below:
a.Media Store Type - select FileNet IS from the drop down list.
b.Name of the new Media Store - enter a unique name for this store.
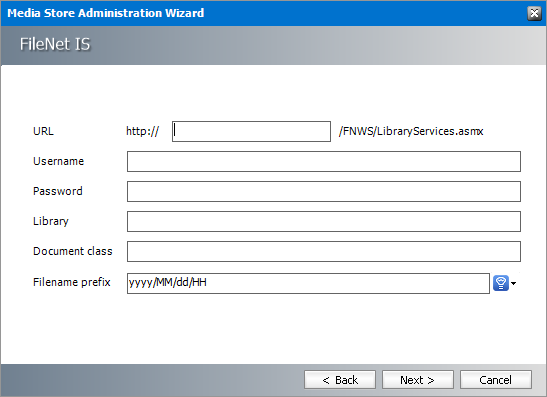
5.Click Next. The Media Store Administration Wizard step for the FileNet IS opens.

Enter the information as described below:
a.URL - FQDN or IP address of the FileNet IS server.
b.Username - Username to access the FileNet IS instance.
c.Password - Password to access the FileNet IS instance.
d.Library - Storage library device name.
e.Document class - Document class for connecting to the FileNet store.
f.Filename prefix - A unique prefix that you can create for each item stored in the media store. To construct a date type prefix, click 
6.Click Next.
Enter the information as described below:
a.Relative speed of the store - the relative speed of this store compared to other stores.
b.Use HSM Cache for read operations - select this check box to allow HSM to use its internal cache to copy files during read operations.
c.Write protection (mark as read only) - not supported for this store type.
d.Re-create service for this Media Store - not supported for this store type.
7.Click Finish.
8.Restart HSM services.
9.Verify that the media store appears in the Stores section.
10.Create a Schema for this media store.
To create a store:
1.Open the Configuration tool from Start > Quest > Archive Manager Configuration or C:\Program Files (x86)\Common Files\PAM\PAMConfig\PAMConfig.exe
2.Select HSM from the features panel.
3.Click the Stores tab.
4.Click New Store from the Stores section. The Create a new Media Store wizard starts.
Enter the information as described below:
a.Media Store Type - select Hitachi HCAP or Hitachi HCP from the drop down list.
b.Name of the new Media Store - enter a unique name for this store.
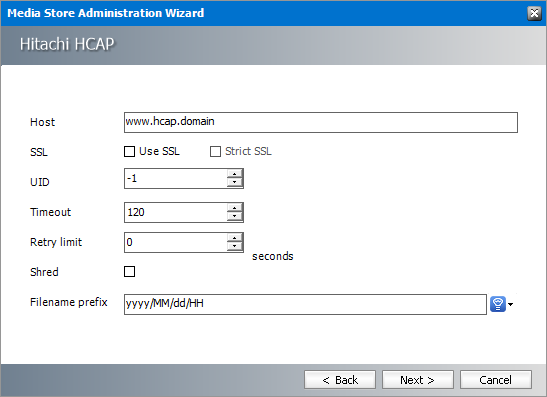
5.Click Next. The Media Store Administration Wizard step for the Hitachi HCAP or Hitachi HCP opens.
For Hitachi HCAP

Enter the information as described below:
a.Host - FQDN or IP address of the Hitachi HCAP server.
b.SSL - Select this check box to use an SSL certificate.
c.Strict SSL - Select this check box to verify the SSL certificate if SSL is checked.
d.UID - Enter the user identifier numerical value. For example, File System User ID (-1), Superuser ID (0)
e.Timeout - Set the server connection timeout (in seconds).
f.Retry limit - Specify how many times the store should try to save a file.
g.Shred - Select this check box to allow secure file deletion. The file will be deleted and all existing references in storage will be overwritten.
h.Filename prefix - a unique prefix that you can create for each item stored in the media store. To construct a date type prefix, click 
For Hitachi HCP
Enter the information as described below:
a.Host - enter a specific host name in the format namespace-name.tenant-name.hcp-domain-name where tenant is the highest node of the storage folder structure. There can be one or more tenants defined. Each tenant can be defined in enterprise or compliance retention-mode. In enterprise mode, privileged operations are allowed. In compliance mode, they are not allowed. For example, when tenant name = company name, there can be another tenant defined in compliance mode. Each tenant can have one or more namespaces defined to indicate departments like sales, development, or other categories.
b.SSL - Select this check box to use an SSL certificate.
c.Strict SSL - Select this check box to verify the SSL certificate if SSL is checked.
d.Username - Username to access the Hitachi HCP server.
e.Password - Password to access the Hitachi HCP server.
f.Root Folder - the top most folder in the folder hierarchy. You can change the default root folder HSM_TESTER.
g.Timeout - Set the server connection timeout (in seconds).
h.Retry limit - Specify how many times the store should try to save a file.
i.Shred - Select this check box to allow secure file deletion. The file will be deleted and all existing references in storage will be overwritten.
j.Filename prefix - a unique prefix that you can create for each item stored in the media store. To construct a date type prefix, click 
6.Click Next.
Enter the information as described below:
a.Relative speed of the store - the relative speed of this store compared to other stores.
b.Use HSM Cache for read operations - select this check box to allow HSM to use its internal cache to copy files during read operations.
c.Write protection (mark as read only) - not supported for this store type.
d.Re-create service for this Media Store - not supported for this store type.
7.Click Finish.
8.Restart HSM services.
9.Verify that the media store appears in the Stores section.
10.Create a Schema for this media store.
|
|
NOTE: Requires Web Services Enhancements (WSE) 3.0 for Microsoft .NET (Runtime files only) to be installed on the Archive server. |
To create a store:
1.Open the Configuration tool from Start > Quest > Archive Manager Configuration or C:\Program Files (x86)\Common Files\PAM\PAMConfig\PAMConfig.exe
2.Select HSM from the features panel.
3.Click the Stores tab.
4.Click New Store from the Stores section. The Create a new Media Store wizard starts.
Enter the information as described below:
a.Media Store Type - select iTernity from the drop down list.
b.Name of the new Media Store - enter a unique name for this store.
5.Click Next.
If Microsoft WSE 3.0 runtime files are not present an error message appears.
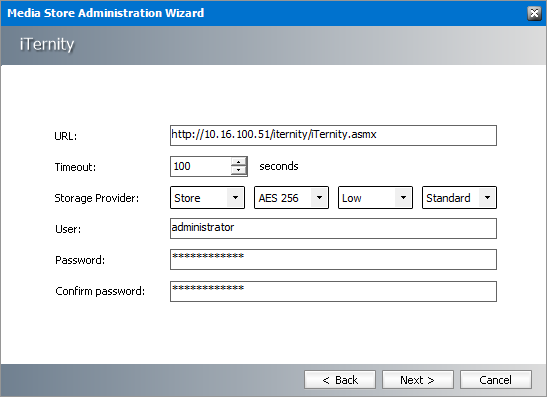
Otherwise, the Media Store Administration Wizard step for iTernity opens.

Enter the information as described below:
a.URL - URL of the iTernity server.
b.Timeout - Set the server connection timeout (in seconds).
c.Storage Provider - specify the type and encryption (Standard or AES256).
d.User - enter the username for access to the iTernity instance
e.Password and Confirm Password - enter and confirm the password for the iTernity instance
6.Click Next.
Enter the information as described below:
a.Relative speed of the store - the relative speed of this store compared to other stores.
b.Use HSM Cache for read operations - select this check box to allow HSM to use its internal cache to copy files during read operations.
c.Write protection (mark as read only) - not supported for this store type.
d.Re-create service for this Media Store - not supported for this store type.
7.Click Finish.
8.Restart HSM services.
9.Verify that the media store appears in the Stores section.
10.Create a Schema for this media store.
To create a store:
1.Open the Configuration tool from Start > Quest > Archive Manager Configuration or C:\Program Files (x86)\Common Files\PAM\PAMConfig\PAMConfig.exe
2.Select HSM from the features panel.
3.Click the Stores tab.
4.Click New Store from the Stores section. The Create a new Media Store wizard starts.
Enter the information as described below:
a.Media Store Type - select KOMpliance from the drop down list.
b.Name of the new Media Store - enter a unique name for this store.
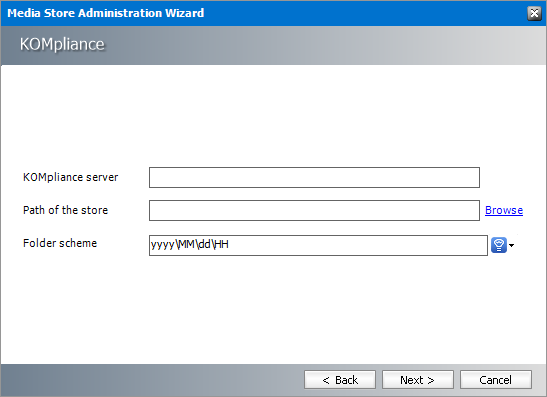
5.Click Next. The Media Store Administration Wizard step for the KOMpliance opens.

Enter the information as described below:
a.KOMpliance server - enter the KOMpliance server name.
b.Path of the store - Click Browse to locate the store in the KOMpliance server.
c.Folder scheme - a unique prefix that you can create for each item stored in the media store. To construct a date type prefix, click 
6.Click Next.
Enter the information as described below:
a.Relative speed of the store - the relative speed of this store compared to other stores.
b.Use HSM Cache for read operations - select this check box to allow HSM to use its internal cache to copy files during read operations.
c.Write protection (mark as read only) - not supported for this store type.
d.Re-create service for this Media Store - not supported for this store type.
7.Click Finish.
8.Restart HSM services.
9.Verify that the media store appears in the Stores section.
10.Create a Schema for this media store.