Configuring Apache web servers for monitoring
The following three options are required for monitoring a web server with an Apache agent. These options are set in the http.conf configuration file. Normally, the required Apache modules are installed and enabled by default. In some instances, the web server administrator may have to enable them manually. If so, see the Apache HTTP Server Documentation, available online at:
http://httpd.apache.org/docs/ .
IMPORTANT: There may be security implications with enabling the server status and information pages. Your web server administrator may not want to expose this information publicly. Ensure that you read and understand the appropriate Apache documentation, and configure your web server access accordingly. For more information, see the topic “Apache Module mod_info — Security Issues” in the Apache HTTP Server documentation: https://httpd.apache.org/docs/current/mod/mod_info.html . Also see Limiting access to server status and information pages on page 11.
To configure an Apache Web Server for monitoring: 1. Open the http.conf file in a text editor.
2. Verify that
mod_info is enabled.
3. Verify that
mod_status is enabled, and that the
ExtendedStatus directive is also enabled (set to On).
IMPORTANT: For Apache versions 2.3.6 and later, ExtendedStatus is enabled (On) when mod_status is loaded. For earlier versions, the default for ExtendedStatus is Off, so manually enable it.
4. Verify that the
server-status and
server-info handlers are configured. These handlers are built in to a standard Apache distribution and allow the agent to get the server’s status report and configuration information respectively.
5 Save the file.
Monitoring Apache web servers in FIPScompliant mode
Foglight for Apache agent supports to run in FIPS-compliant mode, depending on the Agent Manager where it's deployed on. That is to say if the Agent Manager runs in FIPS-compliant mode, the Apache agent will be configured to be FIPS-compliant automatically, and vice versa.
When Foglight for Apache agent runs in FIPS-compliant mode, and tries to access an Apache web server with HTTPs connection, the Apache agent requires to authenticate the Apache web server's certificate. In order to successfully access these web servers and collect metrics, you need to import the web server's certificates to Agent Manager's certificate store.
To import the Apache web server’s certificate to the Agent Manager certificate store: 1. Launch a command shell on the Agent Manager machine, and navigate to the /bin directory.
2. Import the Apache web server’s certificate with the following command:
fglam --add-certificate
For example:
fglam --add-certificate your_alias_name=C:\Certificates\test\ServerSSL.cer
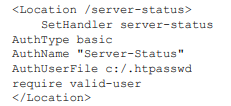
To restrict access to the server status page by requiring a password and a valid user:1. Add the following authentication settings to your http.conf file:
The Apache agent includes a credential wizard to enable access to secure pages. For more information, see
Step 5 of the procedure in
Adding Apache monitors .
An Apache Monitor, or Apache agent, is a Foglight for Apache agent that monitors Apache web servers.
To create an Apache monitoring agent:
1. On the navigation panel, under Dashboards, click Apache.
2. On the Apache Web Server Monitoring dashboard, in the upper right corner of the display area, click Add Apache Monitor.
The Add an Apache Monitor wizard opens.
3. On the Host Input page:
a. Select the Remote Agent Manager that you want to host the Apache monitor from the list.
b. In the Apache Host box, type the host name or IP address of the Apache web server that you want to monitor.
IMPORTANT: Do not attempt to create a single agent to monitor hosts that are part of a loadbalanced or cluster configuration. If you want to monitor hosts behind a load balancer or in a cluster, create a separate agent to monitor each host individually
c. In the Apache Server Protocol list, select http or https
d. Type the port number for the Apache Server Port. The default port number is 80.
e. Apache Server Version — Use only if you have customized the Apache server to hide the server version in the server-status and server-info pages. Select the Apache server version from the list. If the server version is not selected, the agent may fail to collect data. If the Apache server has not been customized, accept the default value.
f. Type the Server Status Path, or accept the default value.
g. Type the Server Info Path, or accept the default value.
h. Click Next.
4 On the Agent Properties page, the Apache agent attempts to auto-detect the required information and auto-populates the properties based on the Apache host name you specified on the previous page. You can change these auto-generated values as necessary.
- Agent Name — The name of the agent as it appears on the main Foglight for Apache agent dashboards (for example, the Agent Status dashboard).
- Server Status URL — The full URL of the server status page. By default this is http://example.com/server-status. where example.com is the host name specified on the previous page.
- Server Info URL — The full URL of the server information page. Be default this is http://example.com/server-info. where example.com is the host name specified on the previous page
TIP: The icons beside the Server Status URL and Server Info URL boxes indicate whether the Apache agent can find the required information at the default URL. If the yellow caution symbol appears, you can click it to access troubleshooting information. For example, if you are using a nonstandard port, you may need to specify the port number as part of the URL.
- Optional — Proxy information. If you need to specify proxy information, click the arrow beside the word Proxy to access additional settings.
Click the Enable Proxy check box to enable the proxy settings.
Type the host name or IP address for the proxy server and type the proxy port number in the appropriate boxes.
If the proxy requires authorization, click the Authorization check box, and type the user name and password in the appropriate boxes.
5 . Credential information. If the server status and information pages are secured resources, you can provide credential information (user name and password) to the Apache agent and store the credential in the Management Server lockbox.
a. In the Credentials section at the bottom of the Agent Properties page, select one of the following options:
-
Do not configure a credential. If you select this option, the Summary page opens. Continue with Step 7.
-
Add host to a new credential. This option is selected by default.
-
Add host to an existing credential.
b. Click Next.
c. On the Credential Type page, select User Name and Password and click Next.
d. On the Credential Properties page, type the user name and password in the appropriate boxes. Click Next.
e. On the Credential Name and Lockbox page, specify a unique name to identify the credential you are creating, and select the lockbox that holds the credential. Click Next.
f. The Resource Mapping page is purely informational. Click Next.
g Optional — On the Policies page, configure any policies to restrict the credential. For more information, see Edit credential policies in the Foglight Administration and Configuration Help.
6 Click
Next.
7 Review the information on the Summary page.
If necessary, click
Previous to correct any of the required settings.
Otherwise, click
Finish.
A message box opens, indicating the status of the agent creation. If any errors occur, an error message appears in this box.
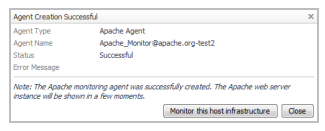
8. Optional — If you have installed Foglight for Infrastructure, and you want to also monitor the host infrastructure, click
Monitor this host infrastructure. The Add Monitored Host wizard opens. For detailed information about this wizard, see Adding a monitored host in the
Foglight for Infrastructure User and Reference Guide.
Otherwise, click
Close.
The dashboard refreshes. Depending on the collection schedule, it may take a few minutes for data to appear.
Configuring host monitoring
If the web server host is not monitored, no information is available in the OS Type box on the web server summary and detail views.
To add host monitoring:
1. On the navigation panel, under Dashboards, click Apache.
2. On the Apache Web Server Monitoring dashboard, click the server name in All Apache Web Servers list.
3. In the Web Server Information section, click the Host box. The Host Monitoring dashboard opens.
4. Click Configure Host Monitoring and complete the wizard to add a host monitoring agent. For more information about host monitoring, see Adding a monitored host in the Foglight for Infrastructure User and Reference Guide.
Configuring how the Apache agent resolves host names
By default, the Apache agent attempts to resolve the host name of the monitored web server. However, sometimes, this is not the preferred host name. In such cases, you can add a mapping to define the host name.
To configure a list of predefined host names:
1 On the navigation panel, under Dashboards, click Administration | Agents | Agent Status.
2. On the Agent Status dashboard, select the Apache agent that you want to configure and click Edit | Edit Properties.
3. Click Modify the private properties for this agent.
4. In the Predefined Host Names section, click Edit.
5. In the box that opens, click Add Row.
6. Type the name or IP address of the host in the first box.
7. Press Tab to move to the second box and type the predefined name.
8. Click Save Changes.
Configuring the IntelliProfile ready time
IntelliProfile requires a certain amount of time to establish an accurate profile for the Apache agent. The default ready time (24 h) may not be long enough, and may generate excess warnings on the Web Server Throughput rule in particular.
To adjust the IntelliProfile ready time for the Apache agent:
1. On the navigation panel, under Dashboards, click Administration | Data | IntelliProfile.
2. Increase the IntelliProfile ready time to one week (168 h). In the General section of the IntelliProfile dashboard, type the value 168 in the IntelliProfile is ready after first [ ] hours of work box.
After changing this setting, IntelliProfile can establish a more accurate profile and therefore trigger fewer false alarms.
3. Click Save Changes.
