You can execute automation scripts on demand from the Automation window or the Project Manager. You can also schedule scripts to run on a recurring basis at a specific time. For example, schedule a script that performs long-running tasks to run when database activity is light.
When you schedule a script in Toad, the Job Manager creates a Windows scheduling task. Scheduled scripts run in batch mode. If using another scheduling application, specify "-batch=true" in the command. This executes the script in non-visual (batch) mode. See the procedure below.
To execute a script from the Automation window
Click Run in the Wizard bar. The script is compiled and executes immediately.
To view the script's execution log, select the Log tab.
If you want to schedule the script, first resolve any problems that caused activities to fail or disable failed activities. An activity can be disabled from its Activity Info window.
Tip: To execute a script from the Project Manager, right-click the script and select Execute.
To schedule an automation script
Note: To run a scheduled script against a password-protected database, the password must be saved in the Connection Properties dialog.
To execute a script in batch mode
To start Toad and execute a script in batch mode (non-visual mode), enter the following command and arguments:
<path to the toad.exe application> -batch=true “<path to Automation script>”
For example:
C:\Program Files\Quest Software\Toad Data Point 6.4.1\toad.exe -batch=true "<path\scriptfilename.tas>"
Notes:
The Automation module is disabled if Toad was installed with the Prohibit saving passwords option selected.
To configure Toad to use SMTP Emails, we need to get the main data from the following third parties:
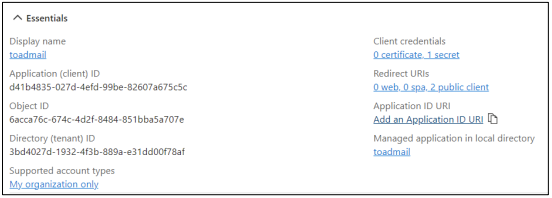

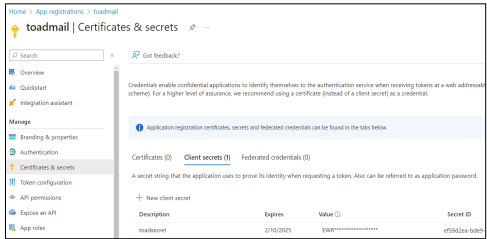


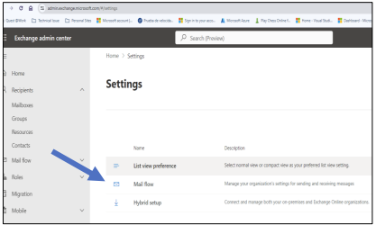
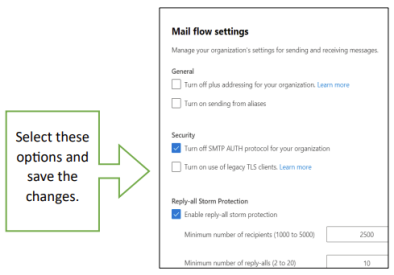
This refers to the setting from the MS Entra ID | Enterprise Application registration, NOT from App Registration. To do this it’s necessary to run these PowerShell commands in the order below:
NOTE: The OBJECT_ID is the Object ID from the Overview page of the Enterprise Application node (Azure Portal) for the application registration. It is not the Object ID from the Overview page of the App Registrations node. Using the incorrect Objec ID will cause an authentication failure.
New-ServicePrincipal -AppId d41b4835-027d-4efd-99be-82607a675c5c -ObjectId 779826e8-397c-4c74-b3a5-c874c82ed4af <-- This is the Object_ID from Enterprise ApplicationAdd-MailboxPermission -Identity "toad@questmail.onmicrosoft.com" -User d41b4835-027d-4efd-99be-82607a675c5c -AccessRights FullAccessGet-ServicePrincipal | flSet-CASMailbox -Identity toad@questmail.onmicrosoft.com -SmtpClientAuthenticationDisabled $falseGet-CASMailbox -Identity toad@questmail.onmicrosoft.com | Format-List SmtpClientAuthenticationDisabled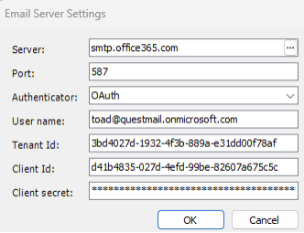
Toad Data Point 6.4.1 introduces the ability to import or export data directly from and to SharePoint Online Server using the Import/Export Wizard.
This guide walks you through exporting data to CSV or Excel files stored on SharePoint Online Server.
1. Launch the Export Wizard
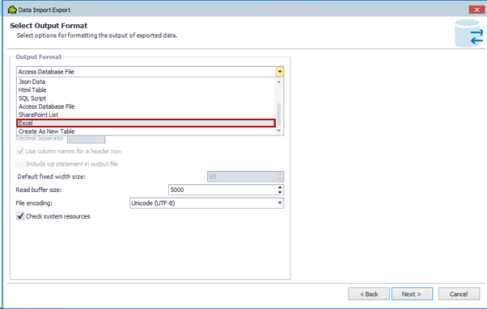
2. Select Output Format
• Choose either Comma Separated Values (CSV) or Microsoft Excel as your output format
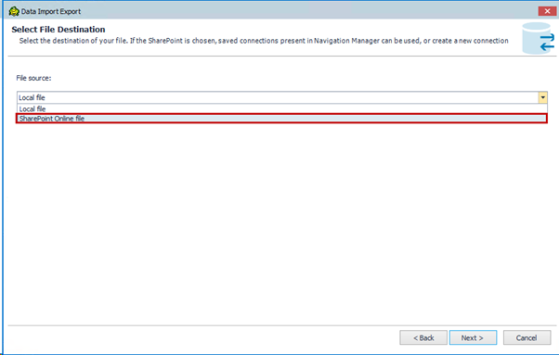
3. Choose a SharePoint Online file option in the Select File Destination step
• From the File Sources drop-down list, select SharePoint Online file
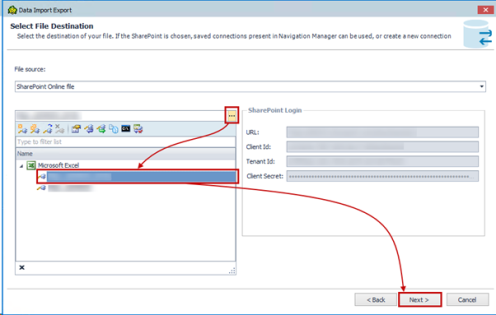
4. Select or create a SharePoint Online Server connection
Note: Based on the chosen Output format, only connection to that type will be listed – if it is Excel selected, only the Excel connections will be listed.
If you have an existing SharePoint Online Server connection:
• Click the Eclipse button (...) in the Select a connection field
• Choose your connection from the list
• Click Next to continue
If you need to create a new connection:
• Click Create to open the Connection dialog
• In the Connection group, select either Microsoft Excel or CSV file, depending on your export format
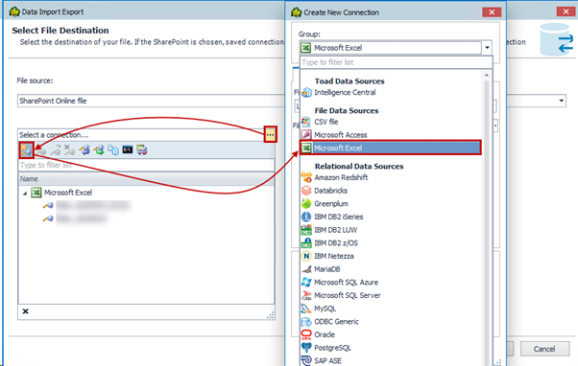
• In the File source drop-down, choose SharePoint Online file
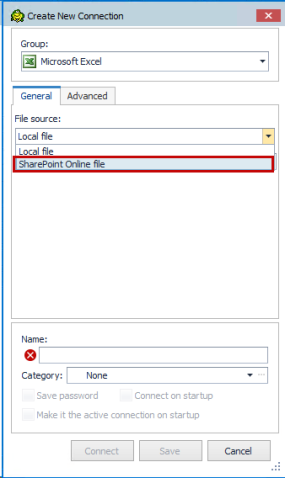
• Fill in the required connection parameters:
o SharePoint URL
o Client Id
o Tenant Id
o Client Secret
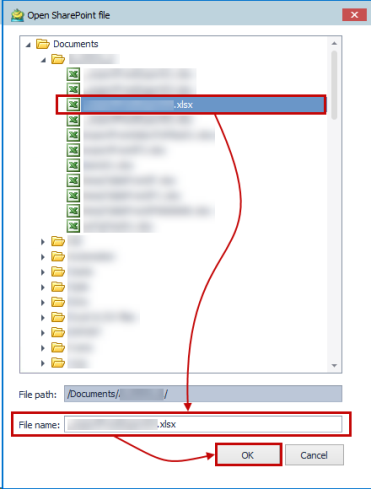
• Select a file from the SharePoint Online Server
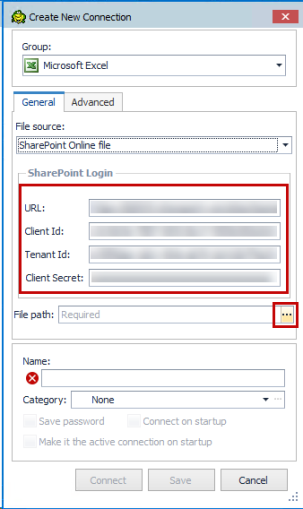
Note: Since the Excel connection is selected, only Excel files will be listed. If you choose the CSV connection, only the CSV files will be listed.
• Click Connect

Your new connection is automatically saved and will appear in the Navigation or Connection Manager tab for future use.
Note: A file must be specified to establish the connection, but you can change it or create a new one in the next step, the Select Output Options step.
5. Specify an Excel or CSV file to export your data
After a successful connection, you'll reach the Select Output Options step. You can:
o Choose an existing file on the SharePoint Online Server (already specified through connection, or you can choose a different one) or
o Create a new file directly from this interface
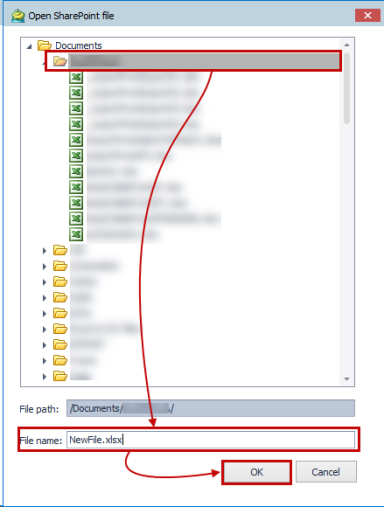
To create a new file:
1. Click the Eclipse button at the end of the Excel file field
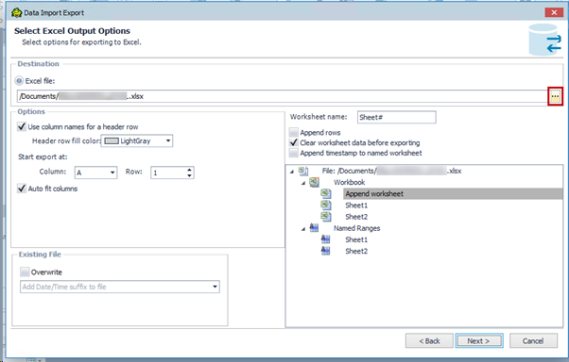
2. Select folder where you want to save an Excel or CSV file on SharePoint Online Server and in the File name field, type the desired name for your new file
3. Click OK to proceed
4. The data will be exported into this new file on SharePoint Online Server
Continue through the wizard to finalize and complete your data export.
This guide walks you through importing data from CSV or Excel files stored on SharePoint Online Server.
1. Launch the Import Wizard
2. Select Add file option

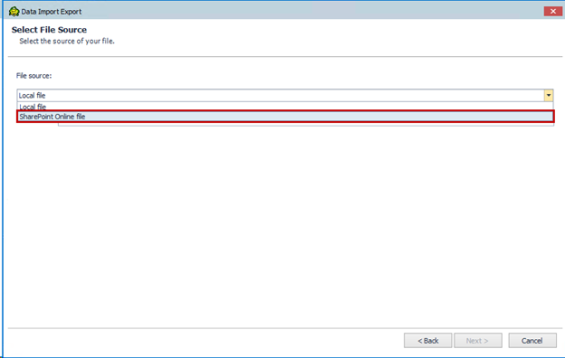
3. Choose a SharePoint Online file option in the Select File Source step
• From the File Sources drop-down list, select SharePoint Online file
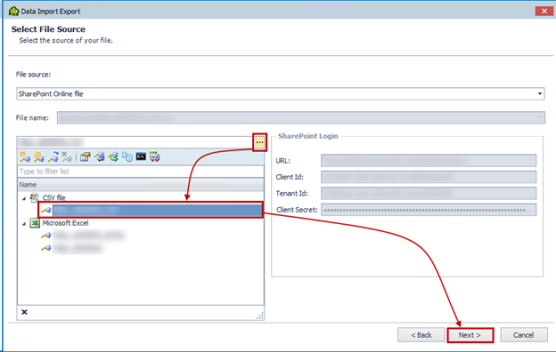
4. Select or create a SharePoint Online Server connection
If you have an existing SharePoint Online Server connection:
• Click the Eclipse button (...) in the Select a connection field
• Choose your connection from the list
• Click Next to continue
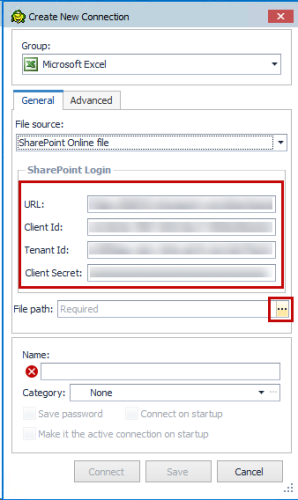
If you need to create a new connection:
• Click Create to open the Connection dialog
• In the Connection group, select either Microsoft Excel or CSV file, depending on your export format

• In the File source drop-down, choose SharePoint Online file

• Fill in the required connection parameters:
o SharePoint URL
o Client Id
o Tenant Id
o Client Secret
• Select a file from the SharePoint Online Server

• Click Connect
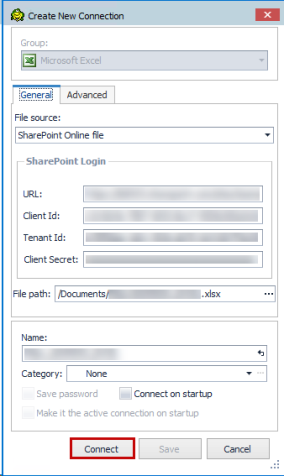
Your new connection is automatically saved and will appear in the Navigation or Connection Manager tab for future use.
Continue through the wizard to finalize and complete your data import.
No matter if you export or import data, once done, your data will be available in the specified database - ready to share, analyze, or integrate.
