The Active Directory migration scenario assumes you need to migrate only user accounts and resources (such as end-user workstations, file and print servers, and BackOffice servers) to another domain in the same or a different Active Directory forest. Either Exchange Server is not installed in the source forest or for some reason you do not want to migrate Exchange data to the target.
The Active Directory Migration scenario is illustrated in the figure below:
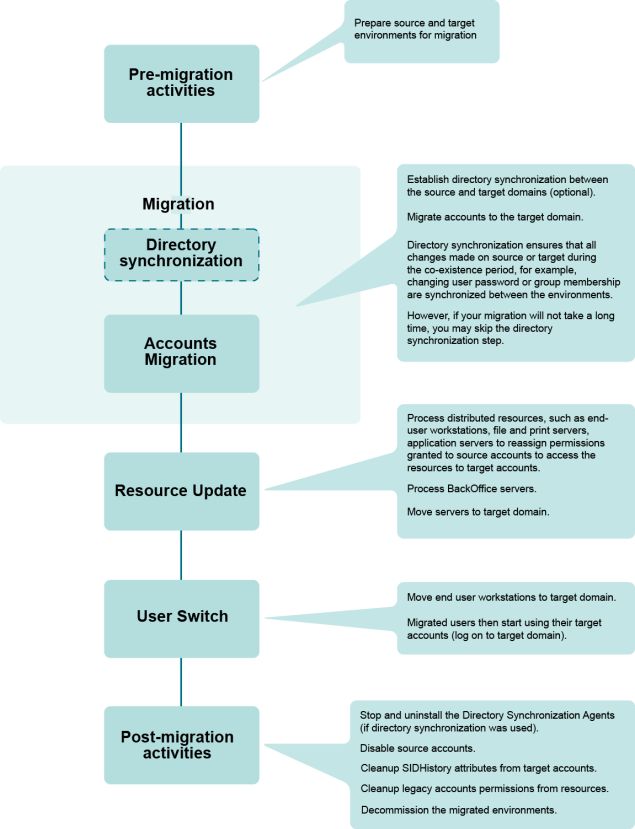
Figure 1: Overview of Active Directory migration process.
To migrate Active Directory, complete the following steps.
Migrate the directory. Migrate accounts from the source to the target domain in migration sessions. You can delegate rights to perform the account migration to the other administrators in your environment.
Process distributed resources. Update distributed resources, such as end-user workstations, file and print servers, and application servers using Resource Updating Manager, adding permissions to the resources for the target users. When user workstations are updated, user profiles should also be updated, so the migrated users will get the same profile as the corresponding source users when they log on to the target domain for the first time. You can delegate rights to perform resource update to other administrators.
Move end-user workstations and servers to the target domain. This step is actually the user switch, because when you move a workstation to a target domain using Resource Updating Manager, the last logged-in domain on users’ workstations is changed from the source to the target domain and thus users start to log in to the target domain. Move file and print servers and other application servers that have been processed by Resource Updating Manager to the target domain.
|
|
NOTE: Migration of the users can be performed in batches. If you choose this approach, repeat steps 2 through 4 for each group of users you migrate. |
The following are the important issues to consider when synchronizing directories:
Do You Need to Synchronize the Directories?
Depending on your project requirements, you may or may not use the ongoing directory synchronization capabilities. You can skip this step if you are going to migrate a small number of objects from one Active Directory forest to another and the coexistence period (when there are active user accounts in both the source and target environments) is expected to be short (for example, a weekend).
However, directory synchronization is required if any of the following applies:
We recommend that you establish directory synchronization between source and target domains to ensure that objects’ properties are kept in sync and changes made to the objects in one directory are replicated to another directory.
Should You Choose One-Way vs. Two-Way Directory Synchronization?
In most cases, you only need one-way directory synchronization to be established between the source and the target domain and directed from source to target. This is the case when you migrate objects in groups to the target domain while continuing administration only on the source (make changes only to source objects) during the whole coexistence period. One-way directory synchronization ensures that all changes made to the source objects (such as passwords and group membership) that have been migrated to the target are replicated to the target directory.
However, sometimes two-way directory synchronization is needed. This is the case when two production directories are merged (for example, when two different companies merge), administration is performed on both sides simultaneously, and you want changes made to the objects on either side to be replicated to the other side.
Should You Have the Directory Synchronization Agent Create the Objects?
The Directory Synchronization Agent matches source and target objects by the criteria you specify. However, if the agent cannot find a matching object in the directory (no matching criterion is met), it can create one and then synchronize object properties.
The best practice for the Active Directory Migration scenario is to establish ongoing directory synchronization between the domains without object creation capability and to migrate the objects from the source to the target domain using migration sessions.
The other benefits of creating objects in the target domain by migrating them in migration sessions are:
The properties of the migrated objects will then be kept in sync by the Directory Synchronization Agent.
Keep in mind that if you establish directory synchronization and do not allow the Directory Synchronization Agent to create objects in the target directory, this does not prevent the Directory Synchronization Agent from searching for target objects that match the source objects by the matching criteria specified. If the agent finds a matching object for the source object in the target domain, it will merge and synchronize these objects regardless of whether the object was migrated in a migration session.
However, if you are going to implement the Exchange migration scenario, you may want to allow the Directory Synchronization Agent to create the disabled mailbox-enabled objects in the target domain. For more information about the Exchange migration scenario, refer to the Exchange Migration topic.
Using Migration Sessions
Migrate the accounts from one source domain to another using migration sessions.
Depending on your project requirements, you can migrate accounts in one or more migration sessions. You can also delegate account migration to other administrators by creating and pre-configuring the delegated migration sessions. For more information about delegated migration, refer to the Delegating Migration Activities topic earlier in this document.
We recommend migrating user accounts and groups together in one session in order to transfer group membership to the target accounts during a session. However, if you plan to migrate user accounts and groups in portions using multiple sessions, we recommend you use the following order to successfully transfer group membership information:
If you migrate groups before users, group membership may not be resolved if a user account that is a member of the source group is not yet migrated to the target domain. Additional steps will be required to update group membership on the target after the user account is migrated, such as re-migrating and merging groups or running full directory resynchronization (if directory synchronization is established for that pair of domains).
Adding SIDHistory
We also recommend that you always add the SIDHistory attribute to the target accounts. This greatly helps to ensure that there is no impact to end users during the co-existence period of two environments, making your migration smoother.
Migrating Other Active Directory Objects and Preserving OU Hierarchy
Migration Manager allows you to migrate not only user and group accounts, but also other Active Directory objects, including organizational units (OUs), contacts, print queues, shares, and computers. If you want to preserve the existing OU hierarchy, select the OUs that you want to create in the target domain as well as objects to be migrated within these OUs.
Migrating Computer Accounts
We also recommend you select and migrate computer accounts in migration sessions. This allows you to specify the target OU where computer accounts will reside. When you later move computers from the source to the target domain, the existing (migrated) computer accounts will be used and no new computer accounts will be created in the default Computers OU in the target domain. You can also use these migration sessions to populate the computer list in Resource Updating Manager later with the computers to be processed. This eliminates the need to select individual computers that must be updated from all computers in the source domain.
Distributed resources are end-user workstations, file and print servers, servers running IIS, scheduled tasks, and other services and applications. To ensure that resources will still be available to users when they start using their target accounts and when you have cleaned up SIDHistory, permissions granted to source accounts to access the resources must be re-assigned to the target accounts.
Service accounts and accounts used to run scheduled tasks must also be changed to the corresponding target ones to ensure that services and scheduled tasks will run correctly after the source accounts are disabled.
|
|
NOTE: Service accounts should be handled separately since the server must be restarted to use the new account. You must coordinate this activity before disabling the source account or the service may stop running. You can use the Services not Running as System Account report to determine which accounts are used to launch services other than local system on the selected computers. |
Update Methods
In order to re-assign user rights and permissions set to the objects, update local group membership, and change service and scheduled tasks’ accounts, distributed resources must be updated. You can do this in any of the following ways:
Items that Can be Updated
The following items can be updated:
"Leave Source Accounts' Permissions" Option
We strongly recommend selecting the Leave source accounts’ permissions option when updating the resources. This ensures that source users will still be able to access the resources after they have been processed. Then if you need to roll back and use your source accounts again, rollback will be immediate and therefore have no impact on source users. The permissions for these legacy accounts can be cleaned up after the migration is over (see step 10 below).
Factors to Consider
Here are the factors to keep in mind when doing the resource updating:
Accordingly, it is recommended that you create separate groups for end-user workstations and servers and that you process workstations first and then servers. See the Resource Updating Manager online help for details.
You may also want to perform server processing during non-business hours to ensure that no users are affected by a possible server slowdown.
Creating a Computer List
In Resource Updating Manager you can create the computer list in either of the following ways:
Administrative Rights
Administrative rights over the resources are required for successful resource updating (see the Quest Migration Manager - System Requirements and Access Rights document). To obtain administrative rights you can do any of the following:
|
|
NOTE: By default, if the computer has been joined to the domain, the Domain Admins group of the domain is a member of a computer’s local Administrators group. You will get administrative access to the computer if the account you are using is a member of the source Domain Admins group. |
Server Service
Server service is automatically installed when you install the File and Printer Sharing service on the computer.
Server service must be running on a computer in order for it to be updated from either Resource Updating Manager or the command-line updating tool VMover.exe.
If for some reason (for example, due to your corporate policy) Server service is not allowed to run on the computers, you need to install or enable Server service temporarily, update the computers, and then disable or uninstall the service.
Client-side Firewalls
In Windows XP Service Pack 2, Microsoft introduced the Security Center, which includes a client-side firewall application. The firewall is turned on by default and configured to filter the packets sent to ports 137–139 and 445. These ports are used by the File and Printer Sharing service that must be installed and running on the computer to be updated.
In order to successfully update Windows XP Service Pack 2 computers from Resource Updating Manager, the File and Printer Sharing service must be added to the firewall Exceptions list and ports 137–139 and 445 must be unblocked.
If the File and Printer Sharing service was installed and running on a computer and a shared folder or printer were then created on that computer, these ports will remain open after you apply Service Pack 2 on Windows XP computer. However, if there were no shared folders or printers created prior to Service Pack 2 installation, these ports will be blocked. You need to make sure that ports 137–139 and 445 are not blocked by the firewall.
To install the File and Printer Sharing service:
To unblock the ports used by the File and Printer Sharing service:
Command-line Updating
If for some reason you cannot use the agents to update computers from Resource Updating Manager, you can update the computers locally, using the command-line updating tool VMover.exe.
VMover.exe is located in the Aelita Shared\Migration Tools\Resource Updating\Agent subfolder of the Migration Manager installation folder (64-bit VMover.exe is located in the x64 subfolder). The update can be performed either directly from the command line or via a logon script.
To perform the updates, VMover retrieves the source-target account pairs from the INI file. This file can be created in Resource Updating Manager.
When using the INI file, VMover will perform the updates for all accounts migrated by that time the INI file was created.
Refer to the Quest Migration Manager for Active Directory Resource Processing Guide for more details.
Centralized Resource Update
Use Resource Updating Manager for centralized resource update. Determine the processing scope, i.e. select the computers on which you want to update resources. For that, you should create collections and include computers you want to process (for example, all workstations or all servers). Each collection will contain the computers to be processed, and the set of processing settings. You can create as many collections as needed. Remember to obtain administrative rights over the resources. For details, refer to Resource Updating Manager help.
Delegated Resource Update
We recommend you use delegated resource updating in sites or resource domains where you cannot get administrative access to computers.
Delegated and decentralized resource updating is useful if computers to be updated are located across a slow WAN connection and therefore sending multiple agents, no matter how small, would consume too much of the available bandwidth.
You can delegate the resource updating tasks to the remote site or to other domain administrators who have the required level of access and are located within an area of good connectivity to the computers to be updated.
Resource updating can be delegated by exporting the INI file and performing resource updating using this file by running the updating tools in stand-alone mode or running resource updating from the command line
Delegating Resource Processing Tasks
To delegate a task to other administrators
|
|
NOTE: You can create the resource processing tasks for:
If you select Resource Updating Manager to perform distributed resource updating, the Resource Updating Manager will start. However, the task of that type is not created in the Tasks container. |
After the task is delegated, the delegated administrator can start Migration Manager from his or her location, connect to the migration project, select the task in the tree he or she was delegated rights to, configure the task (for example, specify the resources to be processed by the task), and run the task.
Creating Task Setup Packages
The setup package is a standard MSI installation file. There are two types of the setup packages:
To create an MSI installation file for the task
Delegating Resource Update Using INI Files
Delegated resource updating can be performed by delegated administrators using the INI files received from the migration administrator.
Updating User Profiles
A user profile consists of two parts: the key in the system registry and the folder on a hard disk that contains user-specific data, desktop settings, and a registry hive stored in NTUSER.DAT file. Depending on where user data is stored (on a local hard disk or server), user profiles can either be local or roaming.
When a user configured with a roaming profile logs on to a workstation for the first time, a local copy of the roaming profile is created on the workstation. NTUSER.DAT is copied from the roaming profile folder to the corresponding local one as well.
User profiles (profile folders and registry keys for both local and roaming profiles) get updated when you run distributed resource updating from Resource Manager and select both the Local profiles and Roaming Profiles options.
After processing, the profiles are shared between the source and target user accounts. As a result, target users will use the same profiles as the corresponding source users do.
|
|
NOTE: You can use the ExportProfile utility from the Migration Manager Resource Kit to associate the current source user's profile with his or her future (migrated) account. However, this does not grant the new account the permissions needed to use the profile. This has to be done by running distributed resource updating. Refer to the Quest Migration Manager for Active Directory Resource Kit - User Guide for more details on the ExportProfile utility. |
Enabling the “Cross-Forest User Policy and Roaming User Profiles” Policy
If the end-user workstations are running Windows 2000 SP4 or higher, you should enable the Allow Cross-Forest User Policy and Roaming User Profiles policy before you move the workstations to the target domain. This is to allow users to use roaming profiles stored on a server that is still a member of the source domain.
You can configure this policy either locally on the client workstation or by using a domain or organizational unit-based Group Policy object (GPO). To do this locally on a workstation, complete the following steps:
For more details on user policies, refer to Microsoft Knowledge Base article 823862 at http://support.microsoft.com/default.aspx?scid=kb;en-us;823862.
Troubleshooting User Profile Update
Many system and service processes work on the workstation on behalf of users (for example, printer drivers and virus scanner services). If such a process does not properly close handles to the user profile hive it used, then the profile cannot be correctly unloaded when the user logs off. In addition, failure to close handles causes a problem with updating of the user profile: if the profile is locked by any service during processing, then the user may get a brand new profile when he or she logs on to the system with the target account for the first time after the workstation has been processed.
The User Profile Hive Cleanup Service (UPHClean) by Microsoft is intended to help troubleshoot such issues. For more information about UPHClean, refer to the following documents:
To download UPHClean, use the following link:
http://www.microsoft.com/downloads/details.aspx?FamilyId=1B286E6D-8912-4E18-B570-42470E2F3582
Update Cluster Servers
Migration Manager is capable of re-permissioning a Microsoft cluster. However, it requires a more involved procedure than what is required by non-clustered servers. Refer to the Cluster Server Migration section of the Quest Migration Manager for Active Directory—Resource Processing Guide for a detailed procedure on how to migrate Microsoft cluster servers with Migration Manager.
Resource Updating Troubleshooting
Workstations
After you run the updating session, some computers you specified may not be successfully updated. The computer may be turned off or inaccessible by the network from your location (network connectivity problems), or you may not have enough rights to connect to it, and so on. Resource Updating Manager allows you to sort computer objects by last error status. If a computer was processed successfully, the last error field is empty and the computer can be removed from the list. Otherwise, you will see error descriptions. The typical errors are:
You need to diagnose each situation separately. Use the ping <ComputerName>, ping <Computer_IP_Address> and nslookup commands to determine whether you have a name-resolution problem or whether the computer is turned off or cannot be accessed by the network from your location.
Servers
We recommend you update servers during non-business hours to ensure that end users will not be affected by a possible decrease in server performance.
After adding servers to the Resource Updating Manager and starting the updating, wait for all computers to finish even if some have errors. Once the processing is finished, use the sort feature on the column headings to sort computers by problem, fix the problems, and start the updating again for only those computers.

