Tchater maintenant avec le support
Tchattez avec un ingénieur du support

KACE Systems Management Appliance 14.0 Common Documents - Administration Guide

About the KACE Systems Management Appliance Getting started
Configuring the appliance
Requirements and specifications Power-on the appliance and log in to the Administrator Console Access the Command Line Console Tracking configuration changes Configuring System-level and Admin-level General Settings Configure appliance date and time settings Managing user notifications Enable Two-Factor Authentication for all users Verifying port settings, NTP service, and website access Configuring network and security settings Configuring session timeout and auto-refresh settings Configuring locale settings Configuring the default theme Configure data sharing preferences About DIACAP compliance requirements Configuring Mobile Device Access Enable fast switching for organizations and linked appliances Linking Quest KACE appliances Configuring history settings Configuring Content Security Policy
Setting up and using labels to manage groups of items Configuring user accounts, LDAP authentication, and SSO Deploying the KACE Agent to managed devices Using Replication Shares Managing credentials Configuring assets
About the Asset Management component Using the Asset Management Dashboard About managing assets Adding and customizing Asset Types and maintaining asset information Managing Software assets Managing physical and logical assets Maintaining and using manual asset information Managing locations Managing contracts Managing licenses Managing purchase records
Setting up License Compliance Managing License Compliance Setting up Service Desk Configure the Cache Lifetime for Service Desk widgets Creating and managing organizations Importing and exporting appliance resources
Managing inventory
Using the Inventory Dashboard Using Device Discovery Managing device inventory
About managing devices Features available for each device management method About inventory information Tracking changes to inventory settings Managing inventory information Finding and managing devices Registering KACE Agent with the appliance Provisioning the KACE Agent Manually deploying the KACE Agent Using Agentless management Adding devices manually in the Administrator Console or by using the API Forcing inventory updates Managing MIA devices Obtaining Dell warranty information
Managing applications on the Software page Managing Software Catalog inventory
About the Software Catalog Viewing Software Catalog information Adding applications to the Software Catalog Managing License assets for Software Catalog applications Associate Managed Installations with Cataloged Software Using software metering Using Application Control Update or reinstall the Software Catalog
Managing process, startup program, and service inventory Writing custom inventory rules
Deploying packages to managed devices
Distributing software and using Wake-on-LAN Broadcasting alerts to managed devices Running scripts on managed devices Using Task Chains
Patching devices and maintaining security
Using the Security Dashboard About patch management Subscribing to and downloading patches Creating and managing patch schedules Managing patch inventory Managing Windows Feature Updates Managing Dell devices and updates Managing Linux package upgrades Manage quarantined file attachments
Using reports and scheduling notifications Monitoring devices
Getting started with monitoring Working with monitoring profiles Managing monitoring for devices Working with alerts
Using the Service Desk
Configuring Service Desk Using the Service Desk Dashboard Managing Service Desk tickets, processes, and reports
Overview of Service Desk ticket lifecycle Creating tickets from the Administrator Console and User Console Creating and managing tickets by email Viewing tickets and managing comments, work, and attachments Merging tickets Using the ticket escalation process Using Service Desk processes Using Ticket Rules Run Service Desk reports Archiving, restoring, and deleting tickets Managing ticket deletion
Managing Service Desk ticket queues About User Downloads and Knowledge Base articles Customizing Service Desk ticket settings Configuring SMTP email servers
Maintenance and troubleshooting
Maintaining the appliance Troubleshooting the appliance
Appendixes Glossary About us Legal notices

About license upgrades

About license upgrades

Application maintenance plans often enable users to upgrade to newer versions of applications when those versions become available, and the License Compliance page shows the number of installations that are considered to be upgrades.

To track upgrades, the appliance uses the information in the Software Catalog and the license details to determine whether to associate new versions of applications with existing licenses. For example, if a License asset was created for the 1.0 version of an application, and the maintenance plan entitles users to upgrade, the 2.0 version of the application is automatically covered by the License asset when it is released. In this example, the License asset must be configured as follows:

The Includes Maintenance field must be set to Yes.
The Maintenance Expiration Date must be later than the version 2.0 GA (General Availability) date in the Software Catalog.
The License Mode must be Enterprise or Unit License.
The Include Upgrade Rights must be set to Yes or Yes - Select from list.

For more information about these settings, see Add License assets for Software Catalog inventory.

About license downgrades

About license downgrades

Vendors often allow users to apply licenses for newer versions of applications to older versions, and these types of installations are referred to as downgrades. The License Compliance page shows the number of installations that are considered to be downgrades.

License seats are first allocated to installations of the latest version of the application. If additional seats are available, and if the vendor allows downgrades, the seats are automatically allocated to installations that are considered downgrades.

Licenses for upgrades are always allocated before licenses for downgrades.

Customize the License Asset Type

Customize the License Asset Type

You can add, change, or delete the fields available to the License Asset Type as needed. The License Asset Type is the template that determines the fields available when you add License assets.

If the Organization component is enabled on your appliance, you customize the License Asset Type for each organization separately.

1.
Go to the Asset Types list:
a.
Log in to the appliance Administrator Console, https://appliance_hostname/admin. Or, if the Show organization menu in admin header option is enabled in the appliance General Settings, select an organization in the drop-down list in the top-right corner of the page next to the login information.
b.
On the left navigation bar, click Asset Management, then click Asset Types.
2.
In the Name column, click License to display the Asset Type Detail page.
3.
In the Default Asset Status field, enter a default asset status, or a custom one (if they exist).
Active: Any asset that is deployed, active, or in use.
Disposed: An asset that is no longer available for use.
Expired: A software license or contract asset that has expired.
In Stock: A recently received asset.
Missing: Any asset that cannot be located.
Repair: An asset that is being repaired.
Reserved: An asset that is set aside for a specific person or use.
Retired: Any asset that reached its end-of-life state, or is no longer in use.
Stolen: An asset that has been reported as stolen.
4.
In the Name field, type the name of the Asset Type.
5.
Optional: In the For License Compliance Reporting section, select the fields to use for License Compliance.
Information from the selected License Mode field appears on the Dashboard License Compliance widget.
In the License Mode Field drop-down list, keep the default as Select Field. This makes all of the values in the License Mode Field available for License Compliance. If you have more than one single-select or multiple-select field on the Asset Fields list, the first field that appears on the list, and all of its values, is used in the License Compliance widget.
In the License Mode Field drop-down list, select a field, such as License Mode, to be used for License Compliance. By default, this drop-down list contains a single field, but you can add fields as needed. If you select a field, such as License Mode as shown in the following illustration, only the selected field is used for License Compliance.The drop-down list for License mode appears to the left of the section

In addition, when you select a field, you can choose the values, if any, you want to ignore in the License Compliance chart. Values that are ignored are listed at 100 percent usage and displayed in gray.

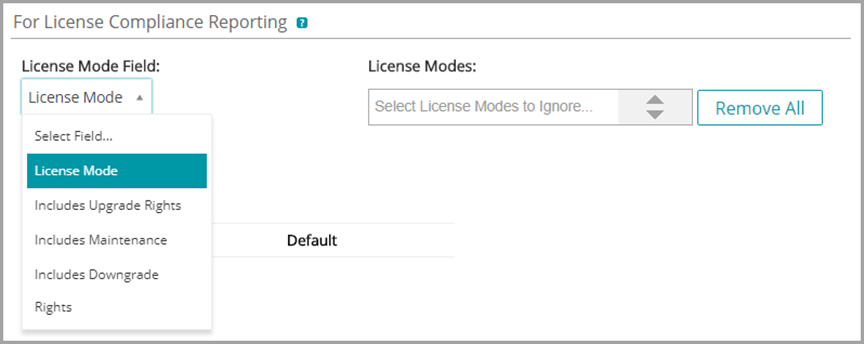
By default License Mode is the only single- or multiple-select field available, so it is the only field listed. If you add single- or multiple-select fields on the Asset Fields table, they appear in this list as well, and they appear on the Asset Detail page when you add a License asset. However, only the selected field, or the first field on the Asset Fields list, is used in the License Compliance widget.

7.
Optional: Modify the License Mode field or values on the Asset Fields table.
a.
Click the Edit button at the end of a row: .
c.
To add a field, click the Add button in the table heading: . Add field information, then click Save at the end of the row.
e.
To remove a field, click Delete button: .
8.
Click Save at the bottom of the page.

Add License assets for Software Catalog inventory

Add License assets for Software Catalog inventory

You can add License assets for applications in the Software Catalog inventory. Adding License assets enables you to view license compliance information on the License Compliance list and on the License Compliance Dashboard widget.

Software Catalog applications must be classified as Discovered, Not Discovered, or Locally Cataloged. You cannot add License assets for applications classified as Uncataloged.

When you associate License assets with applications, you can also view license information on the Software Catalog Detail page. If the Organization component is enabled on your appliance, you manage license information for each organization separately.

1.
Go to the Software Catalog list:
a.
Log in to the appliance Administrator Console, https://appliance_hostname/admin. Or, if the Show organization menu in admin header option is enabled in the appliance General Settings, select an organization in the drop-down list in the top-right corner of the page next to the login information.
b.
On the left navigation bar, click Inventory, then click Software Catalog.
2.
3.
Near the bottom of the page, in the License section, click Add New License to display the License Asset Detail page.
4.
On the License Detail page, on the General tab, provide the following information:

Option

Description

Name

The name of the license, such as Office Professional PO #1234. This is the name that you use to find the asset. If you plan to have multiple licenses associated with an application, provide the purchase order number or purchase date in the fields below to differentiate the licenses.

License Subtype

The Asset Subtype to associate with the license. See About Asset Subtypes, custom fields, and device detail preferences.

Asset Status

The license status, if applicable. You can select a default asset status, or a custom one (if they exist). A default installation of the appliance includes the following asset statuses:

Active: Any asset that is deployed, active, or in use.
Disposed: An asset that is no longer available for use.
Expired: A software license or contract asset that has expired.
In Stock: A recently received asset.
Missing: Any asset that cannot be located.
Repair: An asset that is being repaired.
Reserved: An asset that is set aside for a specific person or use.
Retired: Any asset that reached its end-of-life state, or is no longer in use.
Stolen: An asset that has been reported as stolen.

For more information, see View and configure asset lifecycle settings.

Location

The name of the location where the asset is located. See Managing locations.

License Count

The number of installations or seats the license allows. For example, 50.

Applies to Cataloged Software

Applications in the Software Catalog inventory to which the license applies. You can associate License assets with multiple applications in the Software Catalog if necessary. However, it is not necessary to associate a License asset with multiple versions of the same application because the appliance does this automatically to support upgrades and downgrades. You can simply associate the current version with the License asset when you add the license information.

In addition, if you assign applications from different publishers, such as Microsoft Office and Adobe Acrobat, to the same License asset, the total number of seats specified in the License asset is assigned to each application. For example, if the License asset has 100 seats, both Microsoft Office and Adobe Acrobat are assigned 100 seats.

Applies to Software

Leave this field blank. A software license cannot be associated with applications from the Software Catalog inventory and the Software page inventory at the same time. For more information on how to create license assets for cataloged software, see Add License assets for Software page inventory.

License Mode

The mode of the License asset. For applications that require licenses, and to display license usage information on the License Compliance page, select either Enterprise or Unit License.

NOTE: Most modes, including Not Specified, Client License, Subscription, Shareware, Freeware, OpenSource, No Licensing, and Site License, are not used for License Compliance.

The license mode is used in these sections of the Administrator Console:

The License Compliance chart that is displayed on the Dashboard. Values that are marked as ignored on the Asset Detail page are shown with a usage level of 100 percent. See About Dashboard widgets.
5.
On the License Detail page, on the Purchase tab, provide the following information:

Option

Description

Contract

The contract asset associated with the license.

Product Key

The product key associated with the license. You can modify and edit the default information, which can be captured for a License Asset Type.

Unit Cost

The unit cost associated with the license. You can modify and edit the default information, which can be captured for a License Asset Type.

Vendor

The name of the Vendor asset you want to associate with the application. the Vendor drop-down list is empty unless you have added a Vendor asset. To search for a vendor, begin typing in the list.

Purchase Order Number

The purchase order number associated with the license.

Purchase Date

The date the purchase was made. Click in the field, then select a date on the calendar.

Purchase

Select one or more purchase records associated with this license. See Managing purchase records.

6.
On the License Detail page, on the Maintenance tab, provide the following information:

Option

Description

Includes Upgrade Rights

Indicates if the license includes upgrade rights. Upgrade rights refer to the ability to upgrade to a newer version of the licensed software, when such versions become available. For more information, see About license upgrades. Select one of the following options:

Yes: Upgrade rights are calculated by comparing the number of existing licenses for the selected software with the counts of available licenses for newer versions of the same software.
Yes - Select from list: Choose one or more software versions for which you want to grant upgrade rights. Under Upgrade Software list, click Select cataloged software to add. The list that appears is populated with higher versions of the selected software to which the license can be upgraded. When you click an entry in the list, your selection appears in the Upgrade Software list box. You can add one or more versions, as needed. To delete an item from the list, select it in the Upgrade Software list box, and click Remove.
No: If you do not want to grant upgrade rights to the selected software, select this option.

Includes Maintenance

Whether the license entitles users to upgrade the installed version of the application. See About License Compliance for Software Catalog applications.

Expiration Date

If the license includes maintenance, the expiration date of the maintenance period.

The appliance License Compliance feature leverages Software Catalog information, such as application release dates. If new application versions are released during the maintenance period, they are automatically covered by this License asset.

Includes Downgrade Rights

Indicates if the license includes downgrade rights. Downgrade rights refer to the ability to apply licenses for newer software versions to older versions of the same software. For more information, see About license downgrades. Select one of the following options:

Yes: Downgrade rights are calculated by comparing the number of existing licenses for the selected software with the counts of available licenses for older versions of the same software.
Yes - Select from list: Choose one or more software versions for which you want to grant downgrade rights. Under Downgrade Software list, click Select cataloged software to add. The list that appears is populated with lower versions of the selected software to which the license can be downgraded. When you click an entry in the list, your selection appears in the Downgrade Software list box. You can add one or more versions, as needed. To delete an item from the list, select it in the Downgrade Software list box, and click Remove.
No: If you do not want to grant downgrade rights to the selected software, select this option.
7.
Click Next.
8.
On the License Detail page, on the Related tab, provide the following information:

Option

Description

Department

The business group or department that owns the application.

Cost Center

The cost center associated with the department that owns the application.

Approved for Device

The devices that are approved to use the license. This information is used in License Compliance reporting. For example, if devices have the application installed, but are not on the list of approved devices, the devices are listed in the report titled, Unapproved Software Installation. However, the appliance does not enforce license compliance. For example, the appliance does not prevent applications from being installed on managed devices if a license is expired or otherwise out of compliance.

Barcodes

Add or edit barcodes associated with this license, as required. For more information, see Add barcodes to assets.

9.
Click Next.
10.
On the License Detail page, on the Custom tab, provide additional custom data. You can modify the License Asset Type to include as many additional fields as necessary to meet your business objectives. For more information, see Add or customize Asset Types.
11.
Click Next.
12.
On the License Detail page, on the Notes tab, provide the following information:

Option

Description

Notes

Any additional information you want to provide.

License Text

Any supplemental information about the license, such as a license number.

13.
Click Save.
The new License asset appears on the Licenses page. The License Count number does not change until you update the asset. However, the number in the Installed column changes when managed devices that have the software installed check in to the appliance. This enables you to track the number of licenses that have been purchased and installed.

Perform the following optional tasks:

Enable metering for Software Catalog inventory. When metering is enabled, the License Compliance page shows whether applications have or have not been used in the past 90 days. See About software metering.
Documents connexes

The document was helpful.

Sélectionner une évaluation

I easily found the information I needed.

Sélectionner une évaluation