Tchater maintenant avec le support
Tchattez avec un ingénieur du support

Enterprise Reporter 3.5 - Quick Start Guide

Introducing Quest® Enterprise Reporter Key Features of Enterprise Reporter Enterprise Reporter Components For information on installation, see Installing Enterprise Reporter . System Requirements Overview of Enterprise Reporter communications and required credentials Installing Enterprise Reporter Step-By-Step Walkthroughs

Run the reports you want and export them

Once data is collected, you can run reports against it. When you run a report, it returns data based on the most recent data collected by the discoveries, the selected fields, and any parameter values you enter. Some reports may have required parameters; in this case, the report will not run unless you enter valid parameter values.

To produce the requested information, you must run three reports that are included in Enterprise Reporter:

Once you have run a report, you can export it to the Excel format.

1
Open the Report Manager by selecting Start | Quest | Report Manager.
3
On the Report tab, expand Report Library | Active Directory and select your first report, for example Domain Groups.
4
In the Include the following domains parameter, type the domain name, and click Add.
You also can click Search, locate and add the domain, and click OK.
5
Click Run Report.
6
On the tool bar, click the Export To drop-down arrow, and choose XLS (older versions of Excel) or XLSX (Excel 2007 and later).
9
Click Save.
10
Click Yes to view the report in Excel.

You can repeat this process for the other two reports. Once you have completed the migration, you can create a new discovery to run against the new domain, and ensure that the migration was successful.

Manage Compliance

If you are required to regularly show compliance with corporate or regulatory security requirements, Enterprise Reporter can be of great assistance by automatically gathering information and reporting on it.

At the beginning of each month, you must deliver a report that shows that users who have been inactive for three months have their accounts disabled, in line with your corporate security policy. You are going to use two reports to do this: one report for yourself, in order to identify accounts that are not compliant, and one report that is sent to the stakeholders showing compliance. You will automate the delivery of the monthly report to ensure it is always on time. You must take the following steps:

Modify an Existing Report

You need to modify an existing report to only show accounts that have been inactive for 90 days and are not disabled. You should manually run an appropriate Active Directory® discovery right before you run the report to ensure you are getting up to date data. This will allow you to address any issues before your compliance report is sent out. To do this, you must perform the following steps:

1
On the Report tab of the Report Manager, expand Report Library | Active Directory.
2
Locate the Domain Users without Recent Logons report, and drag it into the My Reports container.
1
In the My Report container, select the Domain Users without Recent Logons report, and click Edit Report.
2
Change the report name to Domain Users to be Disabled.
3
Change the report description to Shows users in the selected domains who have not logged on in the past 90 days and whose accounts are still enabled.
4
Select the Fields tab.
5
In the Selected Fields list, select Is Locked and Number of Logons, and click Remove.
6
Select the Parameters tab.
7
Click +Add.
8
Set This parameter is: to Hidden.
9
Set Select the field to associate with this parameter: to IsDisabled.
10
Set the operator to Equals and the value to No.
11
2
Click Edit.
3
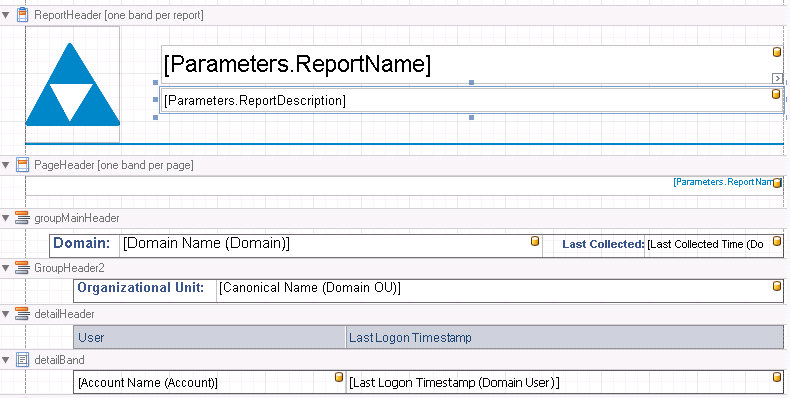
In the detailHeader row of the report layout, right-click Number of Logons, and select Delete then Cell.
4
Repeat for IsDisabled and IsLocked.
6
Click the Preview tab below the report to ensure the new layout it is accurate:
7
Click OK to close the Edit Report dialog box.
8
Click OK to close the Edit Report Definition dialog box, and finish editing the report.
1
If necessary, in the My Reports container, select the Domain Users to be Disabled report.
2
In the Include the following domains parameter, type the domain name, and click Add.
You can also click Search, locate and add the domain, and click OK.
3
In the Users not logged on in the last (days) parameter, change the number of days to 90.
4
To make these the default parameter values, click Save parameters as default, and click OK in the confirmation dialog box.
5
Click Run report.

Your report appears, listing all users who are not in compliance. You can now make any changes you need prior to the sending the compliance report to your stakeholders.

Schedule the Discovery

In this scenario, the Active Directory collection previously configured collects the necessary data. We will edit it to run on a scheduled basis so that the scheduled reports have up-to-date data. You can also run it manually before you run the report you modified that identifies any compliance issues.

1
On the Manage Discoveries page of the Configuration Manager, select the AD - [Domain Name] discovery you created, and click Edit.
2
3
Click Monthly, and select the last Friday of the month.
4
Click +Add.
5
Click OK if you edited an existing discovery.
Click Finish if you created a new discovery.
Documents connexes

The document was helpful.

Sélectionner une évaluation

I easily found the information I needed.

Sélectionner une évaluation