Verify and Fix Issues with the Repository
Verify and Fix Issues with the Repository
When upgrading from older versions of CWSuite / Evolve, or if the product appears to be behaving inconsistently it is advised to check that the Repository is in a consistent state. This is done through the following steps:
1.Check you are privileged to perform this task:
You MUST be an Administrator of the CW repository and also have db_owner, or administrator permissions on the SQL/Oracle database.
2.Open a Windows Command Prompt by:
Pressing At the taskbar, select Start. | Run.
Type: CMD. or on some versions of Windows. COMMAND.
Click 'OK'.
3.Navigate to the CWSuite installation directory, usually:
C:\Program Files (x86)\Casewise\CM10\bin
Use the commands:
Type: C:
Type: cd "program files (x86)\casewise\cm10\bin"
4.Run the Validate tool to check for errors:
Type: validaterepository -username:<your-admin-username> -password:<your-password> -TestOnly
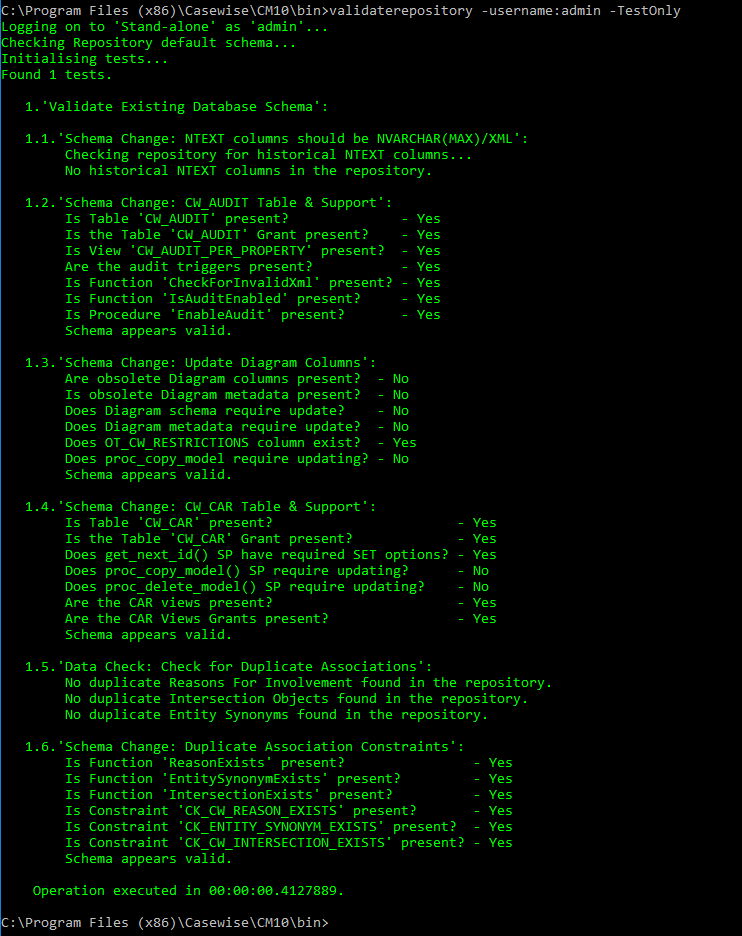
5.You should be presented with something similar to the following response:
6. Other ValidateRepository commands can now be run from this point
Enabling Audit Options
In order to prepare CWSuite to have auditing options available, it is necessary to switch auditing on in the repository. This is performed through the ValidateRepository tool, as it requires minor changes to the database schema.
1.First ensure that the CW repository has its schema up to date, and has no issues, by following the above steps "Verify and Fix Issues with the Repository".
2.Now enable Auditing:
Type: validaterepository -username:<your-admin-username> -password:<your-password> -enableaudit:true
e.g. validaterepository -username:admin password:test -enableaudit:true
3. You should be presented with the following response:
Global Search
Enabling Global Search
1. In CWSuite, ensure that the model’s auditing option is enabled. See image, on the right to find the location of this setting.
|
|
If you do not see the option to 'Enable Object Revision History' in the Model Properties dialog. Ensure you have turned auditing on in the Repository. See details here. |
2. Before deploying a Dynamic Site from Evolve Designer, ensure Enable Global Search is selected by navigating to Site -> Deployments -> [DeploymentMachine] -> Site Name and checking the Enable Global Search checkbox.
3. Also check the location of the temporary search index delta files. This folder will buffer changes from the database, to the search service. It is entirely temporary and should the content be erased, it will automatically be recreated.
This directory should be server-local (a suitable location is selected by default, however if you need more disc space, this can be placed anywhere else on the server).
If this server is Primary, the search content will appear at this location first, before being copied to a "Shared Location", for use by the slave servers.
If this server is a Slave (not Primary), then this location will not be used, as the data is sourced from the "Shared Location". Slave servers must have the "Shared Location" set to the same folder as the Primary Server's "Shared Folder"
|
|
New settings in Evolve 2018.1.0 and above. These control the temporary file location for search index change. |
Searching for Objects
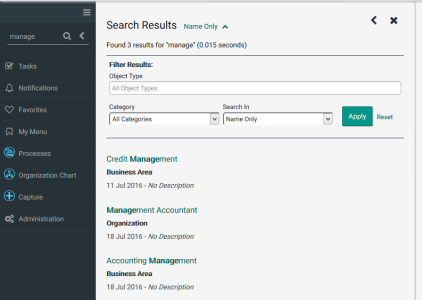
Finding objects is as simple as entering text into the search field and clicking the search icon or pressing enter.
Filtering Search Results
Filtering by Object Type
Search results can be filtered to only show objects that are a specific object type.
Filtering by Category
Search results can be filtered to only show objects that fall under a specific category.
Restricting Search
By default Global Searches are performed on object Names and Descriptions. If this is yielding too many unwanted results you can specify to search based on object names or descriptions separately.
Related Topics
Global Search - Advanced Filters
Global Search - Advanced Filters [2018.0.2+]
Before you start
•Ensure Global Search is enabled.
Accessing the Advanced Filters
Access the search window by typing your search text in the left hand pane and clicking the search icon or pressing enter.
This will give an initial result set using the current filter settings. Clicking the down twisty 'v' will show the standard filters.
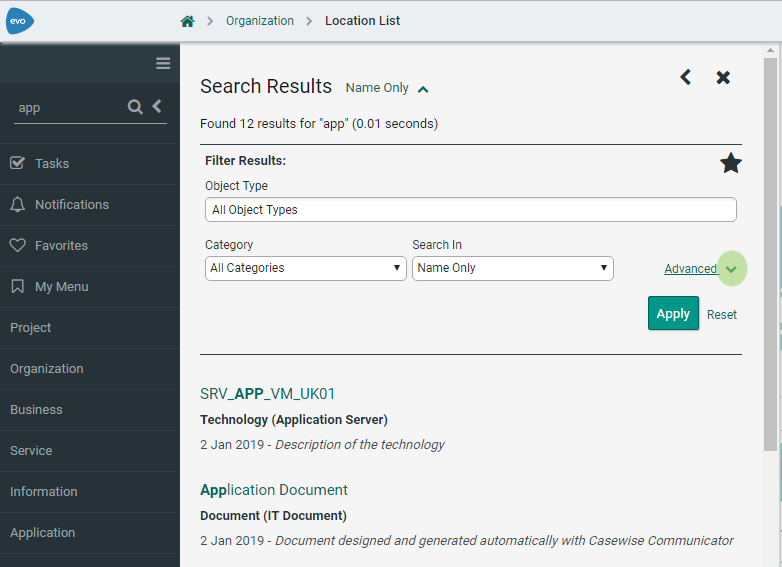
Just above the apply button there is an Advanced twisty 'v', this will give access to the advanced filters section.
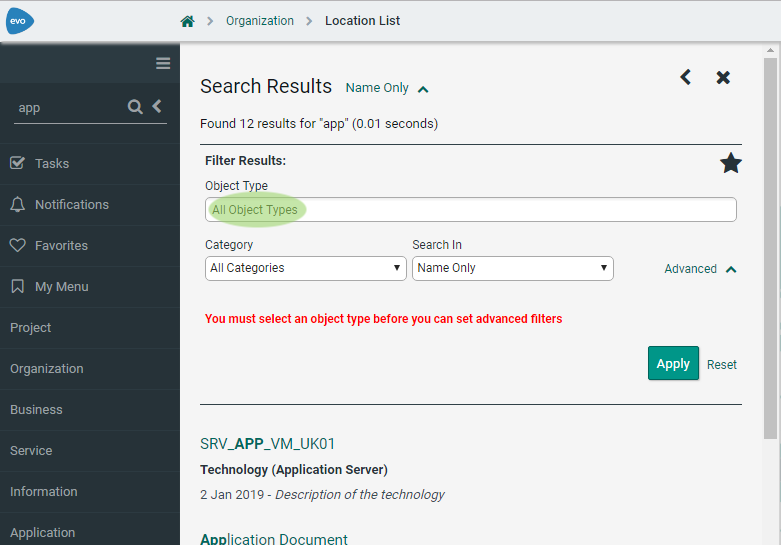
In order to add an advanced filter you must first select one or more object types.
|
Fig. Advanced button |
Fig. Object Type Selection |
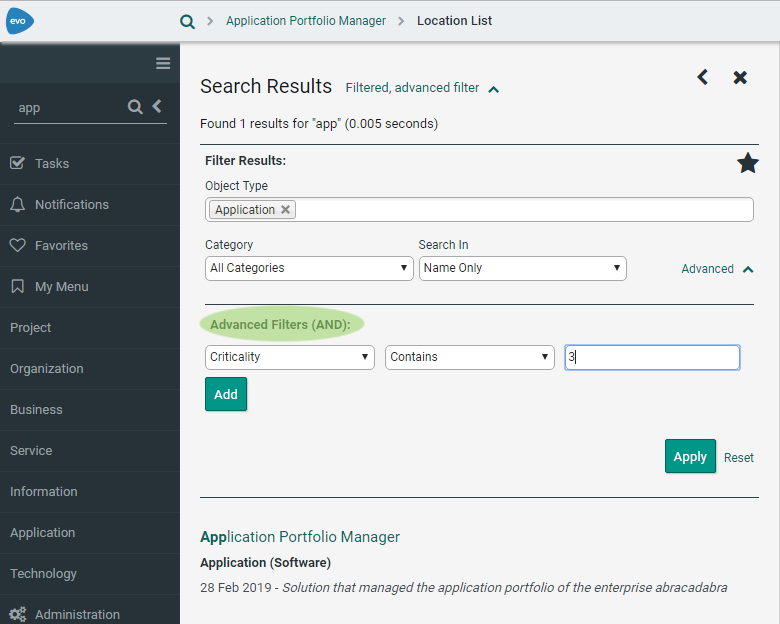
Using the Advanced Filters
•Click the "Add" button to add a filter.
•Drop down a property (note: if multiple object types are selected, only the intersected set of properties will be available).
•Choose your condition from the second drop-down (e.g. Contains).
•Type the text you wish to use with the condition.
•Press 'Apply' to apply a filter and 'Reset' to remove the filters.
Note that all filters are "AND"ed together, with the standard filter content.
Fig. Advanced Filters
Related Topics

