Tchater maintenant avec le support
Tchattez avec un ingénieur du support

SharePlex 11.0 - SharePlex Installation and Setup Guide

About this Guide Conventions used in this guide Revision History SharePlex pre-installation checklist Download the SharePlex installer Installation and setup for Oracle cluster Installation and setup for remote capture Install SharePlex on Linux and UNIX Assign SharePlex users to security groups Set up an Oracle environment for replication Set up replication from Oracle to a different target type Generic SharePlex demonstration-all platforms Advanced SharePlex demonstrations for Oracle Advanced SharePlex Demonstrations for PostgreSQL Solve Installation Problems Database Setup Utilities General SharePlex Utilities Uninstall SharePlex Advanced installer options Install SharePlex as root Run the installer in unattended mode SharePlex installed items

Overview of SharePlex Oracle cluster support

Overview of SharePlex Oracle Cluster Support

SharePlex integrates with Oracle Clusterware cluster hardware and software to maintain the high availability of data capture and uninterrupted replication to your targets. If the node where SharePlex is running fails or must be taken out of the cluster for maintenance, SharePlex can be started on another server by the cluster software. SharePlex start and stop is controlled through the cluster.

These instructions assume that the cluster solution is already installed according to the cluster documentation, tested, and is functioning, and they are not a substitute for the documentation. Additional steps that are specific to your cluster installation may be required.

The following diagram shows SharePlex installed into an Oracle RAC cluster:
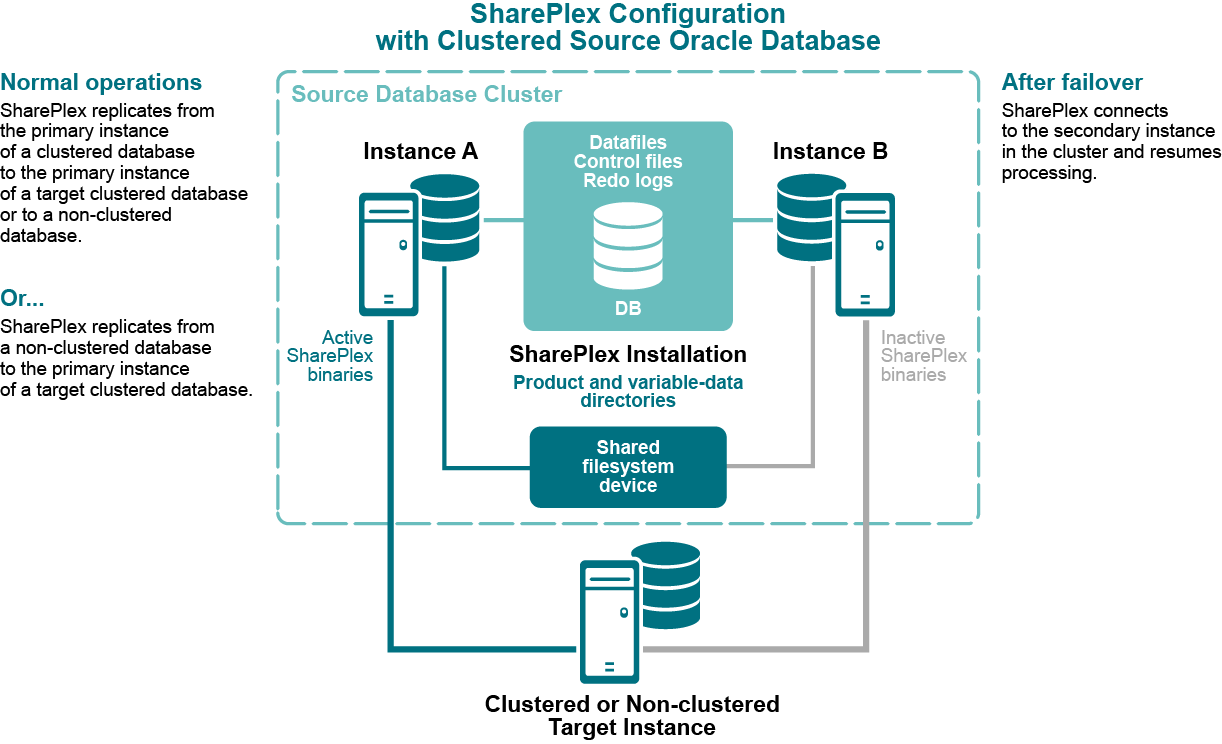
 

Set up SharePlex in an Oracle cluster

Set up SharePlex in an Oracle Cluster

These instructions are for setting up SharePlex in an Oracle cluster.

Important! These instructions cover the parts of installing and setting up a cluster that pertain to the setup of SharePlex in the cluster. See the Oracle documentation for complete instructions for the platform that you are using.

Configure the cluster

Perform these steps on a source cluster and a target cluster, if applicable:

  1. On one node of the cluster, create a static application Virtual IP (VIP) address for SharePlex. This VIP must point to the node where SharePlex will run and fail over to the secondary node if the primary node fails.

    Notes:
    • See the Oracle documentation for more information about creating a Virtual IP address on your specific platform.
    • The VIP establishes a consistent host name across all nodes.
    • The cluster software maps the VIP to the SharePlex server and migrates it during a failover.
    • Alternatively, this mapping can be done as a host alias in the /etc/hosts file (on Unix and Linux) on both nodes. The alias is exported in the SharePlex user profile and used in the SharePlex configuration parameters.

    Example: 123.456.0.78 splex

  2. Create a TNS alias for SharePlex to use to connect to the database on each node. Use the same alias on each node of a cluster. Set load balance to off and set failover to on. For example:

    Node 1:

    	ora_a_sp =
           	(DESCRIPTION =
           	(ADDRESS_LIST =
              	(ADDRESS = (PROTOCOL = TCP)(HOST = RAC1)(PORT = 1521))
              	(ADDRESS = (PROTOCOL = TCP)(HOST = RAC2)(PORT = 1521))
            	)
            	(LOAD_BALANCE = OFF)
            	(FAILOVER = ON)
            	  (CONNECT_DATA =
    		  (SERVER = DEDICATED)
            	  (SERVICE_NAME = ora_a)
    		  (INSTANCE_NAME = ora_a1)
            	  )
    		)

    Node 2:

    	ora_a_sp =
           	(DESCRIPTION =
           	(ADDRESS_LIST =
              	(ADDRESS = (PROTOCOL = TCP)(HOST = RAC2)(PORT = 1521))
              	(ADDRESS = (PROTOCOL = TCP)(HOST = RAC1)(PORT = 1521))
            	)
            	(LOAD_BALANCE = OFF)
            	(FAILOVER = ON)
            	  (CONNECT_DATA =
    		  (SERVER = DEDICATED)
            	  (SERVICE_NAME = ora_a)
    		  (INSTANCE_NAME = ora_a2)
            	  )
    		)

    Note: A TNS alias establishes global connection information that supercedes local instance names and enables SharePlex to connect to the failover instance without requiring a configuration reactivation. SharePlex identifies the correct Oracle instance from the configuration file.

  3. (UNIX and Linux only) Add the TNS alias to the oratab file on each node that SharePlex is expected to start on during a failover.

    Example (all nodes):

    ora_a:/u01/app/oracle/product/11.2.0/dbhome_1:N
    ora_a_sp:/u01/app/oracle/product/11.2.0/dbhome_1:N
  4. If the Oracle instances in the cluster have different ORACLE_HOMEs, edit the oratab file on each node and on the DNS nameserver, if applicable, to use a symbolic link in place of the actual ORACLE_HOME path:

    SID:/path_to_symbolic_link:N

Install SharePlex on the Cluster

In a cluster, SharePlex is installed on Unix and Linux.

To install on Unix and Linux:

On Linux and Unix, the best practice is to install both the SharePlex variable-data and product directories on a shared drive, rather than on each node. This configuration enables more efficient failover and faster upgrades of SharePlex.

If you do install these directories locally on both nodes of the cluster, do the following:

  • Install each SharePlex instance on the same port number, with identical path names. When installing on the secondary node, specify a temporary variable-data directory and then remove it after installation. Alternatively, you can use a shared drive for the variable-data directory, and then specify that directory when installing SharePlex on each node. You will configure SharePlex to use the correct variable-data directory in this procedure.
  • When prompted by the installer for the ORACLE_SID, specify the TNS alias .
  • For more information, see Install SharePlex on Linux/Unix for Oracle Database.

Run database setup

After you install SharePlex, run the Database Setup utility. The following applies in a cluster:

  • Source cluster: Run Database Setup and specify the TNS alias as the connection type.
  • Target system or target cluster:Run Database Setup and specify the TNS alias as the connection type, except if you are populating the target with a hot backup. If you are populating the target with a hot backup, do not run Database Setup now. You will run Database Setup during the activation procedure.
  • For more information, see Database Setup for Oracle.

Persist the SharePlex licenses

If you are using shared drive for variable data directory, license key added for primary node will be applicable for all other secondary nodes. If you are using local variable data directory, license need to be installed on the secondary nodes as well using the splex_add_key utility.

Set the SharePlex environment parameters

Perform these steps on a source cluster and on a target cluster, if applicable.

Set the SharePlex environment to point to the VIP alias and SharePlex variable-data directory.

  • SP_SYS_HOST_NAME directs SharePlex to use the VIP alias when any of its processes issues a name lookup, superseding the local system name. It ensures that sp_ctrl commands are directed to the correct host, in this case the cluster name, and it enables SharePlex to migrate properly during failover.
  • SP_SYS_VARDIR points to the variable-data directory that you installed on the shared disk. This is the active variable-data directory. Setting SP_SYS_VARDIR ensures that the current replication environment continues to be used by SharePlex after failover.

To set the environment on UNIX and Linux:

EXPORT SP_SYS_HOST_NAME="splex"

SP_SYS_PRODDIR=/home/shareplex

SP_SYS_VARDIR="/app/shareplex/vardir"

Configure SharePlex

When you create the configuration file that directs SharePlex replication, you specify the TNS alias rather than an actual ORACLE_SID, as follows.

To capture from a source cluster:

Specify the TNS alias on the o.datasource line of the file. This is the first line of the configuration file.

For example:

datasource:o.ora_a_sp

To post to a target cluster:

Specify the TNS alias as the destination in the routing map.

For example (assumes the use of wildcards to specify objects):

expand hr.%     hr.%    inst_c@ora_b_sp

Activate replication

Once a source and target cluster (if applicable) are configured, you can populate a standalone or clustered target with a copy of the source data, while replication keeps track of transactional changes made by users on the source database. Use any of the Oracle-specific copy methods for activating replication from an active source. See the procedures listed in Activate replication in your production environment in the SharePlex Administration Guide for more information.

Add SharePlex to the cluster software

Incorporate SharePlex as a resource in the cluster software, and include it in the cluster failover routines so that it migrates with the other applications during failover. This ensures that the sp_cop process is started on the adoptive node by the cluster software. At minimum, this includes creating a startup script for SharePlex and a cluster script for SharePlex to handle failover.

Notes:
  • The sp_cop program is the only process that the cluster software should start. The sp_cop process must be allowed to start the other SharePlex processes. All SharePlex processes, except sp_cop, can be controlled through the sp_ctrl interface.
  • Do not attempt to start or stop sp_cop yourself through the command interface; otherwise the cluster software will attempt to restart it. If you need to stop sp_cop, use the cluster software commands.
  • If possible, configure SharePlex and Oracle into a single global cluster package. The combination of SharePlex and Oracle in the same package allows the cluster software to start and stop SharePlex and Oracle in the proper sequence if any component of the package fails. Configure Oracle to start before SharePlex.

  • Assistance for creating startup and cluster scripts is available through SharePlex Professional (PSO) Services.

System maintenance

Make certain your systems administrators understand that any changes or upgrades they perform to the operating system on any node in the cluster must be implemented on all nodes in the cluster so that SharePlex fails over to an identical environment.

Installation and setup for remote capture

SharePlex can capture from an Oracle database that is running on a system other than the system where SharePlex is running.

This support covers Oracle databases running on Linux. This support applies only when SharePlex and the remote capture database are running on the same operating system type (i.e., if SharePlex is on Linux, the remote database must be on Linux).

SharePlex does not support remote capture from Oracle on RAC unless the database is running on ASM.

Notes
  • These instructions apply to on-premises installations. If configuring SharePlex to capture from a remote database that is on Amazon AWS, see the SharePlex Installation and Setup Guide for Oracle on RDS.

  • Remote capture using more than one SharePlex instance to the same Oracle instance is not supported.

To set up SharePlex for remote capture:

  1. Install an Oracle client on the system where SharePlex is running. No database is required on this system.
  2. Set the ORACLE_HOME system variable on the SharePlex system to the Oracle client installation folder.
  3. Set the ORACLE_SID to a dummy value, as a placeholder for the non-existent local database.
  4. Create a tnsnames.ora file on the SharePlex system and make an entry for the remote source database. Place the file in the path specified in the TNS_ADMIN environment variable.
  5. Install SharePlex on the remote system in the normal manner.
  6. Run Oracle Setup on the SharePlex system according to the directions in Database Setup for Oracle.

    • Reply NO to "Will SharePlex install be using a BEQUEATH connection?"
    • Reply NO to "Are you setting up SharePlex for an RDS database?"
    • Reply YES to "Will the current setup for sid: SID be used as a source (including cases as source for failover or primary-primary setups)?"
  7. Complete all other installation and setup tasks according to the this document.
  8. After setup is complete, start sp_cop and sp_ctrl.
  9. Set the SP_OCT_OLOG_USE_OCI parameter to 1 to enable it. When capturing from a remote database, Capture must read the redo logs through OCI calls because it does not have access to the log files on disk.
  10. See the SharePlex Administration Guide for help with configuring and starting replication.

Install SharePlex on Linux and UNIX

Contents


Documents connexes

The document was helpful.

Sélectionner une évaluation

I easily found the information I needed.

Sélectionner une évaluation