Tchater maintenant avec le support
Tchattez avec un ingénieur du support

Recovery Manager for AD Forest Edition 10.2.2 - User Guide

Overview Getting started
Permissions required to use Recovery Manager for Active Directory Recovery Manager Console Getting and using help Configuring Windows Firewall Using Computer Collections Hybrid Recovery with On Demand Recovery Managing Recovery Manager for Active Directory configuration Licensing
Backing up data
Permissions required for the Backup operation Managing Backup Agent Using a least-privileged user account to back up data Using Managed Service Accounts Active Directory backups vs Windows System State backups Creating BMR and Active Directory backups Using the Backup Wizard Retrying backup creation Enabling backup encryption Backing up AD LDS (ADAM) Backing up cross-domain group membership Backing up distributed file system (DFS) data Backup scheduling Setting performance options Setting advanced backup options Using Forest Recovery Agent Unpacking backups Using e-mail notification Viewing backup creation results
Restoring data
Getting started with Active Directory recovery Managing deleted or recycled objects Restoring backed up Active Directory components Integration with Change Auditor for Active Directory Using granular online restore Restoring AD LDS (ADAM) Selectively restoring Active Directory object attributes Restoring objects in an application directory partition Restoring object quotas Restoring cross-domain group membership Performing a restore without having administrator privileges Reports about objects and operations Using complete offline restore Offline restore implications Restoring SYSVOL authoritatively Performing a granular restore of SYSVOL Recovering Group Policy Restoring data from third-party backups Using the Extract Wizard Restoring passwords and SID history
Full Replication Consolidating backup registration data Monitoring Recovery Manager for Active Directory Recovering an Active Directory forest
Forest recovery overview Deploying Recovery Manager for Active Directory Forest Edition (Disaster Recovery Edition) Permissions required to use Forest Recovery Console Forest Recovery Console Managing a recovery project Recovery methods Phased recovery Managing Forest Recovery Agent Rebooting domain controllers manually Resetting DSRM Administrator Password Purging Kerberos Tickets Managing the Global Catalog servers Managing FSMO roles Manage DNS Client Settings Configuring Windows Firewall Developing a custom forest recovery plan Backing up domain controllers Assigning a preferred DNS server during recovery Handling DNS servers during recovery Forest recovery approaches Deciding which backups to use Running custom scripts while recovering a forest Overview of steps to recover a forest Viewing forest recovery progress Viewing recovery plan Viewing a report about forest recovery or verify settings operation Handling failed domain controllers Adding a domain controller to a running recovery operation Selectively recovering domains in a forest Recovering SYSVOL Deleting domains during recovery Resuming an interrupted forest recovery Recovering read-only domain controllers (RODCs) Checking forest health Collecting diagnostic data for technical support
Using Management Shell Creating virtual test environments Appendices
Frequently asked questions Best practices for using Computer Collections Technical characteristics Best practices for creating backups Best practices for creating backups for forest recovery Best practices for recovering a forest Descriptions of recovery or verification steps Ports Used by Recovery Manager for Active Directory Forest Edition (Disaster Recovery Edition) Backup Wizard Online Restore Wizard Online Restore Wizard for AD LDS (ADAM) Group Policy Restore Wizard Repair Wizard Extract Wizard Events generated by Recovery Manager for Active Directory

Ports Used by Recovery Manager for Active Directory Forest Edition (Disaster Recovery Edition)

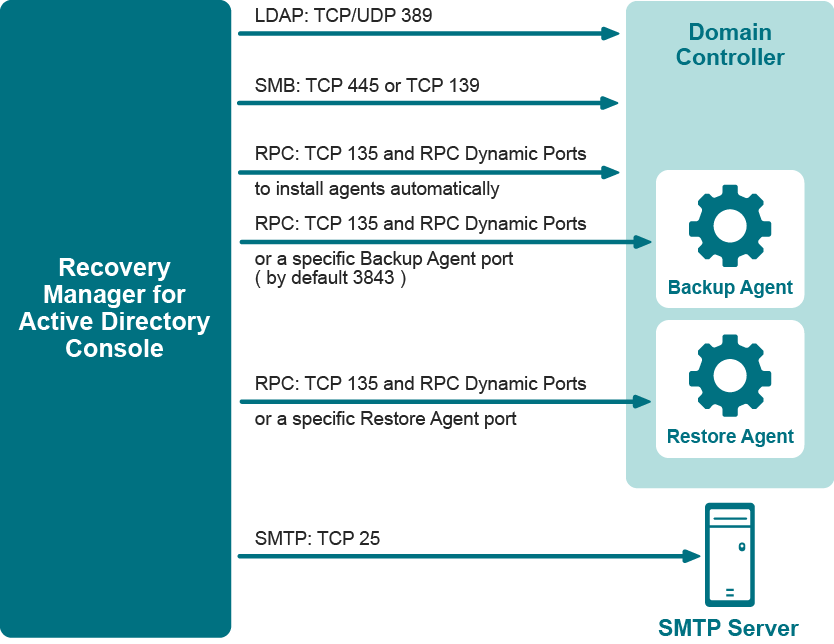
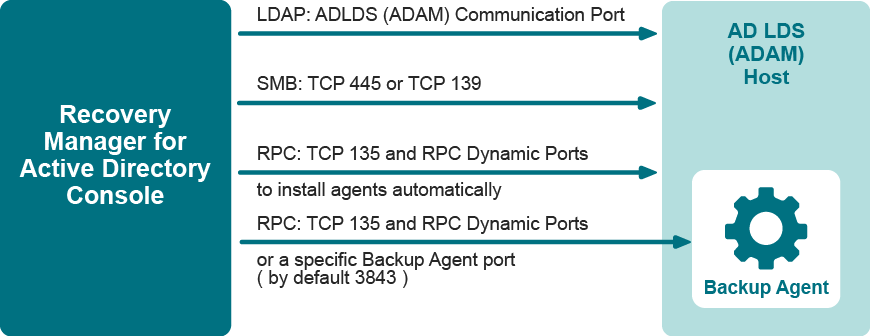
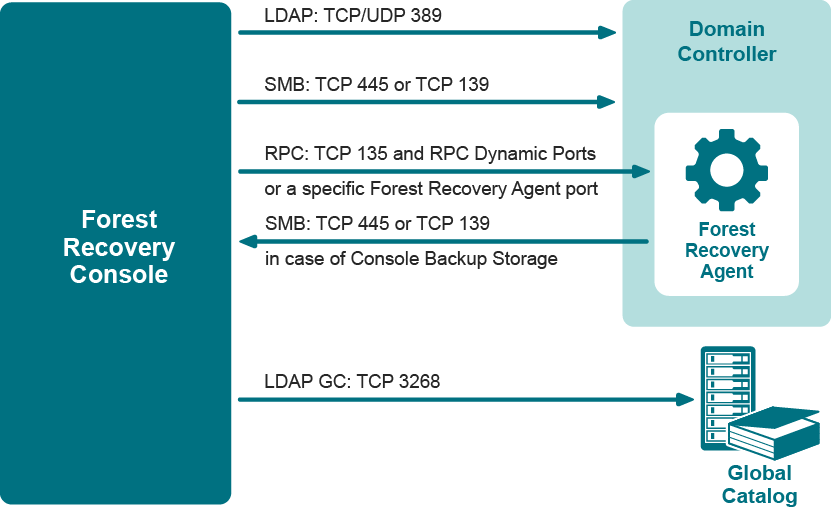
This section provides information about the communication ports required to work with Recovery Manager for Active Directory.

Resources/Images/8_RMADFE_DG_Working scheme-01.png


Resources/Images/8_RMADFE_DG_Working scheme-02.png


Resources/Images/8_RMADFE_DG_Working scheme-03.png


Backup Wizard

The Backup Wizard helps you create backups of domain controllers' Active Directory® components, including Active Directory® and Group Policy data. With this wizard you can select domain controllers whose Active Directory® is to be backed up, specify where to store backups, run backup immediately or schedule it for later, view and modify backup options.

The wizard has the following steps:


What to Back Up

Use this page to select computers whose Active Directory® components you want the wizard to back up. You can back up selected computers or computers that reside in a specific container.

  • Selected objects. The Selected objects list includes the names and descriptions of computers and containers the wizard will process. You can modify the list using the Add and Remove buttons.

  • Add. When you click Add, the wizard presents you with these commands:

    • Domain Controller. Selects and adds domain controllers by name.

    • Container. Selects and adds a container. The wizard will back up all computers that are in that container.

    • AD LDS (ADAM) Host. Selects and adds AD LDS (ADAM) hosts by name.

    • Import Computers. Use a text file, one computer name per line, to add computers to the list.

  • Remove. Removes the selected entries from the Selected objects list.

To add a computer by name
  1. Click Add and then click Add Computer.

  2. In the Select Computers dialog box, supply the name of the computer you want to add to the list.

With the Select Computers dialog box, you can select multiple computers. The Select Computers dialog box only allows you to add computers by computer account name. If you want to add computers by IP address, DNS name, or NetBIOS name, use an import file.

To add computers using an import file
  1. Create a text file that contains computer names, one name per line.

  2. Click Add and then click Import Computers.

  3. Use the Open dialog box to locate and open the text file.

To add a container
  1. Click Add and then click Add Container.

  2. In the Domain box, select or type the DNS name of a domain. If you typed the DNS name, click Connect to refresh the tree in the Containers box.

  3. In the Containers box, select the container to add.

If you select computers or containers before starting the Backup Wizard, the Selected objects list includes the objects you have selected.


Where to Store Backups

Use this page to specify the path and name format for backup files.

  • Backup file path and name format. Provides a space for you to specify format for paths and names of .bkf files where you want the wizard to store backups. You can use UNC names to store backups in a shared network folder. The path format may include optional expressions that enable the automatic creation of subfolders. The file name format may also include expressions. For example, you might specify C:\DIRNAME\%COMPUTERNAME%\%DATETIME%.

    As a result, backups for different computers will be saved in separate subfolders named by a computer name. In addition, the file name of each backup will be composed of the date and time of the backup creation.

  • Expression. Click this button to specify optional path and file name notations in Backup file path and name format. You can choose the following expressions:

    • Default backup storage (%BACKUPS%). Path to the default backup storage folder. Unless modified during the installation of RMAD, it points to the folder %AllUsersProfile%\Quest\Recovery Manager for Active Directory\Backups.

    • Domain (%DOMAIN%). Name of the home domain of the computer being backed up.

    • Computer name (%COMPUTERNAME%). Name of the computer being backed up.

    • Date and Time (%DATETIME%). Date and time of the backup creation.

  • Browse. Click this button to locate the folder where backups are to be stored.

  • Sample path and file name matching the specified format. This box displays an example of the path and file name that matches the format string supplied in Backup file path and name format.


Documents connexes

The document was helpful.

Sélectionner une évaluation

I easily found the information I needed.

Sélectionner une évaluation