Permissions required to use Recovery Manager for Active Directory
Managing Recovery Manager for Active Directory configuration
| Note |
From version 8.8, Recovery Manager for Active Directory (RMAD) supports environments with disabled NTLM authentication and the Protected Users Security Group. |
The following user account permissions are required to perform some common tasks with RMAD.
Table 1. Backup Permissions
| Action | Computer | Permissions Needed |
|---|---|---|
| Discover preinstalled Backup Agent instances | RMAD computer | Write permission to the %AllUsersProfile%\Quest\Recovery Manager for Active Directory folder. Be a member of the Backup Operators group in the domain associated with the target domain controller. |
| Uninstall Backup Agent | RMAD computer | Write permission to the %AllUsersProfile%\Quest\Recovery Manager for Active Directory folder. Be a member of the Backup Operators group in the domain associated with the target domain controller. |
| Update information displayed about Backup Agent in the Recovery Manager Console | RMAD computer | Write permission to the %AllUsersProfile%\Quest\Recovery Manager for Active Directory folder. Be a member of the Backup Operators group in the domain associated with the target domain controller. |
| Automatically install Backup Agent and back up Active Directory data | RMAD computer | Write permission to the %AllUsersProfile%\Quest\Recovery Manager for Active Directory folder. Be a member of the Backup Operators group in the domain associated with the target domain controller. |
| Back up Active Directory using preinstalled Backup Agent | RMAD computer | Write permission to the %AllUsersProfile%\Quest\Recovery Manager for Active Directory folder. Be a member of the Backup Operators group in the domain associated with the target domain controller. |
Table 2. Restore Permissions
| Action | Computer | Permissions Needed |
|---|---|---|
| Perform a complete offline restore of Active Directory by using the Repair Wizard | RMAD computer | Write permission to the %AllUsersProfile%\Quest\Recovery Manager for Active Directory folder. Be a member of the Backup Operators group in the domain associated with the target domain controller. |
| Perform a selective online restore of Active Directory objects - Agentless restore | RMAD computer | Write permission to the %AllUsersProfile%\Quest\Recovery Manager for Active Directory folder. Be a member of the Backup Operators group in the domain associated with the target domain controller. |
| Perform a selective online restore of Active Directory objects - Agent-based restore | RMAD computer | Write permission to the %AllUsersProfile%\Quest\Recovery Manager for Active Directory folder. Be a member of the Backup Operators group in the domain associated with the target domain controller. |
Table 3. Backup and Restore AD LDS (ADAM) Permissions
| Action | Computer | Permissions Needed |
|---|---|---|
| Automatically install Backup Agent and back up an AD LDS (ADAM) instance | RMAD computer | Write permission to the %AllUsersProfile%\Quest\Recovery Manager for Active Directory folder. Local Administrator on computer hosting AD LDS (ADAM). |
| Back up an AD LDS (ADAM) instance using preinstalled Backup Agent | RMAD computer | Write permission to the %AllUsersProfile%\Quest\Recovery Manager for Active Directory folder. Local Administrator on computer hosting AD LDS (ADAM). |
| Restore an AD LDS (ADAM) instance | RMAD computer | Write permission to the %AllUsersProfile%\Quest\Recovery Manager for Active Directory folder. Local Administrator on computer hosting AD LDS (ADAM). |
Table 4. RMAD cmdlets Permissions
| Action | Computer | Permissions Needed |
|---|---|---|
| Run Recovery Manager for Active Directory cmdlets | RMAD computer | Write permission to the %ProgramData%\Quest\Recovery Manager for Active Directory folder. |
The account must be a member of the local Administrators group on the computer where you want to install RMAD. If during the installation you specify an existing SQL Server instance, the account with which RMAD connects to that instance must have the following permissions on the instance:
Create Database
Create Table
Create Procedure
Create Function
The account must be a member of the local Administrators group on the computer where the Recovery Manager Console is installed. The account must also have the following permissions on the SQL Server® instance used by RMAD:
Insert
Delete
Update
Select
Execute
The account you use to access the target computer must be a member of the local Administrators group on that computer.
The account you use to access the target computer must be a member of the local Administrators group on that computer.
The account used to access the target domain controllers must:
Have the Write permission on the %AllUsersProfile%\Quest\Recovery Manager for Active Directory folder that is located on the RMAD computer.
Be a member of the Backup Operators group on each target domain controller.
The account used to access the target domain controllers must:
Have the Write permission on the %AllUsersProfile%\Quest\Recovery Manager for Active Directory folder that is located on the RMAD computer.
Be a member of the Backup Operators group on each target domain controller.
The account used to access the target domain controllers must:
Have the Write permission on the %AllUsersProfile%\Quest\Recovery Manager for Active Directory folder that is located on the RMAD computer.
Be a member of the Backup Operators group on each target domain controller.
To automatically install Backup Agent, the account must:
Have the Write permission on the %AllUsersProfile%\Quest\Recovery Manager for Active Directory folder located on the Recovery RMAD computer.
Local Administrator permissions on the target domain controller.
To back up data, the account must be a member of the Backup Operators group on the target domain controller.
The account used to access the target domain controllers must:
Have the Write permission on the %AllUsersProfile%\Quest\Recovery Manager for Active Directory folder that is located on the RMAD computer.
Be a member of the Backup Operators group on each domain controller to be backed up.
If you restore data to a domain controller where User Account Control (UAC) is not installed or disabled:
If you restore data to a domain controller where User Account Control (UAC) is enabled:
In both these cases, the account you use to access the domain controller must have the Write permission on the %AllUsersProfile%\Quest\Recovery Manager for Active Directory folder located on the RMAD computer.
Agentless restore (used by default in Online Restore Wizard)
The account used to access target domain controllers must:
Have the Write permission on the %AllUsersProfile%\Quest\Recovery Manager for Active Directory folder that is located on the RMAD computer.
Reanimate Tombstones extended right in the domain where objects are to be restored.
Write permission on each object attribute to be updated during the restore.
Create All Child Objects permission on the destination container.
List Contents permission on the Deleted Objects container in the domain where objects are to be restored.
Replicating Directory Changes permission.
For more details, see Agentless method.
Agent-based restore
For more details, see Agent-based method.
The account used to access the target domain controller must:
Be a member of the Group Policy Creator Owners group.
Have Full Control privilege on the Group Policy object.
Be a member of the Backup Operators group.
Have sufficient permissions to read/write Active Directory objects linked to the Group Policy object.
The account used to access the computer hosting the instance must:
Have the Write permission on the %AllUsersProfile%\Quest\Recovery Manager for Active Directory folder that is located on the RMAD computer.
Be a member of the local Administrators group on the computer hosting the AD LDS (ADAM) instance
The account used to access the computer hosting the instance must:
Have the Write permission on the %AllUsersProfile%\Quest\Recovery Manager for Active Directory folder located on the RMAD computer.
Be a member of the local Administrators group on the computer hosting the AD LDS (ADAM) instance.
The account used to access the computer hosting the instance must:
Have the Write permission on the %AllUsersProfile%\Quest\Recovery Manager for Active Directory folder located on the RMAD computer.
Be a member of the local Administrators group on the computer hosting the AD LDS (ADAM) instance.
To access the SQL reporting database (%ProgramData%\Quest\Recovery Manager for Active Directory\DBReporting\RecoveryManager-Reporting-<host name>), the account must be assigned to db_datareader, db_datawriter roles and have rights to run all the usp_* procedures, as follows:
usp_GetSummaryReportBody
usp_GetSessionErrors
usp_GetReportsList
usp_GetReportsHeader
usp_GetReportBody
usp_GetReplicationHistory
usp_GetOptionalObjects
usp_GetOptionalAttributes
usp_GetObjectChildren
usp_GetObjectAttributes
usp_GetAllObjects
usp_GetAllChildObjects
usp_GetAllAttributes
Verify that the user account under which you run RMAD Management Shell console has the Write permission to the %ProgramData%\Quest\Recovery Manager for Active Directory folder. Otherwise, you will get warning messages when you run the snap-in cmdlets.
Recovery Manager for Active Directory (RMAD) includes an MMC snap-in (also known as the Recovery Manager Console) to ensure intuitive operation and close integration with the Windows® operating system.
| Note |
Machine that hosts the Recovery Manager Console must have same or higher version of Windows® operating system than the processed domain controllers. Otherwise, the online compare and object search in a backup during the online restore operation may fail. |
On the Start screen, click the Recovery Manager for Active Directory tile.
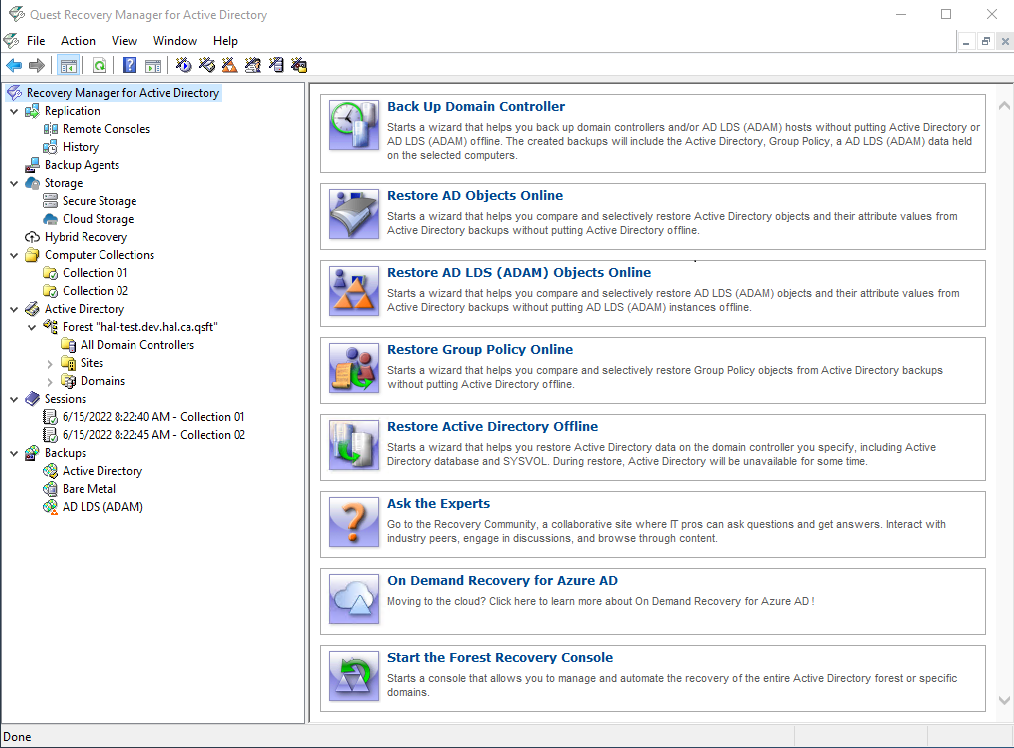
When started for the first time, the Recovery Manager Console looks similar to the following:
The main viewing area of the window is divided into two panes. The left pane contains the console tree, showing the items that are available in the snap-in. The right pane, known as the details pane, is used to display information about those items. The window also contains command menus and toolbars that are provided by both the MMC and the snap-in.
The information in the details pane changes accordingly when you select items in the console tree. To perform management tasks, you can click or right-click entries in the details pane and then use commands on the Action menu or shortcut menu.
You can move objects by selecting them in a source folder and then dragging the selection to a destination folder. If the drop operation is not allowed, the mouse pointer changes accordingly.
For more information about how to navigate an MMC snap-in, refer to Microsoft Management Console Help.
The console tree includes the following items:
Replication Using this node you can add multiple console instances to the replication console list and perform the data replication from source consoles to the local one. For more information, see Full replication and Consolidating backup registration data.
Backup Agent Management. Provides a central location for managing Backup Agent on computers added to Computer Collections. You can use this node to discover all preinstalled instances of Backup Agent and to manually install, uninstall, or update the agent on computers in Computer Collections (such as domain controllers and AD LDS (ADAM) hosts). For more information, see Managing Backup Agent.
Computer Collections. Contains a list of user-defined collections of computers. When you select a collection in the console tree, the details pane displays a list of all members of that collection. For more information, see Using Computer Collections.
Active Directory. Contains nodes representing the forests and AD LDS (ADAM) configuration sets to which the Recovery Manager Console is currently connected. You can browse forests and AD LDS (ADAM) configuration sets for computers and AD LDS (ADAM) instances, respectively.
To add a forest to the list, select Active Directory, and then, on the Action menu, click Connect to Forest.
To add an AD LDS (ADAM) configuration set to the list, select Active Directory, and then, on the Action menu, click Connect to AD LDS (ADAM).
Sessions. Contains a list of all backup-creation sessions performed by RMAD. When you select a session in the console tree, the details pane reports information about that session, such as whether backups were successfully created during the session.
Backups. Contains a list of the Active Directory® backups, AD LDS (ADAM) backups registered in the backup registration database of RMAD. When you select Active Directory or AD LDS (ADAM) under the Backups node, the details pane displays a list of all registered AD backups or AD LDS (ADAM) backups respectively.
You can use the Properties dialog box provided for the Active Directory® or AD LDS (ADAM) node, to filter the list of backups displayed in the details pane.
Help topics and tips provided with Recovery Manager for Active Directory help you accomplish your tasks. To get assistance while you work:
On the Help menu, click Help Topics. This displays the Help Viewer. To find a Help topic, use the Contents and Search tabs of the Help Viewer.
To see a brief description of a wizard page or a dialog box, press the F1 key or click the Help button.
To see a brief description of a menu command or a toolbar button, point to the command or button. Descriptions of toolbar buttons appear as tool-tips.
Descriptions of menu commands appear in the status bar at the bottom of the window. If the status bar is not displayed, click Customize on the View menu, and then select the Status bar check box in the Customize View dialog box.