
Install HSM
In this topic:
·Worksheet for this installation
·Steps to configure the HSM database connection
·Steps to install the HSM database
·Steps to configure the HSM stores and schemas
Worksheet for this installation
The following information will be required through the installation process. Sample values are provided here as a guidance.
|
Item |
Description |
Example |
|
HSM server |
The server where the HSM and Archive Manager Search will be installed. |
AMXHSM |
|
Superuser account |
Windows account that is used to install the application and run the Archive Manager for Exchange services. |
username: democorp\mamadmin password: ************** |
|
Media folder |
Full path of the folder where the media files are extracted |
C:\Metalogix |
|
Installation folder |
Full path of the folder where the application files will be installed |
C:\Program Files (x86)\Metalogix |
|
HSM Store folder |
Full path of the folder that will contain the archived files. |
C:\HSM The local hard drive folder is used as the default media store. Use of other media storage systems are described in the Media Store Administration Guide. |
|
Store name |
Name of the media store on a hard drive. With the Advanced Installation option of the installer wizard, only a local hard drive can be setup as a media store. |
FILESTORE |
|
Schema name |
Name of a schema in a hard drive media store. |
FILESCHEMA |
|
Database Authentication method |
Type of database authentication: Integrated Windows Authentication or SQL Authentication |
Integrated Windows Authentication |
|
UserLogin |
Username if SQL Authentication is selected |
dbadmin |
|
Password |
Database password if SQL Authentication is selected |
************** |
|
Database server |
The database server instance name where the databases for Archive Manager for Files will be installed. |
AMXDB |
Steps to install the application
1.Log in to the server (eg. AMXHSM) with the credentials of the superuser (eg. democorp\mamadmin)
2.Download the installation media. For more information see Steps to download the install media.
3.Run the Metalogix Archive Manager Installation Package to extract the files to a local folder.
4.Close the integrated installer wizard which starts automatically.
5.Run the HSM setup from <Media folder>\Archive Manager Installation Package\HSM\HSM Setup.exe
6.A prerequisite check occurs and missing requirements if any are displayed. Click Install to ensure all missing requirements are installed.
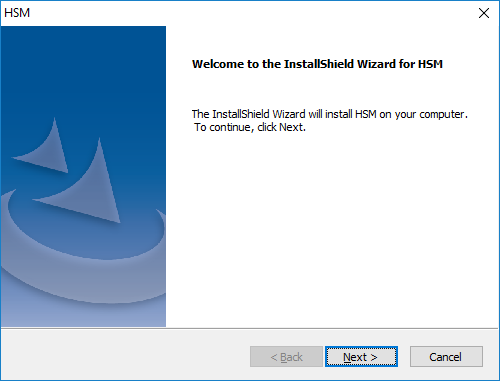
7.The Welcome window of the HSM installer opens.
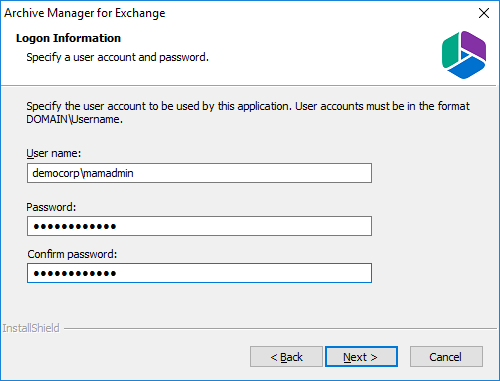
8.Click Next. The Logon Information window opens.
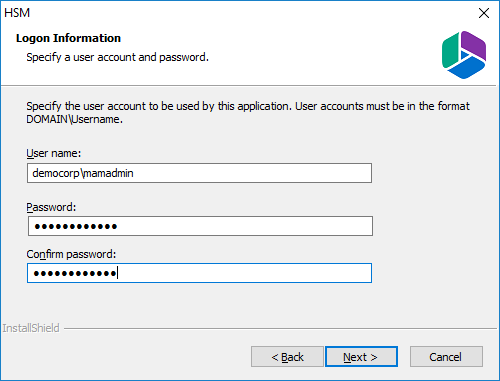
Enter the information as described below:
a.User name - logon name of the superuser (for example, democorp\mamadmin)
b.Password - logon password of the superuser
c.Confirm password - same as the Password.
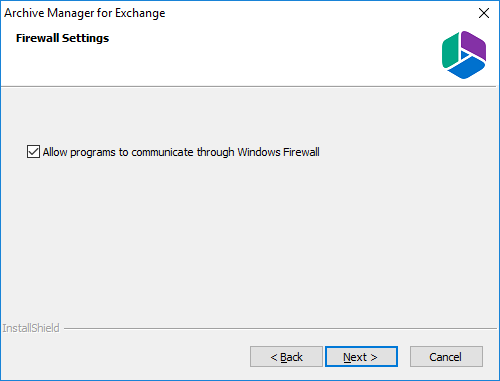
9.Click Next. The Firewall Settings window opens.

Select Allow programs to communicate through Windows Firewall.
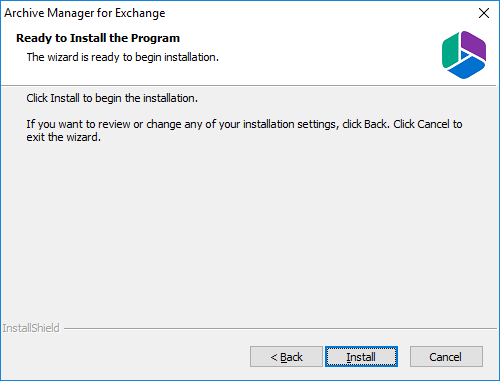
10.Click Next. The Ready to install the Program window opens.
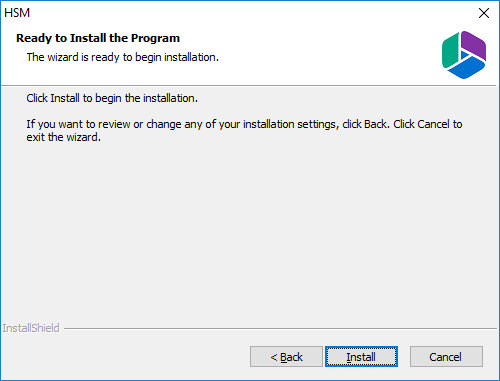
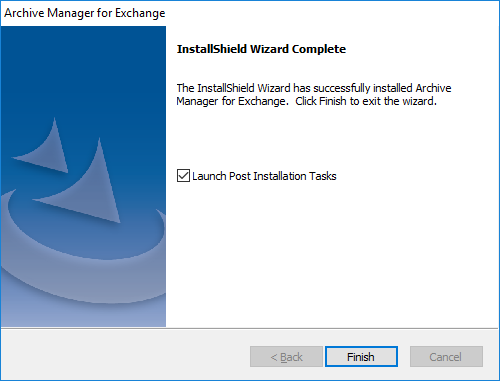
11.Click Install. The installation starts and the progress is displayed on the Setup Status window. When the installation completes, the InstallShield Wizard Complete window opens.

12.Click Finish to close the installer.
Steps to configure the HSM database connection
1.When the installation completes, the Configuration wizard opens. If it does not open automatically, click Start > Metalogix > Archive Manager Configuration.
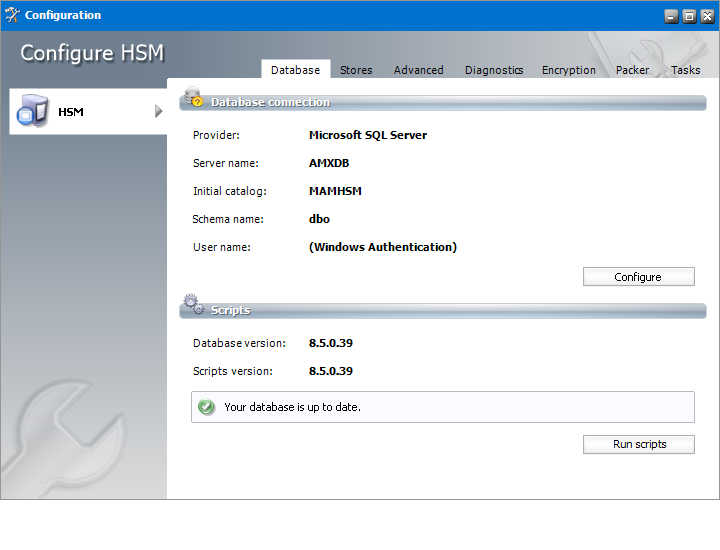
2.From the feature panel on the left, click HSM and select the Database tab.
3.Click Configure. The Database Connection Wizard opens.
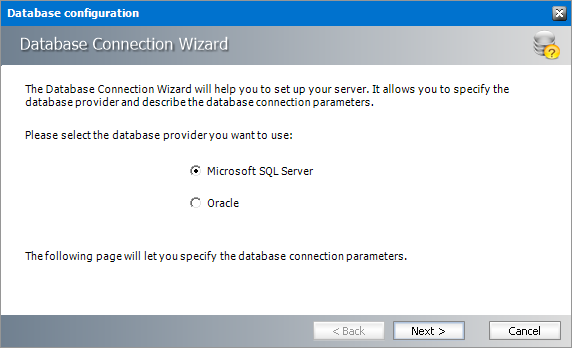
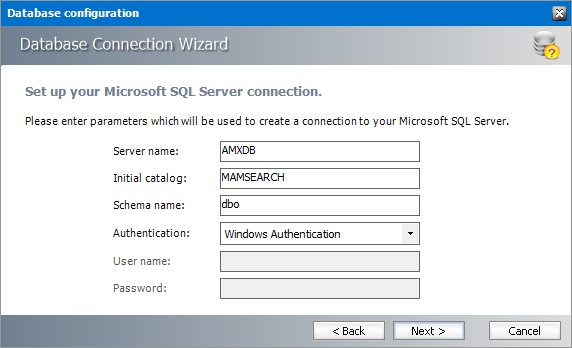
4.Select either Microsoft SQL Server or Oracle and click Next. If you choose Microsost SQL Server, the Database Connection window opens for the Microsoft SQL Server connection information.

For Microsoft SQL Server
a.Server name - name of the SQL server (eg. AMXDB)
b.Initial catalog - name of the HSM database (e.g. MAMHSM which is the default name of the HSM database)
c.Schema name - name of the SQL Schema (e.g. dbo)
d.Authentication authentication type used for the database. Choose either Windows authentication or SQL Server authentication
e.User name - database login user name if SQL Server authentication is the selected as the authentication mode.
f.Password - password of the database user if SQL Server authentication is the selected as the authentication mode.
For Oracle
a.Oracle net name - net service name that describes the network address of the database server in your tnsnames.ora file.
b.Schema - name of the Oracle schema from your tnsnames.ora file.
c.User name - database login user name.
d.Password - password of the database user.
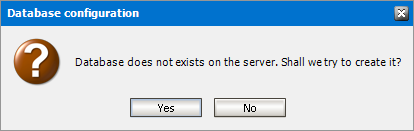
5.Click Next and then click Yes on the confirmation dialog that opens.
6.If the database connection is setup successfully, the configuration completion window opens.
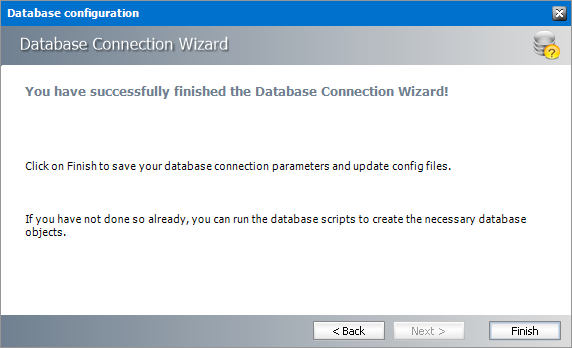
7.Click Finish to close the Database Connection wizard.
Steps to install the HSM database
1.From the feature panel on the left in the Configuration wizard, click HSM and select the Database tab.
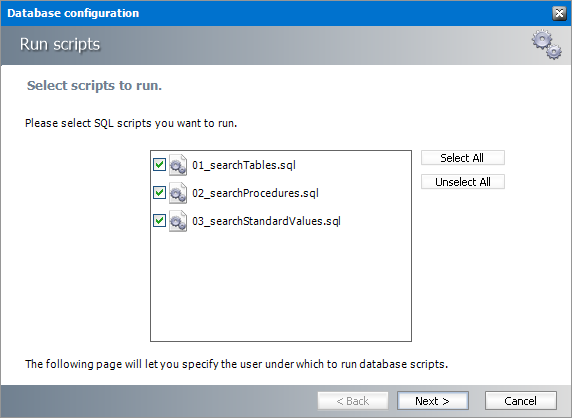
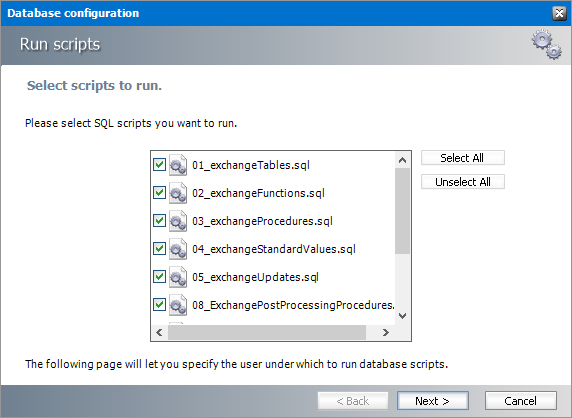
2.Verify that the database connection information is as expected. Then click Run Scripts. The script installer wizard opens.
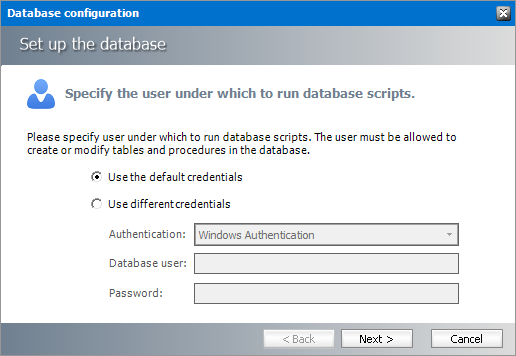
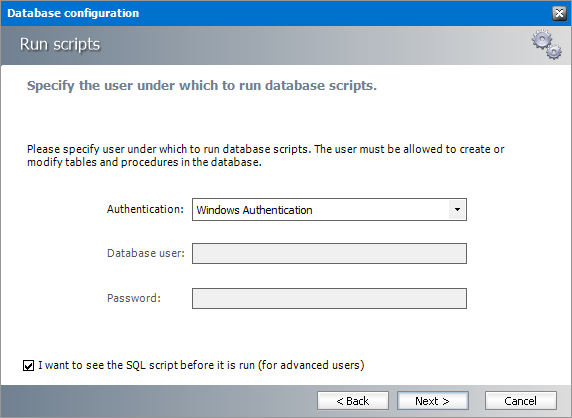
3.Select Use the default credentials to use the information displayed in the Database connections section. If you select Use different credentials, enter the following information:
a.Authentication - authentication type used for the database. Choose either Windows authentication or SQL Server authentication
a.User name - database login user name if SQL Server authentication is the selected as the authentication mode.
b.Password - password of the database user if SQL Server authentication is the selected as the authentication mode.
4.Click Next.
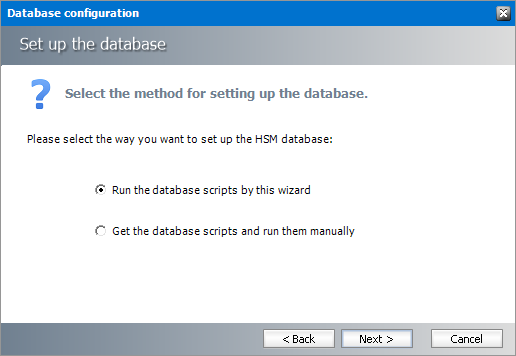
In the Select the method for setting up the database step, choose one of the following options:
a.Run the database scripts by this wizard - the installer will automatically run the scripts to create the tables and procedures required for the database.
b.Get the database scripts and run them manually - you get the option to either save the scripts or copy it to clipboard and paste it elsewhere.
5.Click Next. Depending on your selection, one of the following windows open:
For Run the database scripts by this wizard
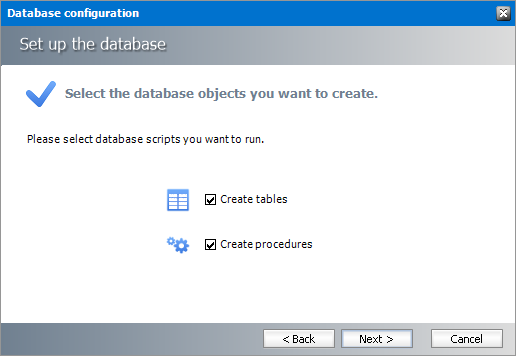
Select both check boxes: Create tables and Create procedures.
For Get the database scripts and run them manually
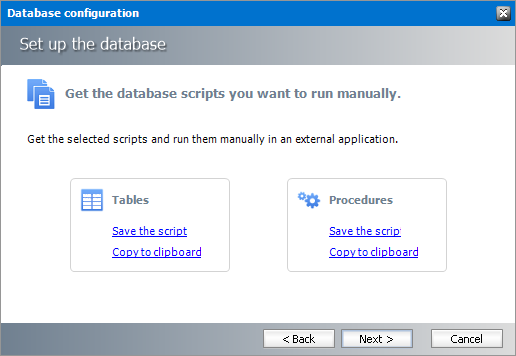
You must run both the scripts for a successful database installation.
6.Click Next. Depending on your selection in step 4, one of the following windows open
a.If you chose Run the database scripts by this wizard, and the installation is successful, a confirmation dialog opens. Click OK to close the dialog.
b.If you chose Get the database scripts and run them manually, you must run the scripts immediately because a confirmation dialog will verify whether you ran the scripts.
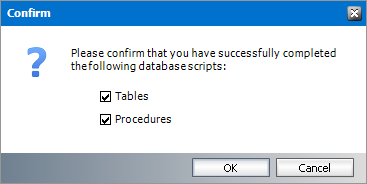
Select both check boxes after you run scripts and click OK.
7.If the installation is successful, the confirmation dialog opens. Click OK to close the dialog. The database setup completion window opens.
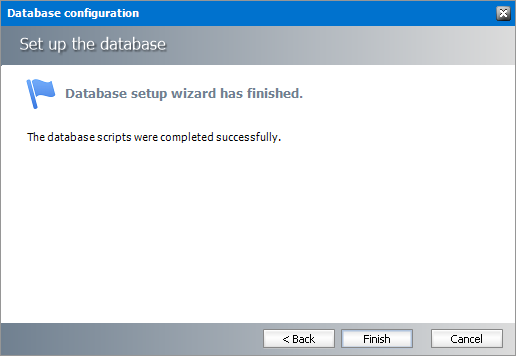
8.Click Finish to close the script installer. The Scripts section of the Configuration wizard displays the status and version of the scripts(the version of the scripts you install may differ from the version shown in the image below).
9.Keep the Configuration wizard open for next steps.
Steps to configure the HSM stores and schemas
1.From the feature panel on the left of the Configuration wizard, click HSM and select the Stores tab.
2.From the Stores section click New Store. The Create a new media Store window opens.
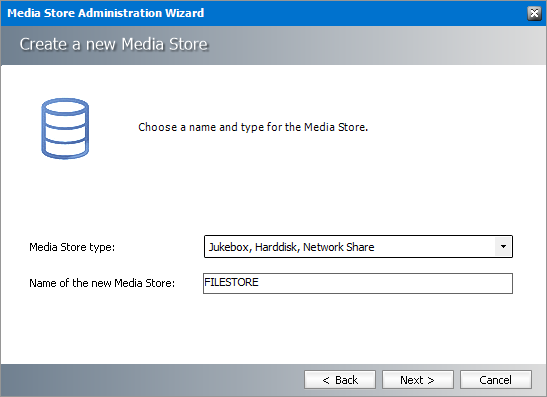
3.Click Next. The location information window opens.
Enter the information as described below;
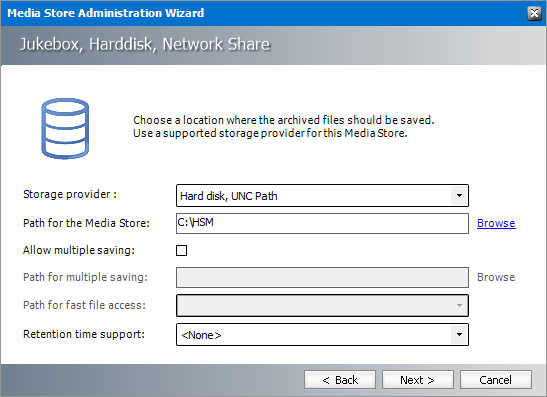
a.Storage Provider - select Hardisk, UNC Path because we are going to setup a media store in folder on the local hard drive.
b.Path for the media store - Browse and create the folder if it does not exist (eg. C:\HSM). You could specify a UNC path to a shared folder as well.
4.Keep clicking Next to accept the default settings on each window until you reach the HSM server connection information window. Every media store must provide this information so the HSM server can connect to it. For more information about various media stores see the Archive Manager for Exchange - Media Store Administration Guide.
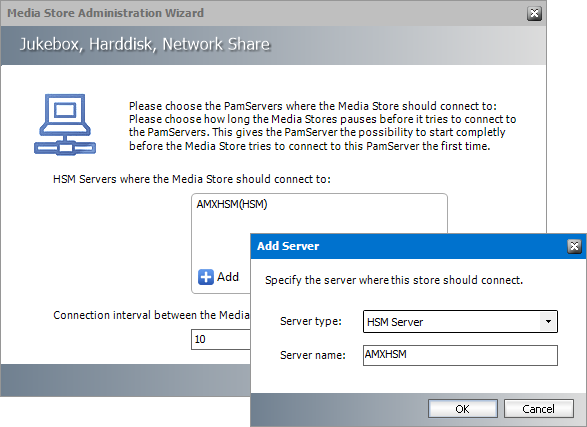
5.Click Add. The Add Server window opens. Enter the following information:
a.Server type - select HSM Server
b.Server name - name of the server where HSM is installed (eg. AMXHSM)
6.Click OK to close the window and add the the HSM Server to the list.
7.Click Next. The final configuration window appears.
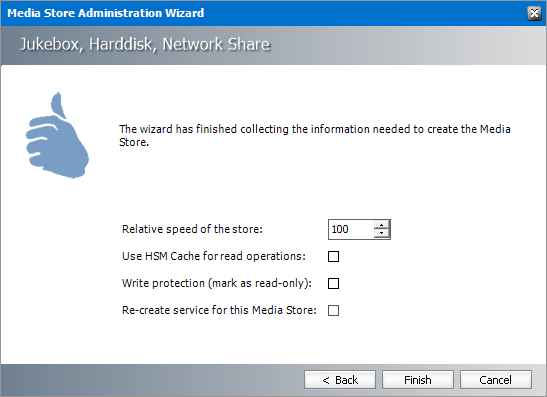
8.Accept the defaults and click Finish. The Service Restart window opens.
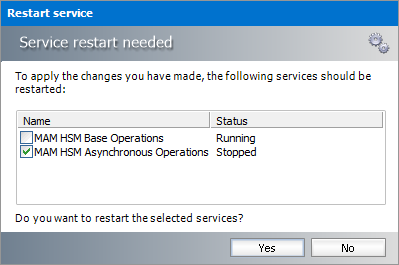
Select one or more check boxes where the Status indicates Stopped. Click Yes to restart the service so that the HSM service is aware of the media store configuration.
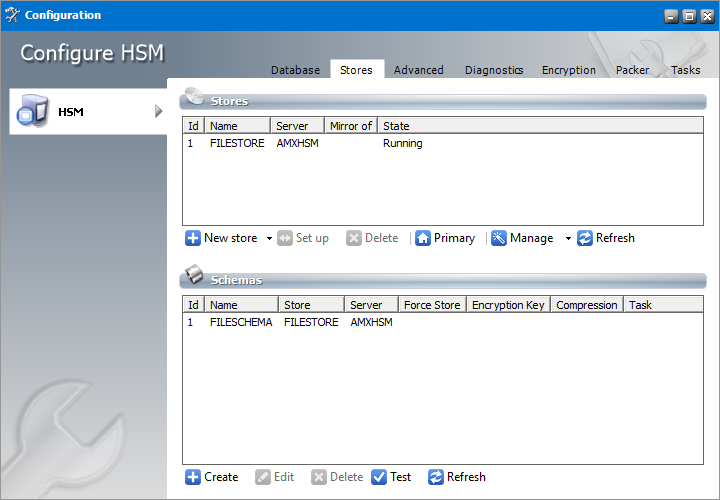
9.Verify that the media store information appears in the Stores tab of the Configuration wizard.
10.From the Schemas section in the Stores tab of the the Configuration wizard, click New Schema. The Create new schema window opens.
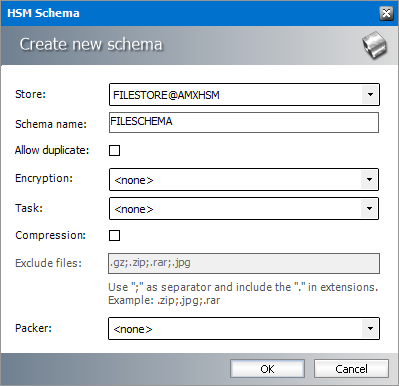
Enter the following information:
a. Store field - verify that it indicates the media store you just created.
b.Schema name - enter a name for the schema (eg. FILESCHEMA)
11.Click OK to save the schema information. In the Service Restart window opens, select one or more check boxes where the Status indicates Stopped. Click Yes to restart the service so that the HSM service is aware of the schema information.
12.Verify that the schema information appears in the Schemas section of the Stores tab in the Configuration wizard.
13.Close the Configuration wizard.
|
|
NOTE: The steps to create a local media store described above with default values completes the HSM installation. HSM offers more capabilities that can be configured. Configuration of HSM is described in detail in the HSM Installation and Configuration Guide. A large selection of media store types that are supported by Metalogix Archive Manager for Exchange are described in the Media Store Administration Guide. |

Steps to test the HSM and Media Store connectivity
1.Open the Configuration wizard and select HSM from the feature panel.
2.Click the Stores tab. Then click Test from the Schemas section. The HSM Test window opens.
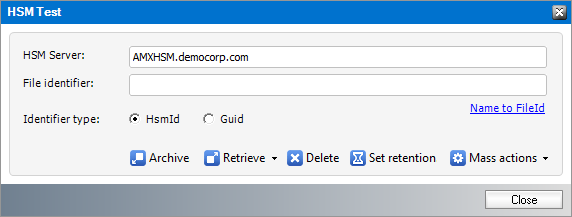
3.Click Archive. The Archive window opens.
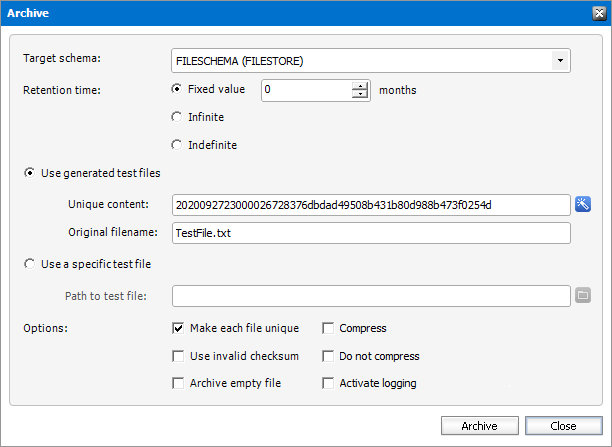
Keep the default test file settings. Copy the value in the Unique content field if you wish to test the retrieve process.
4.Click Archive. The Result window opens.
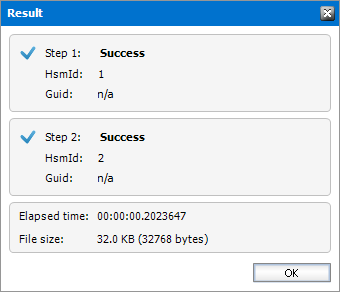
5.Verify that the result indicates success. Then click OK to close the Result window. Then close the Archive window.
6.In the HSM Test window, enter the name of the file that was archived in the Media Store during the archive test.
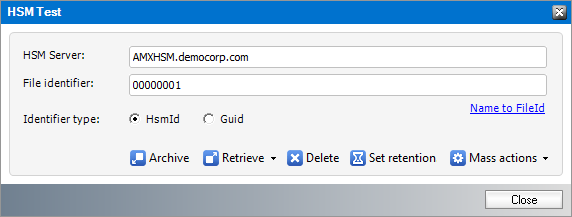
For example if the TestFile.txt was archived as 00000001.txt, enter 00000001 in the File Identifier field.
7.Click Retrieve. The Result window opens.
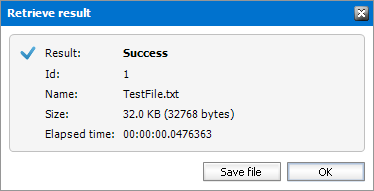
8.Verify that the result indicates success. Then click OK to close the Result window. Then close the other windows.
Install Search
The Archive Manager Search installer also installs the Post Processing service which allows a user to run specific tasks on each archived message. Archive Manager Search can be installed on a dedicated server, but in keeping with the topology described in the Deployment Plan we will install the Archive Manager Search and Post Processing service on the same server where HSM was installed (eg. AMXHSM).
In this topic:
For Archive manager Search
·Worksheet for this installation
·Steps to install Archive Manager Search (with Post Processing)
·Steps to configure the Search database connection
·Steps to install the Search database
·Steps to configure Search Scopes
For Post Processing
·Steps to configure the Post Processing database connection
·Steps to install the Post Processing database
·Steps to configure Post Processing Scopes
Worksheet for this installation
The following information will be required through the installation process. Sample values are provided here as a guidance.
|
Item |
Description |
Example |
|
HSM server |
The server where the HSM and Archive Manager Search will be installed. |
AMXHSM |
|
Superuser account |
Windows account that is used to install the application and run the Archive Manager for Exchange services. |
username: democorp\mamadmin password: ************** |
|
Media folder |
Full path of the folder where the media files are extracted |
C:\Metalogix |
|
Installation folder |
Full path of the folder where the application files will be installed |
C:\Program Files (x86)\Metalogix |
|
HSM Store folder |
Full path of the folder that will contain the archived files. |
C:\HSM The local hard drive folder is used as the default media store. Use of other media storage systems are described in the Media Store Administration Guide. |
|
Store name |
Name of the media store on a hard drive. With the Advanced Installation option of the installer wizard, only a local hard drive can be setup as a media store. |
FILESTORE |
|
Schema name |
Name of a schema in a hard drive media store. |
FILESCHEMA |
|
Database Authentication method |
Type of database authentication: Integrated Windows Authentication or SQL Authentication |
Integrated Windows Authentication |
|
UserLogin |
Username if SQL Authentication is selected |
dbadmin |
|
Password |
Database password if SQL Authentication is selected |
************** |
|
Database server |
The database server instance name where the databases for Archive Manager for Files will be installed. |
AMXDB |
Steps to install Archive Manager Search
1.Log in to the server where HSM was installed (eg. AMXHSM) with the credentials of the superuser (eg. democorp\mamadmin)
2.Download the installation media. For more information see Steps to download the install media.
3.Run the Metalogix Archive Manager Installation Package to extract the files to a local folder.
4.Close the integrated installer wizard which starts automatically.
5.Run the Archive Manager Search setup from <Media folder>\Archive Manager Installation Package\Archive Manager Search\Archive Manager Search Setup.exe
6.A prerequisite check occurs and missing requirements if any are displayed. Click Install to ensure all missing requirements are installed.
7.The Welcome window of the HSM installer opens.

8.Click Next. The License Agreement window opens.
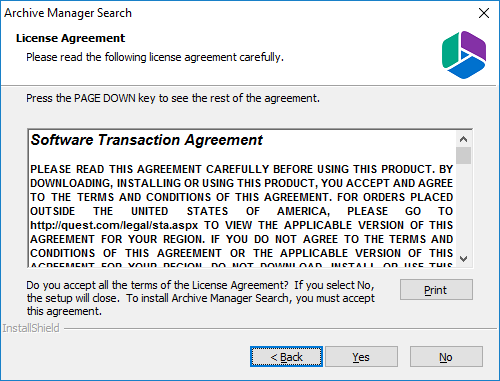
9.Click Yes to accept the license. The Setup Type window opens. Click Print if you wish to print the license agreement.
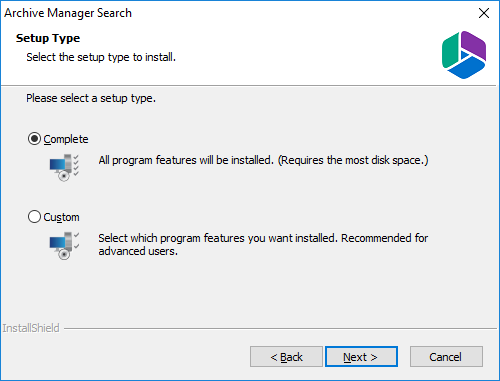
Select Complete to include Post Processing service. If you select Custom, you can modify the installation folder path which defaults to C:\Program Files (x86)\Metalogix\MAMSearch, and choose to whether you want to install Archive Manager Search or Post Processing or both.
10.Click Next. The Choose Destination Location windows opens. This setting is for the Metalogix Archive Manager for Files product and is not used by Metalogix Archive Manager for Exchange.
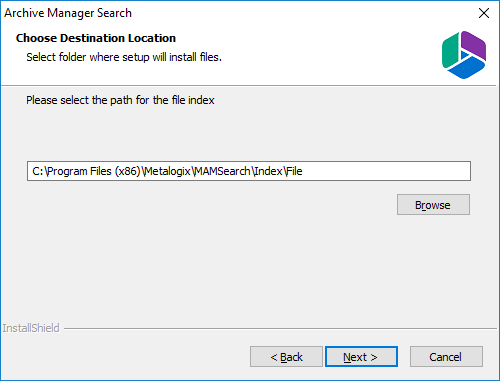
11.Accept the default setting and click Next. The Choose Destination Location for the mail index opens.

12.Accept the default setting and click Next. The Logon Information window opens.
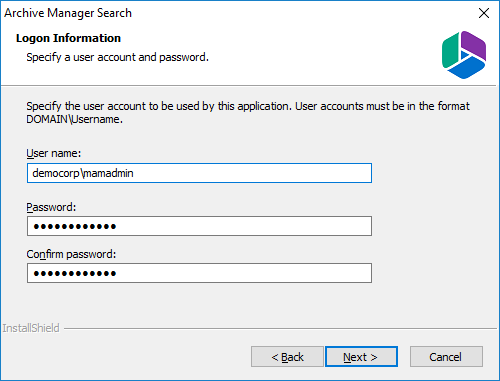
Enter the information as described below:
a.User name - logon name of the superuser (for example, democorp\mamadmin)
b.Password - logon password of the superuser
c.Confirm password - same as the Password.
13.Click Next. The Firewall Settings window appears.
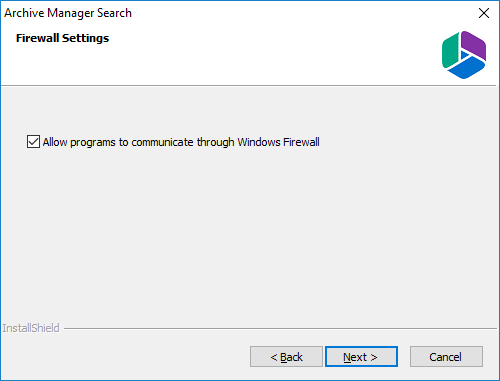
Select the check box Allow programs to communicate through Windows Firewall.
14.Click Next. The Ready to Install the Program window opens.
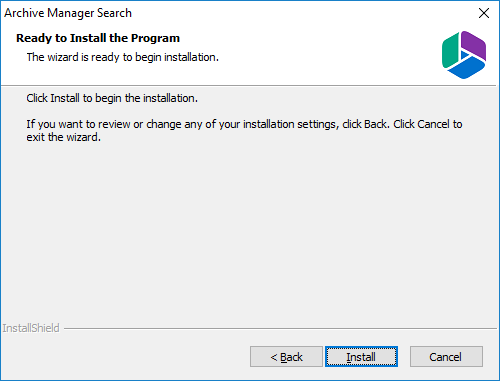
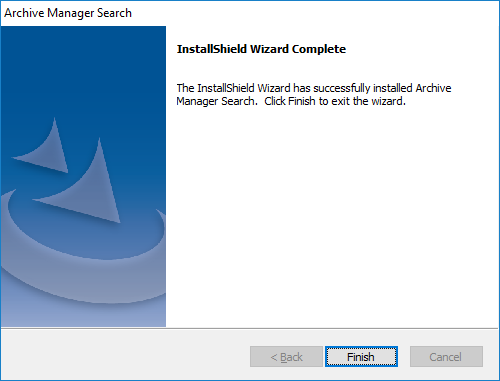
15.Click Install. The InstallShield Wizard Complete window opens.
Steps to configure the Search database connection
1.When the installation completes, the Configuration wizard opens. If it does not open automatically, click Start > Metalogix > Archive Manager Configuration.
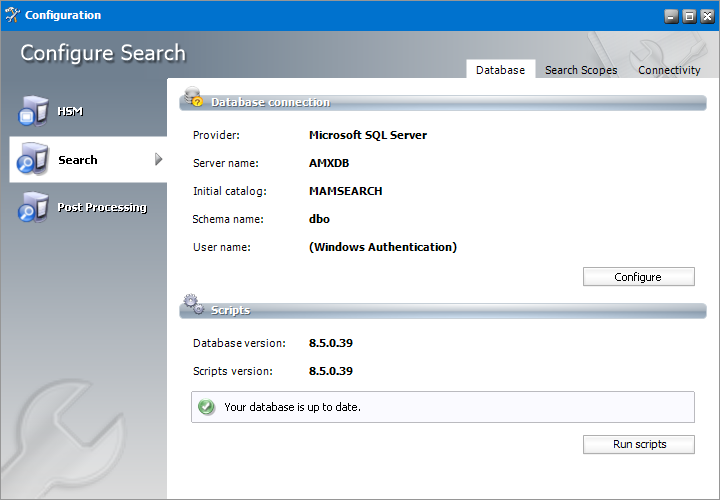
2.From the feature panel on the left, click Search and select the Database tab.
3.Click Configure. The Database Connection Wizard opens.

4.Select either Microsoft SQL Server or Oracle and click Next. The database connection information window opens for the selected database.
For Microsoft SQL Server
a.Server name - name of the SQL server (eg. AMXDB)
b.Initial catalog - name of the HSM database (e.g. MAMSEARCH which is the default name of the Archive Manager Search database)
c.Schema name - name of the SQL Schema (e.g. dbo)
d.Authentication authentication type used for the database. Choose either Windows authentication or SQL Server authentication
e.User name - database login user name if SQL Server authentication is the selected as the authentication mode.
f.Password - password of the database user if SQL Server authentication is the selected as the authentication mode.
For Oracle
a.Oracle net name - net service name that describes the network address of the HSM database in your tnsnames.ora file (eg. AMXDB)
b.Schema - name of the HSM database (e.g. MAMSEARCH which is the default name of the Archive Manager Search database)
c.User name - database login user name
d.Password - password of the database user
5.Click Next and then click Yes on the confirmation dialog that opens.
6.If the database connection is setup successfully, the configuration confirmation window opens.
7.Click Finish to close the Database Connection wizard.
Steps to install the Search database
1.From the feature panel on the left in the Configuration wizard, click Search and select the Database tab.
2.Verify that the database connection information is as expected. Then click Run Scripts. The Run Scripts selection window opens.
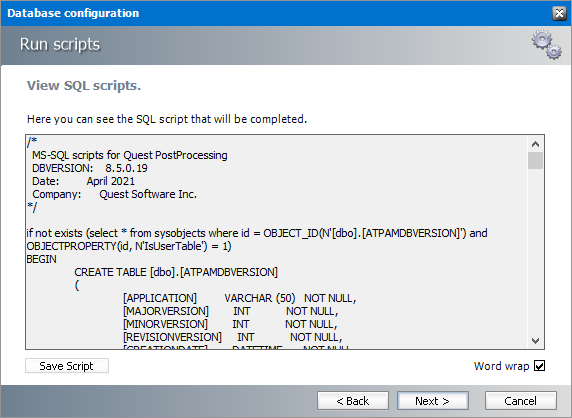
3.Click Select All to select all check boxes. Click Next. The View SQL scripts window opens.
4.Click Next. The Run Scripts authentication window opens.
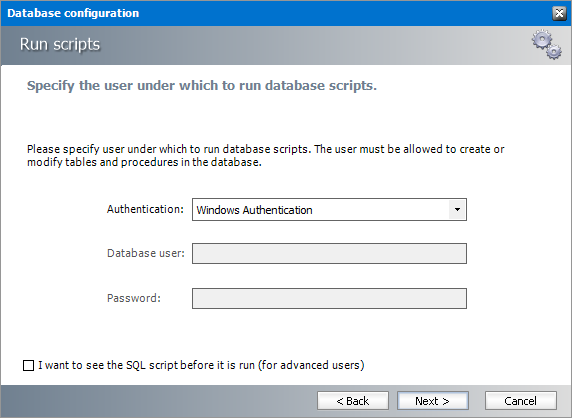
Enter the information as described below:
a.Authentication - authentication type used for the database. Choose either Windows authentication or SQL Server authentication
a.User name - database login user name if SQL Server authentication is the selected as the authentication mode.
b.Password - password of the database user if SQL Server authentication is the selected as the authentication mode.
c.(optional) Check the I want to review the SQL Scripts check box to view the scripts.
5.Click Next. If you chose to view the SQL scripts then the View SQL scripts window opens. If you chose to view the Oracle scripts then the View Oracle scripts window opens
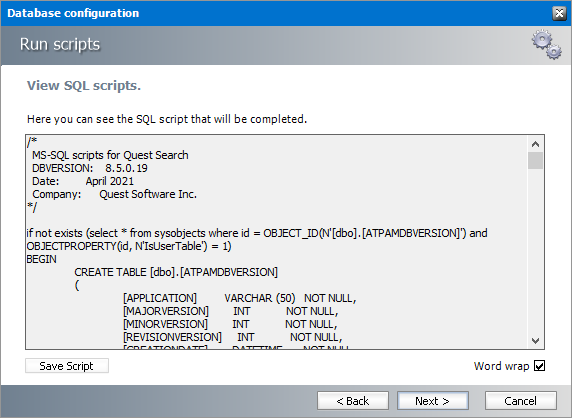
Click Save Script to save the script as a script file to a folder. Check the Word wrap check box to display long lines as multiple lines of text.
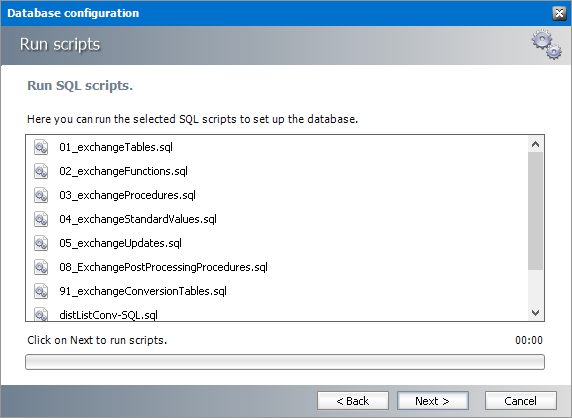
6.Click Next. The Run SQL scripts window reopens with the scripts you have chosen to run.
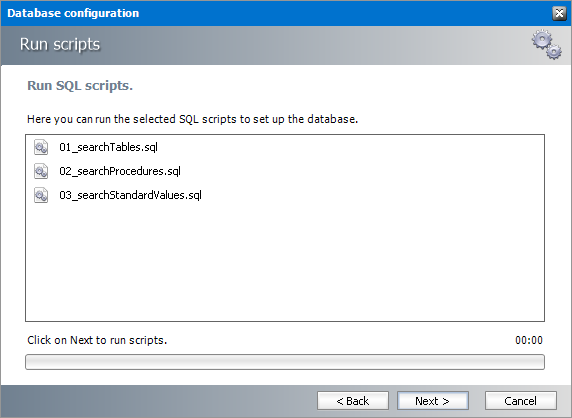
7.Click Next. When the status changes to Scripts were run successfully, click Finish to close the script installer. The Scripts section of the Configuration wizard displays the status and version of the scripts.
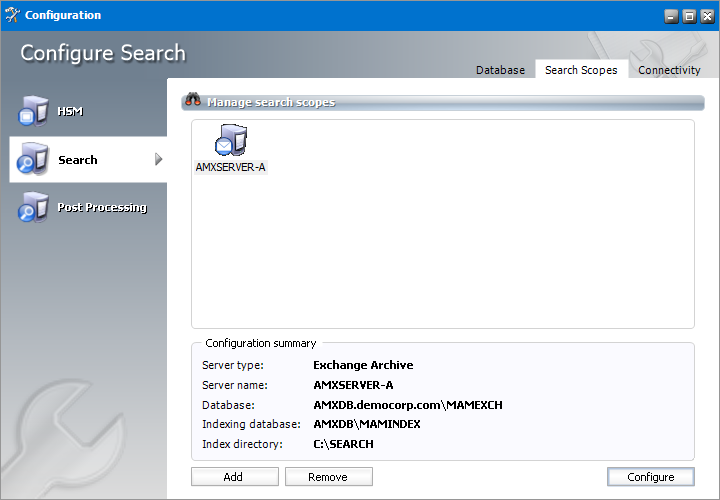
Steps to configure Search Scopes
1.From the feature panel on the left in the Configuration wizard, click Search and select the Search Scopes tab.
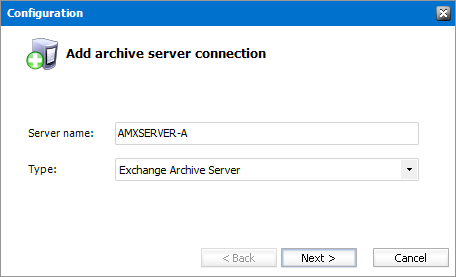
Enter the information and described below:
a.Server name - name of the primary Archive Manager for Exchange server (eg. AMXSERVER-A) where the role will be set to Archive server.
b.Type - Select Exchange Archive Server.
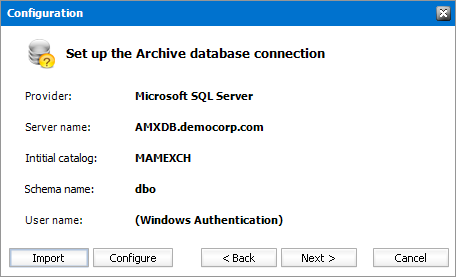
2.Click Next. The Connection window for the Archive database opens.
3.If the MAMEXCH database already exists, click Import.
-or-
If the MAMEXCH database does not exist, follow the steps below to configure the database:
a.Click Configure to setup the Archive Manager for Exchange database. The Database Connection Wizard opens.
b.Select either Microsoft SQL Server or Oracle and click Next. The database connection information window opens for the selected database.

For Microsoft SQL Server
·Server name - name of the SQL server (eg. AMXDB)
·Initial catalog - name of the Archive Manager for Files database (e.g. MAMEXCH which is the default name of the Archive Manager for Files database)
·Schema name - name of the SQL Schema (e.g. dbo)
·Authentication authentication type used for the database. Choose either Windows authentication or SQL Server authentication
·User name - database login user name if SQL Server authentication is the selected as the authentication mode.
·Password - password of the database user if SQL Server authentication is the selected as the authentication mode.
For Oracle
·Oracle net name - net service name that describes the network address of the HSM database in your tnsnames.ora file (eg. AMXDB)
·Schema - name of the Archive Manager for Files database (e.g. MAMEXCH which is the default name of the Archive Manager for Files database)
·User name - database login user name
·Password - password of the database user
c.Click Next and then click Yes on the confirmation dialog that opens.
d.If the database connection is setup successfully, the configuration confirmation window opens.
e.Click Finish to close the Database Connection wizard.
4.The Configuration window for the Archive database reopens.
5.Click Next. The Configuration window for the Index database opens.
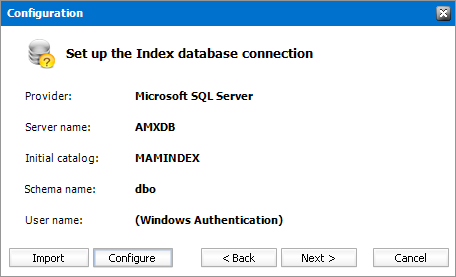
6.If the MAMINDEX database already exists, click Import.
-or-
If the MAMINDEX database does not exist, follow the steps below to configure the database:
a.Click Configure to setup the Archive database connection. The Database Connection Wizard opens.
b.Select either Microsoft SQL Server or Oracle and click Next. The database connection information window opens for the selected database.

For Microsoft SQL Server
·Server name - name of the SQL server (eg. AMXDB)
·Initial catalog - name of the Archive Manager for Files database (e.g. MAMINDEX which is the default name of the Archive Manager for Files database)
·Schema name - name of the SQL Schema (e.g. dbo)
·Authentication authentication type used for the database. Choose either Windows authentication or SQL Server authentication
·User name - database login user name if SQL Server authentication is the selected as the authentication mode.
·Password - password of the database user if SQL Server authentication is the selected as the authentication mode.
For Oracle
·Oracle net name - net service name that describes the network address of the HSM database in your tnsnames.ora file (eg. AMXDB)
·Schema - name of the Archive Manager for Files database (e.g. MAMINDEX which is the default name of the Archive Manager for Files database)
·User name - database login user name
·Password - password of the database user
c.Click Next and then click Yes on the confirmation dialog that opens.
d.If the database connection is setup successfully, the configuration confirmation window opens.
e.Click Finish to close the Database Connection wizard.
7.The Configuration window for the Index database reopens.
8.Click Next. The Index directory window opens.
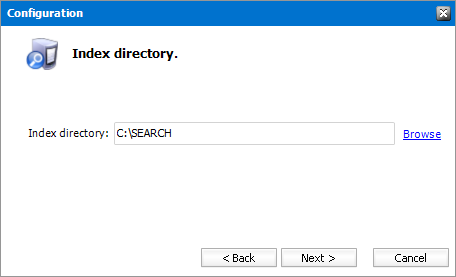
9.Click Browse to select or create a folder for the search index and then click Next. The Apply the configuration changes confirmation window opens.
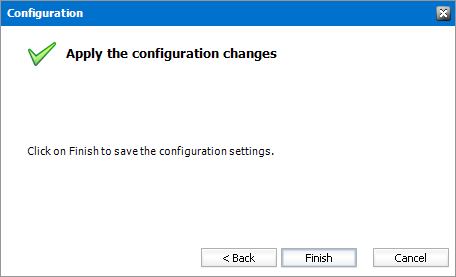
10.Click Finish. The Archive server is added to the Manage search scopes section.
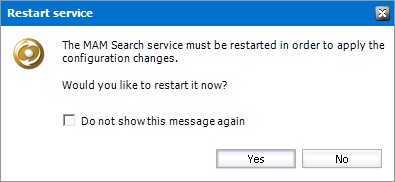
11.If the Restart service window opens, click Yes to restart the MAM service. Otherwise you must start the windows service manually.
12.Close the Configuration wizard.
Steps to configure the Post Processing database connection
1.When the installation completes, the Configuration wizard opens. If it does not open automatically, click Start > Metalogix > Archive Manager Configuration.
2.From the feature panel on the left, click Post Processing and select the Database tab.
3.Click Configure. The Database Connection Wizard opens.
4.Click Next. The SQL Server connection window opens.

5.Click Next and then click Yes on the confirmation dialog that opens.
6.If the database connection is setup successfully, the confirmation window opens.
7.Click Finish to close the Database Connection wizard.
Steps to install the Post Processing database
1.From the feature panel on the left of the Configuration wizard, click Post Processing and select the Database tab.
2.Verify that the database connection information is as expected. Then click Run Scripts. The Run Scripts selection window opens.

Click Select All to select all check boxes. Click Next. The View SQL scripts window opens.
3.Click Next. The run Scripts authentication window opens.
Enter the information as described below:
a.Authentication - authentication type used for the database. Choose either Windows authentication or SQL Server authentication
b.User name - database login user name if SQL Server authentication is the selected as the authentication mode.
c.Password - password of the database user if SQL Server authentication is the selected as the authentication mode.
d.(optional) Check the I want to review the SQL Scripts check box to view the scripts.
4.Click Next. If you chose to view the SQL scripts then the View SQL scripts window opens. If you chose to view the Oracle scripts then the View Oracle scripts window opens
Click Save Script to save the script as a script file to a folder. Check the Word wrap check box to display long lines as multiple lines of text.
5.Click Next. The Run SQL scripts window reopens with the scripts you have chosen to run.

6.Click Next. When the status changes to Scripts were run successfully, click Finish to close the script installer. The Scripts section of the Configuration wizard displays the status and version of the scripts(the version of the scripts you install may differ from the version shown in the image below).

|
|
IMPORTANT: You may close the Configuration wizard. Click Cancel on any warning dialogs that may open. Additional Post Processing configuration is required but must wait until the Archive Server installation and configuration is completed. See Install the Archive server for next steps. |
Steps to configure Post Processing Scopes
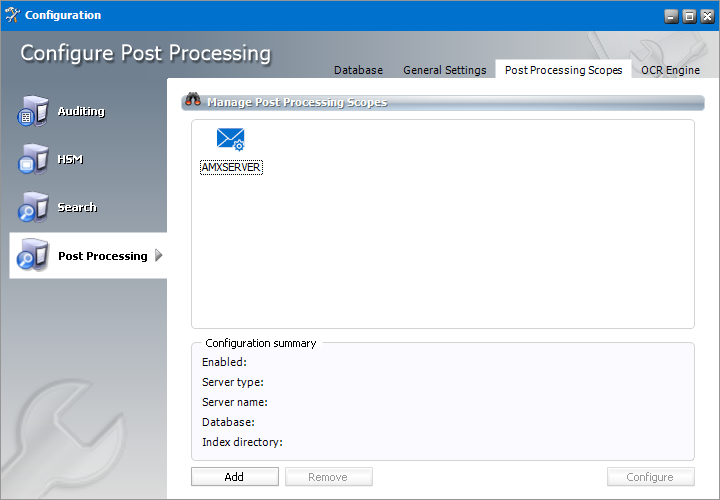
1.From the feature panel on the left in the Configuration wizard, click Post Processing and select the Post Processing Scopes tab.

Enter the information and described below:
a.Server type - select Archive server for Exchange
b.Server name - specify the name of the Archive Manager for Exchange server which will be the designated Archive server. For example, AMXSERVER-A
2.Click OK. If you have did not install the Archive server for Exchange yet, an error message appears

3.Click OK. The Configuration window for the Post Processing Scopes opens.
Enter the following information:
a.Activated - select the check box to activate the Post Processing Scope for Exchange.
b.HSM server - name of the HSM server
c.Index directory - full path to the index directory, the default path is C:\Program Files (x86)\Metalogix\MAMSearch\Index\Mail
d.Mailboxes index - number of mailboxes that can be indexed.
e.Exchange database - click Configure and use the wizard to connect to the Archive Manager database.
f.Plugins - click Add to insert the plugins.
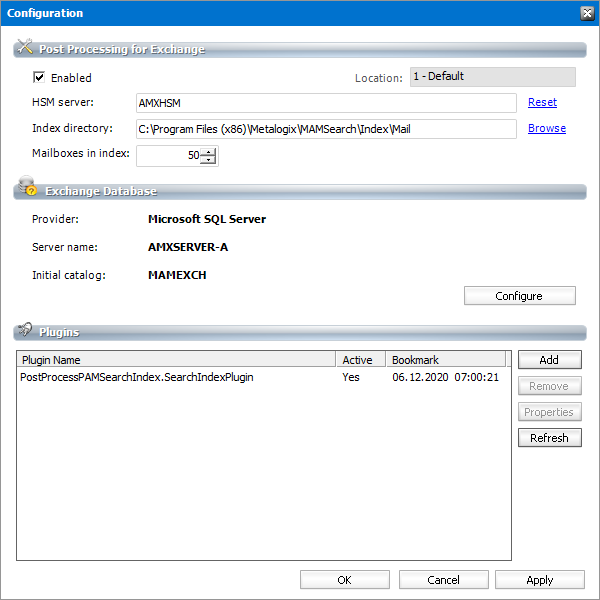
4.Click OK to add the Post processing Scope for Archive manager for Exchange.
Install the Archive server
In this topic:
·Worksheet for this installation
·Steps to install Archive Manager for Exchange
·Steps to configure the Archive Manager database connection
·Steps to install the Archive Manager database
·Steps to configure the Auditing database
·Steps to install the Auditing database
·Steps to configure the User database
·Steps to install the User database
·Steps to start the Archive Manager services
·Steps to configure and verify the Archive server
Worksheet for this installation
The following information will be required through the installation process. Sample values are provided here as a guidance.
|
Item |
Description |
Example |
|
License Key |
The license key that you received from Quest. If you don't have a license key, contact your Quest representative. |
894K5-3M448-M544E-A594A-7K8Z7 (Sample only. This key is neither an active nor an expired license key) |
|
Archive manager for Exchange server |
The server where the Archive Manager for Exchange will be installed. |
AMXSERVER-A |
|
Superuser account |
Windows account that is used to install the application and run the Archive Manager for Exchange services. |
username: democorp\mamadmin password: ************** |
|
Media folder |
Full path of the folder where the media files are extracted |
C:\Metalogix |
|
Installation folder |
Full path of the folder where the application files will be installed |
C:\Program Files (x86)\Metalogix |
|
Database Authentication method |
Type of database authentication: Integrated Windows Authentication or SQL Authentication |
Integrated Windows Authentication |
|
UserLogin |
Username if SQL Authentication is selected |
dbadmin |
|
Password |
Database password if SQL Authentication is selected |
************** |
|
Database server |
The database server instance name where the databases for Archive Manager for Files will be installed. |
AMXDB |
|
HSM server |
The server where HSM is installed. |
AMXHSM |
|
Search server |
The server where the Archive Manager Search is installed. |
AMXHSM |
Steps to install Metalogix Archive Manager for Exchange
1.Login to the server with the credentials of the superuser (eg. democorp\mamadmin)
2.Run the Metalogix Archive Manager Installation Package to extract the files to a local folder.
3.Close the integrated installer wizard if it starts automatically.
4.Run the Archive Manager setup. The default path is C:\Metalogix\Archive Manager Installation Package\Exchange\Archive Manager for Exchange Setup.exe
5.A prerequisite check occurs and missing requirements if any are displayed. Click Install to ensure all missing requirements are installed.
6.The Welcome window of the Archive Manager for Exchange installer opens.
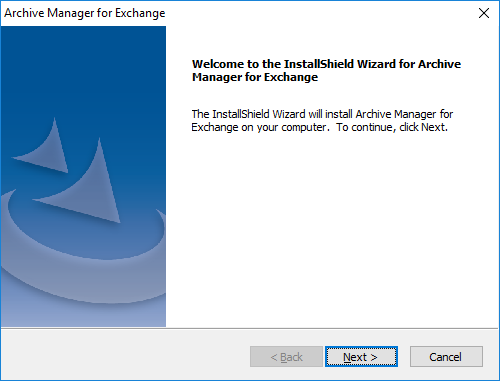
7.Click Next. The License Agreement window opens.
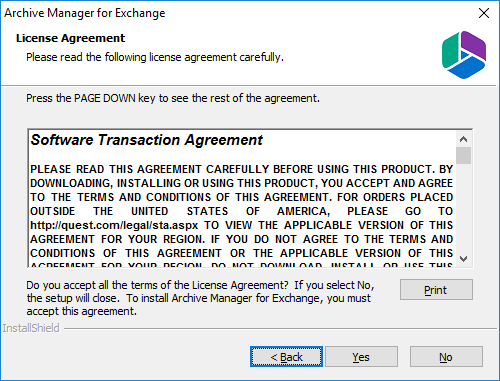
8.Click Yes to accept the license. The License Key window opens. Click Print if you wish to print the license agreement.
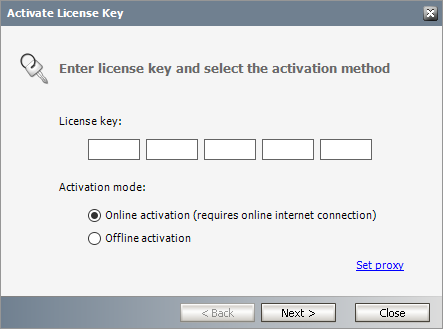
9.If you are connected to the internet, select Online activation or see License Activation for more options. Click Next. When your license is activated, you will see a confirmation message and the license details. Click Finish to close the Activate License Key dialog.
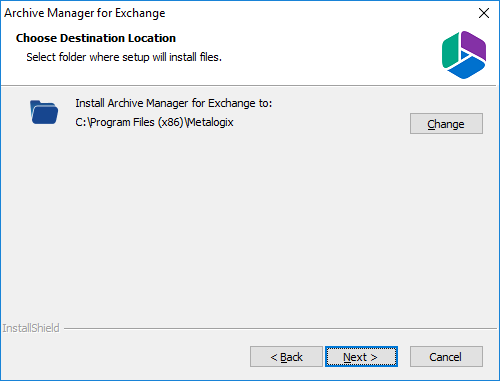
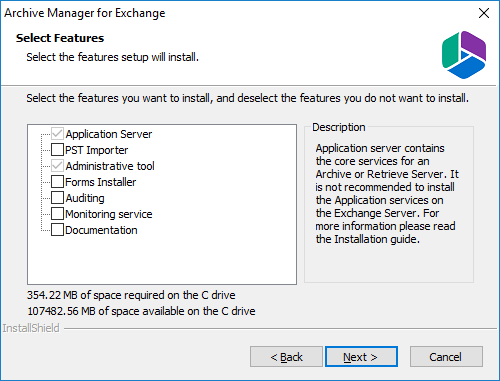
10.Click Change to choose another installation folder or keep the default and click Next. The Select Features window opens.
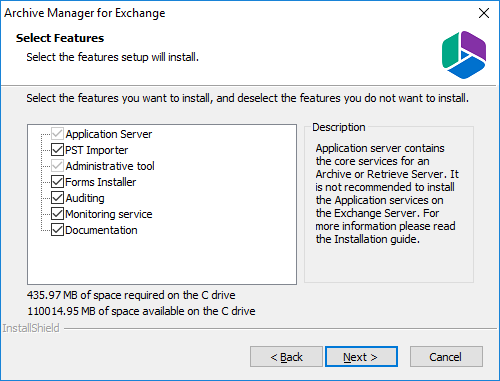
Mandatory features
·Application Server
·Administrative tool
Optional features
·Auditing
·Monitoring service
Optional resources
·PST Importer. For more information see the Metalogix® Archive Manager for Exchange PST Importer Guide.
·Forms Installer
·Documentation
11.Click Next. The Archive Manager site port Information window opens.
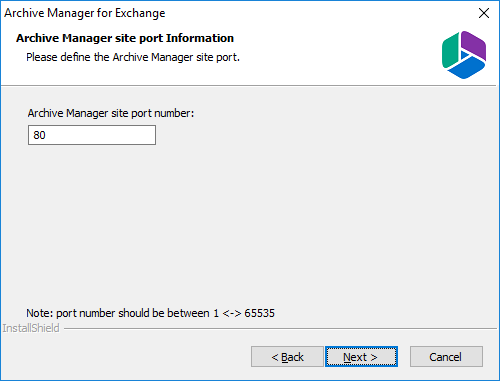
12.Keep the default port 80 unless there are other application co-located on this server that also use port 80. Click Next and the Select HSM server window opens.
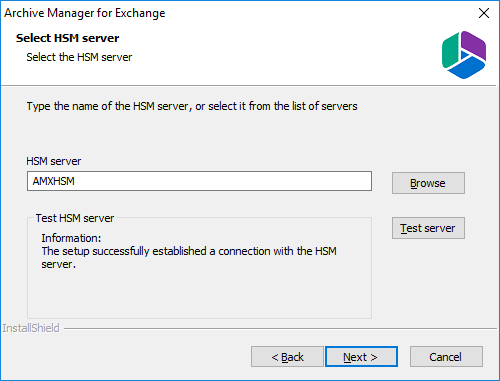
In the HSM server field, enter the name, FQDN or IP address of the server where the HSM application feature was installed. You can click Browse to locate the server in the domain.
13.Click Test server to verify the connection and then click Next. The Search server window opens.
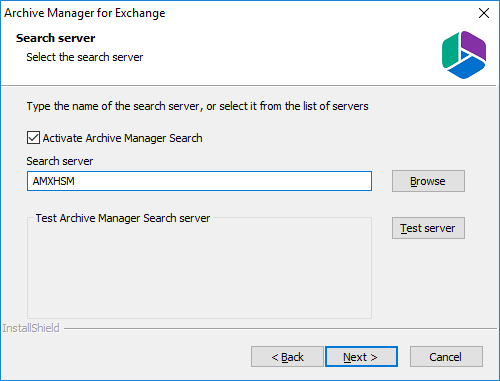
Check the Activate Archive Manager Search to allow search functionality from this server. In the Search server field, enter the name, FQDN or IP address of the server where the HSM application feature was installed. You can click Browse to locate the server in the domain.
14.Click Next. The Logon Information window opens.
In the User name field, specify the superuser name (eg. democorp\mamadmin)and Password. Enter the password again in the Confirm password field.
15.Click Next. The Firewall Settings window opens.
Select the Allow programs to communicate through Windows Firewall check box. Metalogix Archive Manager for Exchange features will be then able to communicate through the firewall.
16.Click Next. The Ready to Install the Program window opens.
17.Click Install to start the installation. When the installation completes, the InstallShield Wizard Complete window opens.
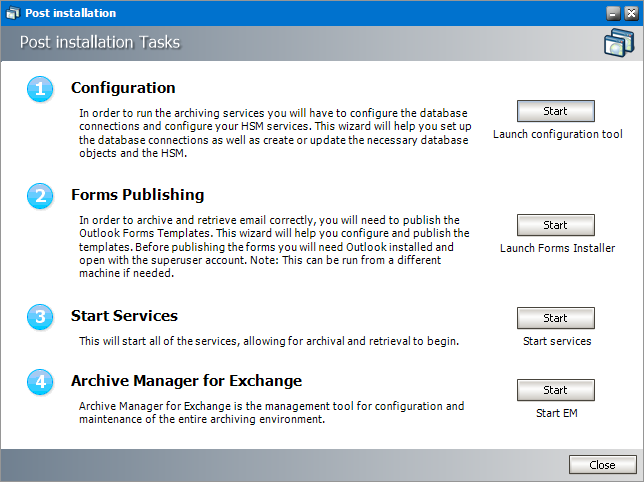
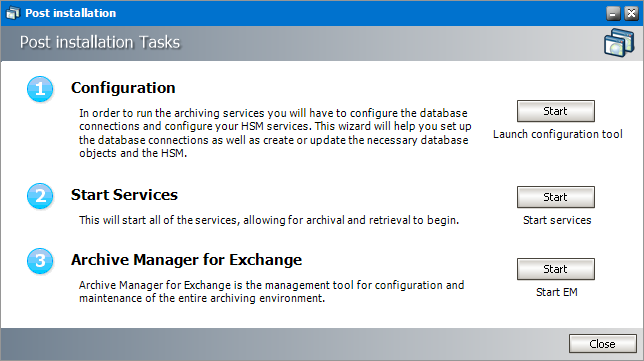
18.Select the Launch Post Installation Tasks check box and click Finish. The Post installation Tasks wizard opens.
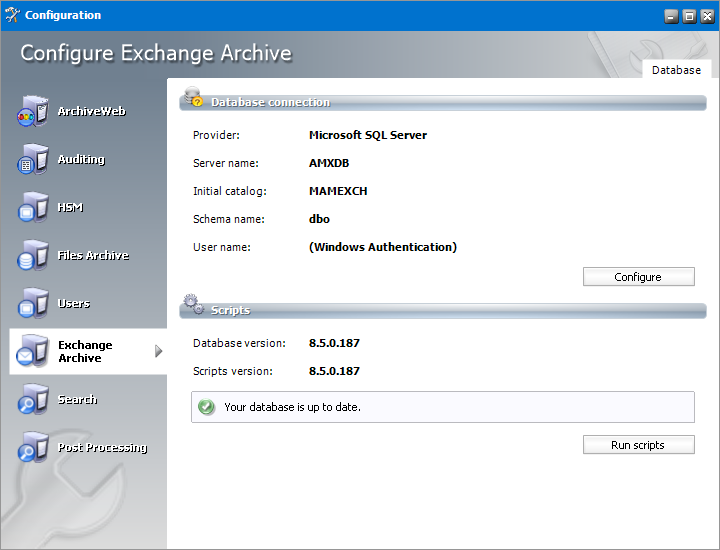
Steps to configure the Archive Manager database connection
1.When the installation completes, the Post installation Tasks wizard opens. You can open the the Post installation Tasks wizard from C:\Program Files (x86)\Metalogix\MAM4Exchange\Tools\LaunchTools\LaunchTools.exe.
2.Click Start next to the Configuration step to open the Configuration wizard. To directly open the Configuration wizard click Start > Metalogix > Archive Manager Configuration.
3.From the feature panel on the left, click Archive Manager and select the Database tab.
4.Click Configure. The Database Connection Wizard opens.
5.Select either Microsoft SQL Server (for on-premise MS SQL Database Server or Azure SQL Database) or Oracle and click Next. The database connection information window opens for the selected database.

For Microsoft SQL Server
a.Server name - name of the SQL server (eg. AMXDB)
b.Initial catalog - name of the HSM database (e.g. MAMEXCH which is the default name of the Archive Manager for Exchange database)
c.Schema name - name of the SQL Schema (e.g. dbo)
d.Authentication authentication type used for the database. Choose either Windows authentication or SQL Server authentication
e.User name - database login user name if SQL Server authentication is the selected as the authentication mode.
f.Password - password of the database user if SQL Server authentication is the selected as the authentication mode.
For Oracle
a.Oracle net name - net service name that describes the network address of the HSM database in your tnsnames.ora file (eg. AMXDB)
b.Schema - name of the HSM database (e.g. MAMEXCH which is the default name of the Archive Manager for Exchange database)
c.User name - database login user name
d.Password - password of the database user
6.Click Next and then click Yes on the confirmation dialog that opens.
7.If the database connection is setup successfully, the confirmation window opens.
8.Click Finish to close the Database Connection wizard.
Steps to install the Archive Manager database
1.From the feature panel on the left in the Configuration wizard, click Exchange Archive and select the Database tab.
2.Verify that the database connection information is as expected. Then click Run Scripts. The Run Scripts selection window opens.
3.Click Select All to select all check boxes. Then click Next. The Run Scripts authentication window opens.
Enter the information as described below:
a.Authentication - authentication type used for the database. Choose either Windows authentication or SQL Server authentication
a.User name - database login user name if SQL Server authentication is the selected as the authentication mode.
b.Password - password of the database user if SQL Server authentication is the selected as the authentication mode.
c.(optional) Check the I want to review the SQL Scripts check box to view the scripts.
4.Click Next. If you chose to view the SQL scripts then the View SQL scripts window opens. If you chose to view the Oracle scripts then the View Oracle scripts window opens

Click Save Script to save the script as a script file to a folder. Check the Word wrap check box to display long lines as multiple lines of text.
5.Click Next. The Run SQL scripts window reopens with the scripts you have chosen to run.
6.Click Next. When the status changes to Scripts were run successfully, click Finish to close the script installer. The Scripts section of the Configuration wizard displays the status and version of the scripts (the version of the scripts you install may differ from the version shown in the image below).
7.Close the Configuration wizard.
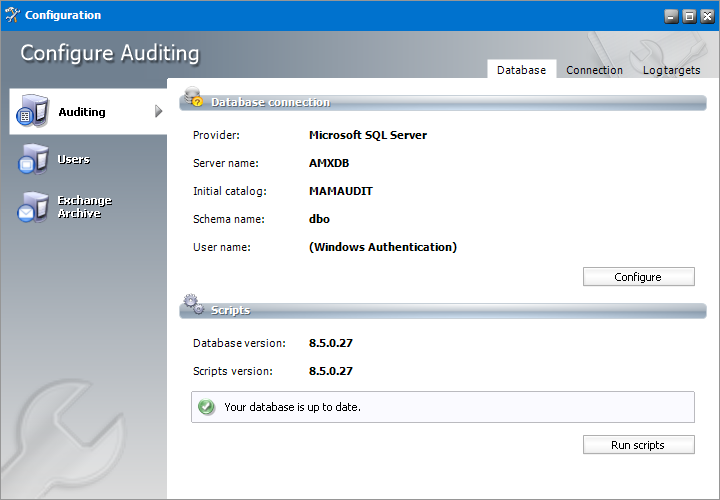
Steps to configure the Auditing database
1.Open the Configuration wizard if it is not already open.
2.From the feature panel on the left, click Auditing and then select the Database tab.
3.Click Configure. The Database Connection Wizard opens.
4.Select either Microsoft SQL Server or Oracle and click Next. The database connection information window opens for the selected database.

For SQL Server
a.Server name - name of the SQL server (eg. AMXDB)
b.Initial catalog - name of the HSM database (e.g. MAMAUDIT which is the default name of the Archive Manager for Exchange database)
c.Schema name - name of the SQL schema (e.g. dbo)
d.Authentication authentication type used for the database. Choose either Windows authentication or SQL Server authentication
e.User name - database login user name if SQL Server authentication is the selected as the authentication mode.
f.Password - password of the database user if SQL Server authentication is the selected as the authentication mode.
For Oracle
e.Oracle net name - net service name that describes the network address of the database server in your tnsnames.ora file (eg. AMXDB)
f.Schema - name of the Auditing schema (e.g. MAMAUDIT which is the default name of the Archive Manager for Exchange database)
g.User name - database login user name
h.Password - password of the database user
5.Click Next and then click Yes on the confirmation dialog that opens.
6.If the database connection is setup successfully, the configuration confirmation window opens.
7.Click Finish to close the Database Connection wizard.
Steps to install the Auditing database
1.From the feature panel on the left in the Configuration wizard, click Auditing and select the Database tab.
2.Verify that the database connection information is as expected. Then click Run Scripts. The Run Scripts selection window opens.
3.Click Select All to select all check boxes. Click Next. The View SQL scripts window opens.
4.Click Next. The Run Scripts authentication window opens.
5.Enter the information as described below:
a.Authentication - authentication type used for the database. Choose either Windows authentication or SQL Server authentication
b.User name - database login user name if SQL Server authentication is the selected as the authentication mode.
c.Password - password of the database user if SQL Server authentication is the selected as the authentication mode.
6.(optional) Check the I want to review the SQL Scripts check box to view the scripts.
7.Click Next. If you chose to view the SQL scripts then the View SQL scripts window opens. If you chose to view the Oracle scripts then the View Oracle scripts window opens
8.Click Save Script to save the script as a script file to a folder. Check the Word wrap check box to display long lines as multiple lines of text.
9.Click Next. The Run SQL scripts window reopens with the scripts you have chosen to run.
10.Click Next. When the status changes to Scripts were run successfully, click Finish to close the script installer. The Scripts section of the Configuration wizard displays the status and version of the scripts.
11.Close the Configuration wizard.
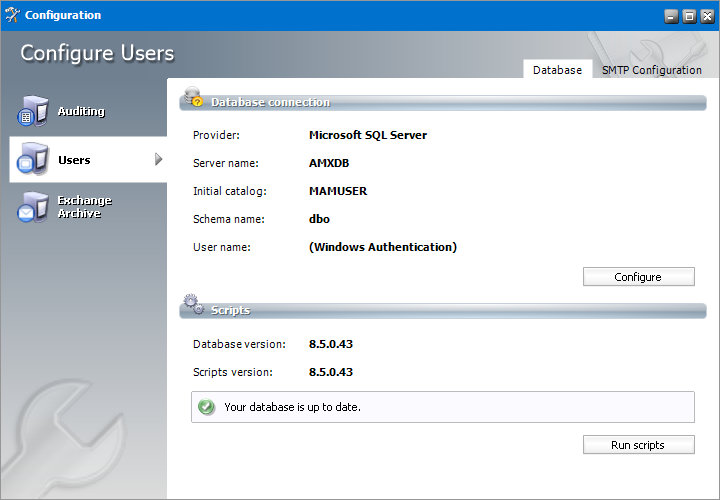
Steps to configure the User database
1.Open the Configuration wizard if it is not already open.
2.From the feature panel on the left, click Users and then select the Database tab.
3.Click Configure. The Database Connection Wizard opens.
4.Select either Microsoft SQL Server or Oracle and click Next. The database connection information window opens for the selected database.
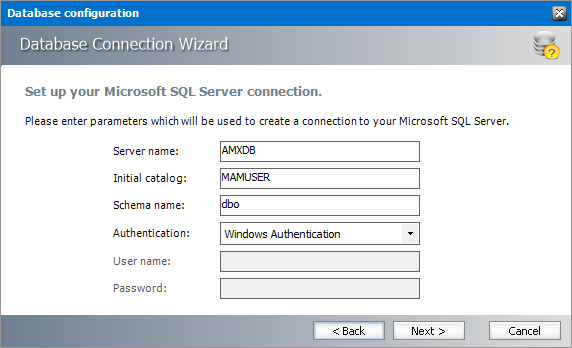
For SQL Server
a.Server name - name of the SQL server (eg. AMXDB)
b.Initial catalog - name of the HSM database (e.g. MAMUSER which is the default name of the Archive Manager for Exchange database)
c.Schema name - name of the SQL schema (e.g. dbo)
d.Authentication authentication type used for the database. Choose either Windows authentication or SQL Server authentication
e.User name - database login user name if SQL Server authentication is the selected as the authentication mode.
f.Password - password of the database user if SQL Server authentication is the selected as the authentication mode.
For Oracle
a.Oracle net name - net service name that describes the network address of the database server in your tnsnames.ora file (eg. AMXDB)
b.Schema - name of the Auditing schema (e.g. MAMUSER which is the default name of the Archive Manager for Exchange database)
c.User name - database login user name
d.Password - password of the database user
5.Click Next and then click Yes on the confirmation dialog that opens.
6.If the database connection is setup successfully, the configuration confirmation window opens.
7.Click Finish to close the Database Connection wizard.
Steps to install the User database
1.From the feature panel on the left in the Configuration wizard, click Users and select the Database tab.
2.Verify that the database connection information is as expected. Then click Run Scripts. The Run Scripts selection window opens.
3.Click Select All to select all check boxes. Click Next. The View SQL scripts window opens.
4.Click Next. The Run Scripts authentication window opens.
5.Enter the information as described below:
a.Authentication - authentication type used for the database. Choose either Windows authentication or SQL Server authentication
b.User name - database login user name if SQL Server authentication is the selected as the authentication mode.
c.Password - password of the database user if SQL Server authentication is the selected as the authentication mode.
d.(optional) Check the I want to review the SQL Scripts check box to view the scripts.
6.Click Next. If you chose to view the SQL scripts then the View SQL scripts window opens. If you chose to view the Oracle scripts then the View Oracle scripts window opens
7.Click Save Script to save the script as a script file to a folder. Check the Word wrap check box to display long lines as multiple lines of text.
8.Click Next. The Run SQL scripts window reopens with the scripts you have chosen to run.
9.Click Next. When the status changes to Scripts were run successfully, click Finish to close the script installer. The Scripts section of the Configuration wizard displays the status and version of the scripts.
10.Close the Configuration wizard.
Steps to start the Archive Manager for Exchange services
1.If the Post installation Tasks wizard is not already open, you can open the the Post installation Tasks wizard from C:\Program Files (x86)\Metalogix\MAM4Exchange\Tools\LaunchTools\LaunchTools.exe.
2.Click Start next to step 3 to start the services. You can also start services with the batch file available at <Installation folder> > Metalogix > MAM4Exchange > Tools > Start.bat.
|
|
NOTE: To stop the services at any time you can use the batch file available at <Installation folder> > Metalogix > MAM4Exchange > Tools > Stop.bat. |
Steps to configure and verify the Archive Server
Unless you manually change the role, every installation of the Archive Manager for Exchange will automatically assign the Archive Server role to the installed instance. The Archive Server role indicates that this is the primary server and all administration tasks are controlled from this server.
1.If the Post installation Tasks wizard is not already open, you can open the the Post installation Tasks wizard from C:\Program Files (x86)\Metalogix\MAM4Exchange\Tools\LaunchTools\LaunchTools.exe.
2.Click Start next to step 4 of the the Post installation Tasks wizard to open the AMAC. You can also open the Archive Manager for Exchange Administration Center (AMAC) from Start > Archive Manager for Exchange. The AMAC opens.
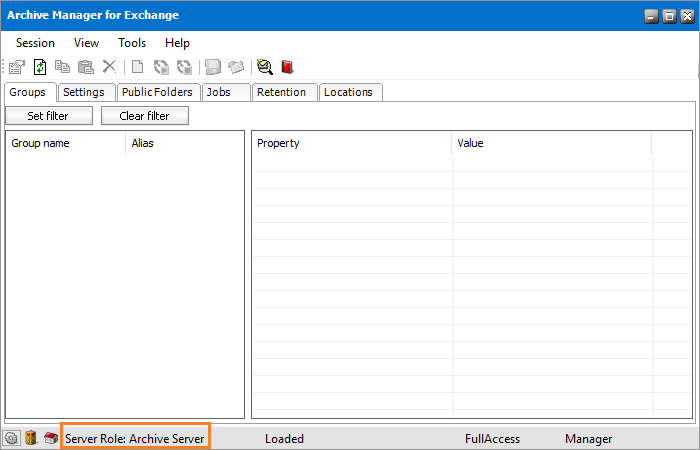
3.On the status bar at the bottom of the window, verify that the Server Role is set to Archive Server.
4.The Address Book Setup wizard opens automatically for a new installation. Click Close to exit the wizard. Then close the Address Book Manager window that opens. For a manual installation, Address Book setup can be done at a later step. For more information see Setup the Address Book.
|
|
NOTE: Whenever an Archive Manager for Exchange server is installed, the default role assigned is Archive Server. These servers are also identified with a MultiServerID and a LocationID which are integers that default to 1. Large organizations with more than 3000 mailboxes use more that one Archive server. Since the MultiServerID and LocationID of each Archive server must be unique, you must manually change the MultiServerID and LocationID of each extra Archive server by changing the following registry key values. For example, for a second Archive server, set the following registry key values to 2, for a third Archive server set the registry key values to 3, and so on. HKEY_LOCAL_MACHINE > SOFTWARE > Wow6432Node > Metalogix > exchangePAM > MultiServerID HKEY_LOCAL_MACHINE > SOFTWARE > Wow6432Node > Metalogix > exchangePAM > OfflineStorage > LocationID |
Install the Retrieve server
In this topic:
·Worksheet for this installation
·Steps to install Archive Manager for Exchange
·Steps to configure the Archive Manager database
·Steps to install the Archive Manager database
·Steps to configure the User database
·Steps to install the User database
·Steps to start the Archive Manager services
·Steps to set the Retrieve Server role
·Steps to verify the Retrieve Server role
Worksheet for this installation
The following information will be required through the installation process. Sample values are provided here as a guidance.
|
Item |
Description |
Example |
|
License Key |
The license key that you received from Quest. If you don't have a license key, contact your Quest representative. |
894K5-3M448-M544E-A594A-7K8Z7 (Sample only. This key is neither an active nor an expired license key) |
|
Archive manager for Exchange server |
The server where the Archive Manager for Exchange will be installed. |
AMXSERVER-R |
|
Superuser account |
Windows account that is used to install the application and run the Archive Manager for Exchange services. |
username: democorp\mamadmin password: ************** |
|
Media folder |
Full path of the folder where the media files are extracted |
C:\Metalogix |
|
Installation folder |
Full path of the folder where the application files will be installed |
C:\Program Files (x86)\Metalogix |
|
Database Authentication method |
Type of database authentication: Integrated Windows Authentication or SQL Authentication |
Integrated Windows Authentication |
|
UserLogin |
Username if SQL Authentication is selected |
dbadmin |
|
Password |
Database password if SQL Authentication is selected |
************** |
|
Database server |
The database server instance name where the databases for Archive Manager for Files will be installed. |
AMXDB |
|
HSM server |
The server where HSM is installed. |
AMXHSM |
|
Search server |
The server where the Archive Manager Search is installed. |
AMXHSM |
Steps to install Metalogix Archive Manager for Exchange
1.Login to the server with the credentials of the superuser (eg. democorp\mamadmin)
2.Run the Metalogix Archive Manager Installation Package to extract the files to a local folder.
3.Close the integrated installer wizard which starts automatically.
4.Run the Archive Manager Search setup from <Media folder>\C:\Metalogix\Archive Manager Installation Package\Exchange\Archive Manager for Exchange Setup.exe.
5.A prerequisite check occurs and missing requirements if any are displayed. Click Install to ensure all missing requirements are installed.
6.The Welcome window of the Archive Manager for Exchange installer opens.
7.Click Next. The License Agreement window opens.
8.Click Yes to accept the license. The License Key window opens. Click Print if you wish to print the license agreement.
9.If you are connected to the internet, select Online activation or see License Activation for more options. Click Next. When your license is activated, you will see a confirmation message and the license details. Click Finish to close the Activate License Key dialog.
10.Click Change to choose another installation folder or keep the default and click Next. The Select Features window opens.
Keep on the mandatory features. Uncheck all other check boxes.
·Application Server
·Administrative tool
11.Click Next. The Archive Manager site port Information window opens.
12.Keep the default port 80 unless there are other application co-located on this server that also use port 80. Click Next and the Select HSM server window opens.
In the HSM server field, enter the name, FQDN or IP address of the server where the HSM application feature was installed. You can click Browse to locate the server in the domain.
13.Click Test server to verify the connection and then click Next. The Search server window opens.
Check the Activate Archive Manager Search to allow search functionality from this server. In the Search server field, enter the name, FQDN or IP address of the server where the HSM application feature was installed. You can click Browse to locate the server in the domain.
14.Click Next. The Logon Information window opens.
In the User name field, specify the superuser name (eg. democorp\mamadmin)and Password. Enter the password again in the Confirm password field.
15.Click Next. The Firewall Settings window opens.
Select the Allow programs to communicate through Windows Firewall check box. Metalogix Archive Manager for Exchange features will be then able to communicate through the firewall.
16.Click Next. The Ready to Install the Program window opens.
17.Click Install to start the installation. When the installation completes, the InstallShield Wizard Complete window opens.
18.Select the Launch Post Installation Tasks check box and click Finish. The Post installation Tasks wizard opens.
Steps to configure the Archive Manager database
1.When the installation completes, the Post installation Tasks wizard opens. You can open the the Post installation Tasks wizard from C:\Program Files (x86)\Metalogix\MAM4Exchange\Tools\LaunchTools\LaunchTools.exe.
2.Click Start next to the Configuration step to open the Configuration wizard. To directly open the Configuration wizard click Start > Metalogix > Archive Manager Configuration.
3.From the feature panel on the left, click Archive Manager and select the Database tab.
4.Click Configure. The Database Connection Wizard opens.
5.Select either Microsoft SQL Server (for on-premise MS SQL Database Server or Azure SQL Database) or Oracle and click Next. The database connection information window opens for the selected database.
For Microsoft SQL Server
a.Server name - name of the SQL server (eg. AMXDB)
b.Initial catalog - name of the HSM database (e.g. MAMEXCH which is the default name of the Archive Manager for Exchange database)
c.Schema name - name of the SQL Schema (e.g. dbo)
d.Authentication authentication type used for the database. Choose either Windows authentication or SQL Server authentication
e.User name - database login user name if SQL Server authentication is the selected as the authentication mode.
f.Password - password of the database user if SQL Server authentication is the selected as the authentication mode.
For Oracle
a.Oracle net name - net service name that describes the network address of the HSM database in your tnsnames.ora file (eg. AMXDB)
b.Schema - name of the HSM database (e.g. MAMEXCH which is the default name of the Archive Manager for Exchange database)
c.User name - database login user name
d.Password - password of the database user
6.Click Next and then click Yes on the confirmation dialog that opens.
7.If the database connection is setup successfully, the confirmation window opens.
8.Click Finish to close the Database Connection wizard.
Steps to install the Archive Manager database
1.From the feature panel on the left in the Configuration wizard, click Search and select the Database tab.
2.Verify that the database connection information is as expected. Then click Run Scripts. The Run Scripts selection window opens.
3.Click Select All to select all check boxes. Click Next. The View SQL scripts window opens.
4.Click Next. The Run Scripts authentication window opens.
Enter the information as described below:
a.Authentication - authentication type used for the database. Choose either Windows authentication or SQL Server authentication
a.User name - database login user name if SQL Server authentication is the selected as the authentication mode.
b.Password - password of the database user if SQL Server authentication is the selected as the authentication mode.
c.(optional) Check the I want to review the SQL Scripts check box to view the scripts.
5.Click Next. If you chose to view the SQL scripts then the View SQL scripts window opens. If you chose to view the Oracle scripts then the View Oracle scripts window opens
Click Save Script to save the script as a script file to a folder. Check the Word wrap check box to display long lines as multiple lines of text.
6.Click Next. The Run SQL scripts window reopens with the scripts you have chosen to run.
7.Click Next. When the status changes to Scripts were run successfully, click Finish to close the script installer. The Scripts section of the Configuration wizard displays the status and version of the scripts (the version of the scripts you install may differ from the version shown in the image below).

8.Close the Configuration wizard.
Steps to configure the User database
1.Open the Configuration wizard if it is not already open.
2.From the feature panel on the left, click Users and then select the Database tab.
3.Click Configure. The Database Connection Wizard opens.
4.Select either Microsoft SQL Server or Oracle and click Next. The database connection information window opens for the selected database.
For SQL Server
a.Server name - name of the SQL server (eg. AMXDB)
b.Initial catalog - name of the HSM database (e.g. MAMUSER which is the default name of the Archive Manager for Exchange database)
c.Schema name - name of the SQL schema (e.g. dbo)
d.Authentication authentication type used for the database. Choose either Windows authentication or SQL Server authentication
e.User name - database login user name if SQL Server authentication is the selected as the authentication mode.
f.Password - password of the database user if SQL Server authentication is the selected as the authentication mode.
For Oracle
a.Oracle net name - net service name that describes the network address of the database server in your tnsnames.ora file (eg. AMXDB)
b.Schema - name of the Auditing schema (e.g. MAMUSER which is the default name of the Archive Manager for Exchange database)
c.User name - database login user name
d.Password - password of the database user
5.Click Next and then click Yes on the confirmation dialog that opens.
6.If the database connection is setup successfully, the configuration confirmation window opens.
7.Click Finish to close the Database Connection wizard.
Steps to install the User database
1.From the feature panel on the left in the Configuration wizard, click Auditing and select the Database tab.
2.Verify that the database connection information is as expected. Then click Run Scripts. The Run Scripts selection window opens.
3.Click Select All to select all check boxes. Click Next. The View SQL scripts window opens.
4.Click Next. The Run Scripts authentication window opens.
5.Enter the information as described below:
a.Authentication - authentication type used for the database. Choose either Windows authentication or SQL Server authentication
b.User name - database login user name if SQL Server authentication is the selected as the authentication mode.
c.Password - password of the database user if SQL Server authentication is the selected as the authentication mode.
d.(optional) Check the I want to review the SQL Scripts check box to view the scripts.
6.Click Next. If you chose to view the SQL scripts then the View SQL scripts window opens. If you chose to view the Oracle scripts then the View Oracle scripts window opens
7.Click Save Script to save the script as a script file to a folder. Check the Word wrap check box to display long lines as multiple lines of text.
8.Click Next. The Run SQL scripts window reopens with the scripts you have chosen to run.
9.Click Next. When the status changes to Scripts were run successfully, click Finish to close the script installer. The Scripts section of the Configuration wizard displays the status and version of the scripts.

10.Close the Configuration wizard.
Steps to start the Archive Manager for Exchange services
1.If the Post installation Tasks wizard is not already open, you can open the the Post installation Tasks wizard from C:\Program Files (x86)\Metalogix\MAM4Exchange\Tools\LaunchTools\LaunchTools.exe.
2.Click Start next to step 2 to start the services. You can also start services with the batch file available at <Installation folder> > Metalogix > MAM4Exchange > Tools > Start.bat.
|
|
NOTE: To stop the services at any time you can use the batch file available at <Installation folder> > Metalogix > MAM4Exchange > Tools > Stop.bat.. |
Steps to set the Retrieve Server role
Unless you manually change the role, every installation of the Archive Manager for Exchange will automatically assign the Archive Server role to the installed instance. You must set the Retrieve Server role for this server.
1.If the Post installation Tasks wizard is not already open, you can open the the Post installation Tasks wizard from C:\Program Files (x86)\Metalogix\MAM4Exchange\Tools\LaunchTools\LaunchTools.exe.
2.Click Start next to step 3 of the the Post installation Tasks wizard to open the AMAC. You can also open the AMAC from Start > Archive Manager for Exchange. The AMAC opens.
3.From the Tools menu select Options. The Options window opens.
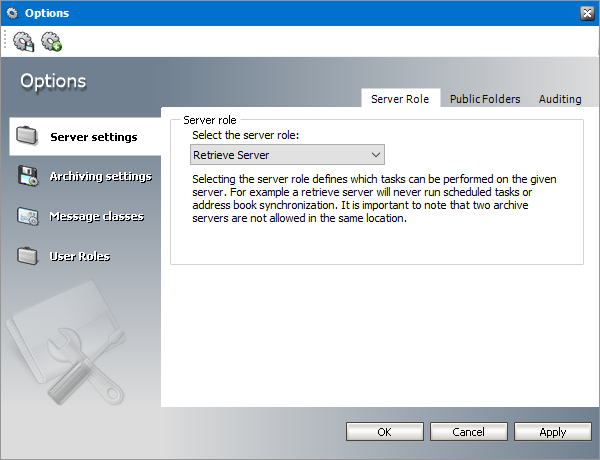
4.From the Select the server role drop down list, select Retrieve Server.
5.Click OK to set the server role and close the window and restart the server.
Steps to verify the Retrieve Server role
1.Login to the server with the credentials of the superuser (eg. democorp\mamadmin)
2.Click Start > Archive Manager for Exchange. The AMAC opens.

On the status bar at the bottom of the AMAC window, verify that the Server Role is set to Retrive Server.