Viewing job definitions
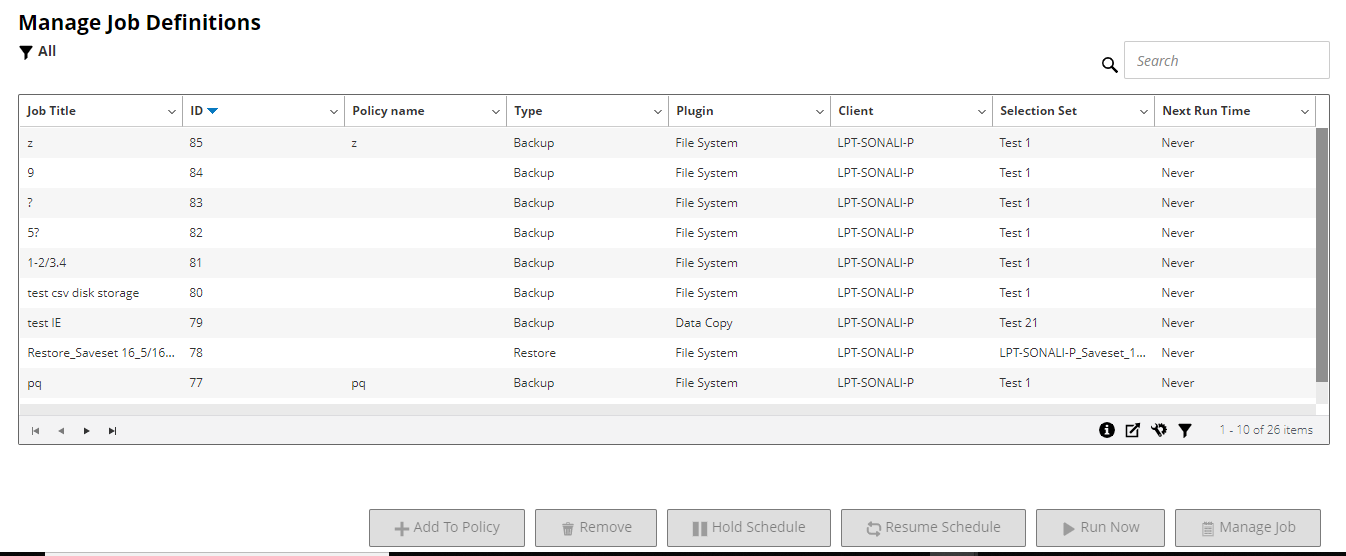
Job definitions are stored in the Scheduler Database. You can view the job definitions for all scheduled, saved, completed, and active jobs from the Manage Job Definitions page.
|
1 |
In the Navigation pane, click Manage Job Definitions. |
|
• |
Job Title: Name or title of the job. |
|
• |
Job ID: Job ID number (also shows the instance ID number and phase ID number). |
|
• |
Policy name: Name of the policy if the job belongs to a backup policy. |
|
• |
Type: Backup or restore. |
|
• |
Plugin: Name of the plug-in used to perform the job. |
|
• |
Client: Name of the NetVault Backup Client for which the job was performed. |
|
• |
Selection Set: Backup or Restore Selection Set. |
|
• |
Next Run Time: Date and time when the next instance is scheduled to run. |
|
2 |
|
3 |
Optionally, use the Search option to filter the table data and quickly find entries that contain the specified string in any column values. You can also include wildcards (“?” or “*”) in the search filter string. |
|
• |
Job Details: This area shows the following information: job name, job ID, job type (backup or restore), and name of the client. |
|
• |
Configuration: This area lets you create, edit, and view the protection sets. It shows the selections, the plug-in options, schedule, source storage, target storage, and advanced options. |
|
• |
Recent Instances: This table lists the recent instances of the job. It shows the following information: Run time, duration, job size, instance ID, phase ID, and status (Succeeded, Failed, Aborted, and others). |
Editing job definitions
|
1 |
In the Navigation pane, click Manage Job Definitions. |
|
• |
For a policy job, Customize Policy Job dialog box displayed. |
|
• |
To edit a policy job without changing its job type, click No. Edit Policy Job wizard is started. |
|
• |
To edit a policy job by changing its job type (for example, changing it to a normal backup or restore job), click Yes. Backup or restore job wizard is started. |
|
4 |
|
• |
Schedule the job: To submit the job for scheduling, click Save & Submit. |
|
• |
Save the definition without scheduling the job: To save the job definition without scheduling it, click Save. |
|
7 |
If a new name was provided in Step 5, the Save Job dialog box is displayed. Select the applicable option in this dialog box: |
|
• |
Save changes creating a new job using the supplied name: Select this option to save the changes to a new job. |
|
• |
Save changes renaming this job to the supplied name: Select this option to rename the existing job. |
|
8 |
Click OK. |
Deleting job definitions
|
1 |
In the Navigation pane, click Manage Job Definitions. |
|
3 |
Adding a non-policy job to a policy
You can add a non-policy job to an existing policy.
|
1 |
In the Navigation pane, click Manage Job Definitions. |
|
3 |
|
a |
|
b |
In the Select Policies dialog box, select the policy name ‘Policy1’. |
|
c |
Click OK. |

