When working with a large number of databases on multiple SQL Servers, creating a foolproof disaster recovery plan can be challenging. Well organized backup and restore strategies will definitely help with this. In order to successfully implement these strategies in a larger environment, configuring automated backup and restore processes is a must. Some database administrators use the batch or power shell scripts for automation, while other prefer to use various 3rd party solutions. In both cases, it is necessary to format database backup names properly. Properly formatted backup names make the job of organizing and maintaining of the backup sets much easier. Old backup files are usually obsolete, and they can be easily identified and deleted from the drive either manually, or by using a script.
Depending on the user requirements, backup names can contain the information such as: server name, SQL Server instance name, database name, backup type, date and time. The data can be typed in manually for each backup created, but doing so for the multiple databases on the multiple servers would be an impossible task. There are several other options available for creating daily database backups with the mentioned parameters:
Create and use the SQL Server agent schedule
Create and use SQL Server Maintenance plan
Use ApexSQL Backup
To use this option, it is necessary to have the SQL Server Agent service installed and started. This option would require some basic understanding of dynamic T-SQL scripting and date and time functions, but automates the process entirely, and offers many possibilities for the backup name customization. To create the SQL Server Agent schedule, perform the following steps:
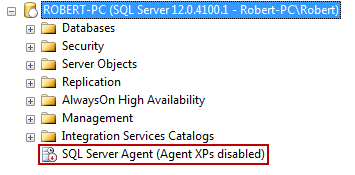
Make sure that the SQL Server Agent service is running: open the Object Explorer, and check the icon for SQL Server Agent. If the message “Agent XPs disabled” is displayed, go to Control Panel\System and Security\Administrative Tools\ and run the Services shortcut. Locate the SQL Server Agent service for the respective instance, right click on it, and choose Start. If SQL Server Agent service is running already, just skip this step.
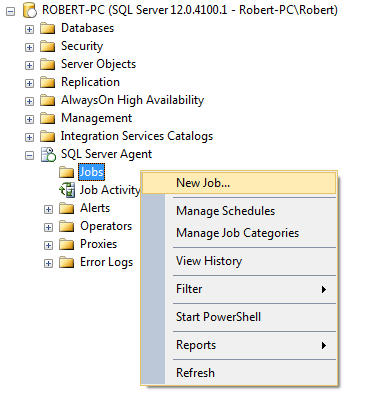
Expand the SQL Server Agent node, right click on Jobs, and select the New Job option.
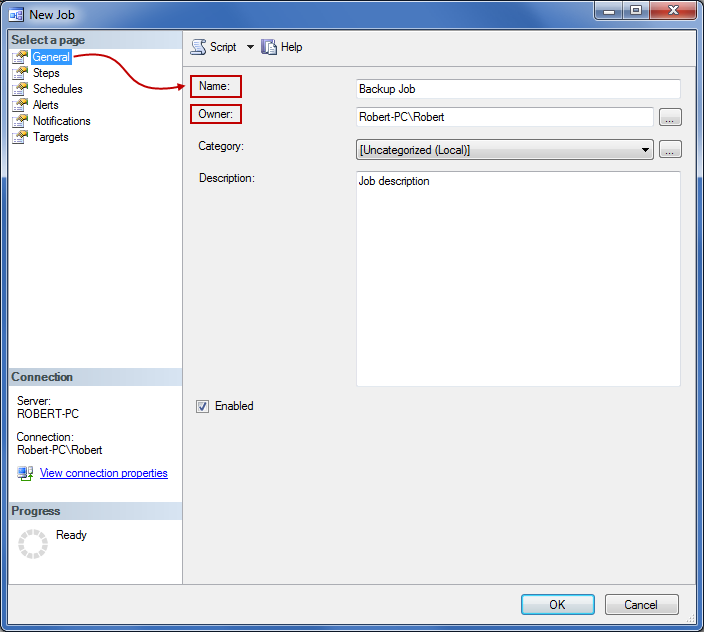
The New job window is opened. In General tab specify the name and the owner for the job. Optionally, the category and description for the job can also be provided.
In Steps tab, select the New… button to open the New Job Step window. Enter the name for the step, and choose the database that would be targeted by the step. It is common to target the master database, since this setting allows the modification of any database on the server. It is also necessary to provide the T-SQL Script that would be executed in first step of the job. Depending on the needs, use one of the scripts from the next step.
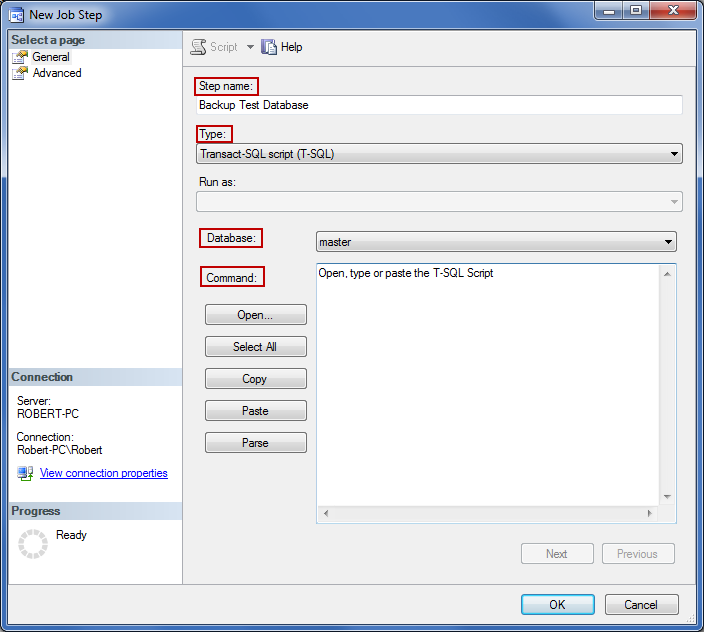
Two scripts will be provided in this step. The first script performs the backup of a single, specific database, and the second backs up all non-system databases on the server. Both scripts use several variables such as: year, month, date, hour, minute and second.
Backup the specific database
--Script 1: Backup specific database

-- 1. Variable declaration

DECLARE @path VARCHAR(500)
DECLARE @name VARCHAR(500)
DECLARE @pathwithname VARCHAR(500)
DECLARE @time DATETIME
DECLARE @year VARCHAR(4)
DECLARE @month VARCHAR(2)
DECLARE @day VARCHAR(2)
DECLARE @hour VARCHAR(2)
DECLARE @minute VARCHAR(2)
DECLARE @second VARCHAR(2)

-- 2. Setting the backup path

SET @path = 'E:\Backup\'

-- 3. Getting the time values

SELECT @time   = GETDATE()
SELECT @year   = (SELECT CONVERT(VARCHAR(4), DATEPART(yy, @time)))
SELECT @month  = (SELECT CONVERT(VARCHAR(2), FORMAT(DATEPART(mm,@time),'00')))
SELECT @day    = (SELECT CONVERT(VARCHAR(2), FORMAT(DATEPART(dd,@time),'00')))
SELECT @hour   = (SELECT CONVERT(VARCHAR(2), FORMAT(DATEPART(hh,@time),'00')))
SELECT @minute = (SELECT CONVERT(VARCHAR(2), FORMAT(DATEPART(mi,@time),'00')))
SELECT @second = (SELECT CONVERT(VARCHAR(2), FORMAT(DATEPART(ss,@time),'00')))

-- 4. Defining the filename format

SELECT @name ='TestDatabase' + '_' + @year + @month + @day + @hour + @minute + @second

SET @pathwithname = @path + @namE + '.bak'

--5. Executing the backup command

BACKUP DATABASE [TestDatabase]
TO DISK = @pathwithname WITH NOFORMAT, NOINIT, SKIP, REWIND, NOUNLOAD, STATS = 10
In first part of the query, all necessary variables are declared. It is not necessary to use all stated variables, just the ones that should be included in the filename for the backup. Delete any variables that don’t need to be used in the filename, or simply comment them out by adding two hyphens (--) in front of the DECLARE command.
Set the backup path in second part of the script. Use any desired backup path instead of ‘E:\Backup\’.
In third part, the specific values are assigned to each variable by using GETDATE, CONVERT, FORMAT and DATEPART functions. The GETDATE function fetches the current date and time, and assigns it to the @time variable. DATEPART function extracts the specific value (year, month, date, hour, minute and second) for each variable. The FORMAT function formats the values from the DATEPART function to two-digit strings. This way, the single digit months, dates, hours, minutes and seconds get additional 0 in front of them. Finally, the CONVERT function converts all results to VARCHAR strings.
The fourth part of the script is crucial. The output format of the filename is defined in this step. The @name variable represents the filename. The elements on the right side of equation are the strings that are concatenated in presented order. The first string ‘TestDatabase’ is the name of the backed up database in this case, and it does not need to match the name of the original database. Any other custom string can be added to the backup filename on any position in order to make it more descriptive.
If there is a need to change or modify the backup filename, just change the sequence of the variables in this step according to your needs.
The fifth part of the script is the backup command. Enter the name of the database that needs to be backed up instead of [TestDatabase].
Backup all non-system databases
--Script 2: Backup all non-system databases

--1. Variable declaration

DECLARE @path VARCHAR(500)
DECLARE @name VARCHAR(500)
DECLARE @filename VARCHAR(256)
DECLARE @time DATETIME
DECLARE @year VARCHAR(4)
DECLARE @month VARCHAR(2)
DECLARE @day VARCHAR(2)
DECLARE @hour VARCHAR(2)
DECLARE @minute VARCHAR(2)
DECLARE @second VARCHAR(2)

-- 2. Setting the backup path

SET @path = 'E:\Backup\'

 -- 3. Getting the time values

SELECT @time = GETDATE()
SELECT @year   = (SELECT CONVERT(VARCHAR(4), DATEPART(yy, @time)))
SELECT @month  = (SELECT CONVERT(VARCHAR(2), FORMAT(DATEPART(mm,@time),'00')))
SELECT @day    = (SELECT CONVERT(VARCHAR(2), FORMAT(DATEPART(dd,@time),'00')))
SELECT @hour   = (SELECT CONVERT(VARCHAR(2), FORMAT(DATEPART(hh,@time),'00')))
SELECT @minute = (SELECT CONVERT(VARCHAR(2), FORMAT(DATEPART(mi,@time),'00')))
SELECT @second = (SELECT CONVERT(VARCHAR(2), FORMAT(DATEPART(ss,@time),'00')))

-- 4. Defining cursor operations

DECLARE db_cursor CURSOR FOR
SELECT name
FROM master.dbo.sysdatabases
WHERE name NOT IN ('master','model','msdb','tempdb')  -- system databases are excluded

--5. Initializing cursor operations

OPEN db_cursor
FETCH NEXT FROM db_cursor INTO @name

WHILE @@FETCH_STATUS = 0
BEGIN

-- 6. Defining the filename format

       SET @fileName = @path + @name + '_' + @year + @month + @day + @hour + @minute + @second + '.BAK'
       BACKUP DATABASE @name TO DISK = @fileName


       FETCH NEXT FROM db_cursor INTO @name
END
CLOSE db_cursor
DEALLOCATE db_cursor
In this script, the first three steps are identical to the previous script: the same variables are declared, and same method is used to assign values to the variables. Starting from step 4, the cursor operation is used to automatically fetch the name of each database, and to back them up one by one. The final formatting of the backup filename is performed in part six, in the same way as in the previous script.
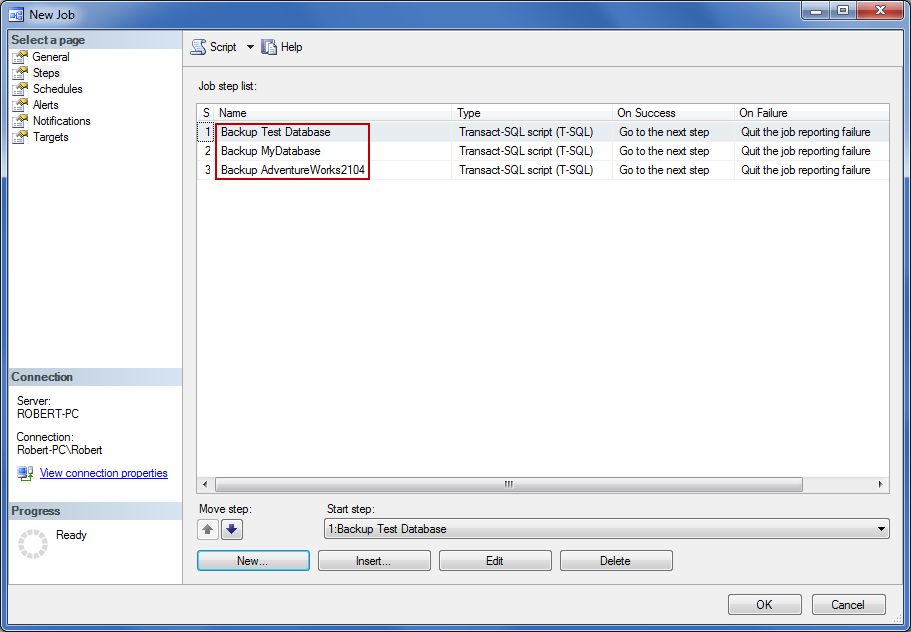
Upon defining the first job step, it is possible to set the additional job steps, if needed. This could be the case if script from the step 5.1 is used, and the first job step performs the backup of a single database. To backup multiple specific databases, multiple job steps need to be defined. To do this, repeat steps 4 and 5 until all necessary steps are listed.
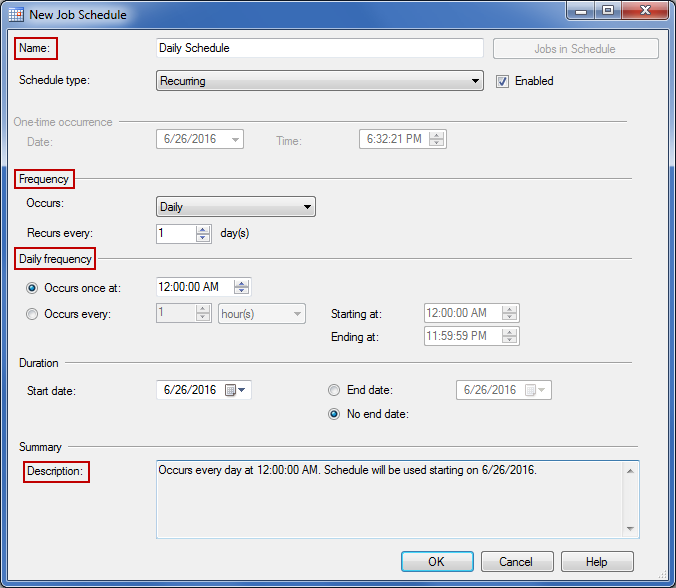
To set the schedule for the defined job steps, select Schedules tab, and click the New… button.

Set the preferred parameters in New Job Schedule window. It is only necessary to set the name and frequency for the schedule, but many other parameters may be specified as well. Check the description in summary any time to see if the schedule settings match the anticipated backup schedule. Click OK when done.
Optionally, set the alerts and Email notification for the job in the respective tabs of the New Job window, and click on OK when completed. The new agent job is created, and all defined job steps should be executed following the schedule from previous step.
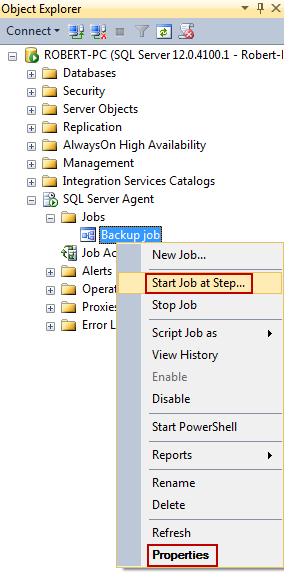
It is a good practice to test the created job immediately, regardless of the schedule. To do so, expand the SQL Server Agent and Jobs nodes in Object Explorer. Right click the created job, and select Start Job at Step… Select the first job step, and click Start. Upon getting the “Success” message, check the newly created backups, and make sure that the name format meets the expectations. If this is not the case it is always possible to modify any of the set parameters by selecting the Properties for the job.
Open the folder from the backup path stated in the query, and check the format of backup filenames. Running the agent job from this example produces following backup files:
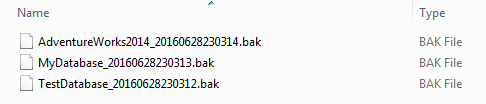
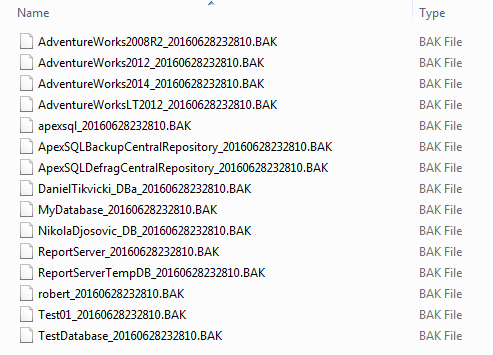
If the query from step 5.2 is used for the agent job, the backup folder contains backup files for all user databases from the server:
This option does not require the use of dynamic T-SQL scripts, but offers much less in the way of customization. The backup filename in this case contains the database name as well as the date and time when backup file is created. Unfortunately, the sequence and formatting of these elements cannot be changed.
There are two ways to create the SQL Server Maintenance plans – either by creating the new plan manually, or by using Maintenance Plan Wizard.
To create the new maintenance plan manually:
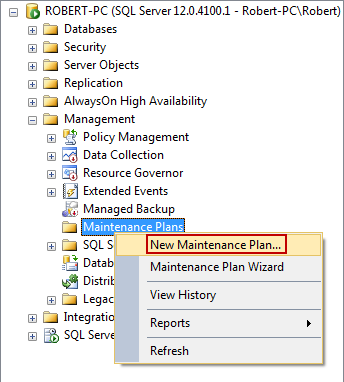
Expand the Management node in server explorer, and right click on Maintenance Plans. Select the New Maintenance Plan… option.
Enter the name for the plan.

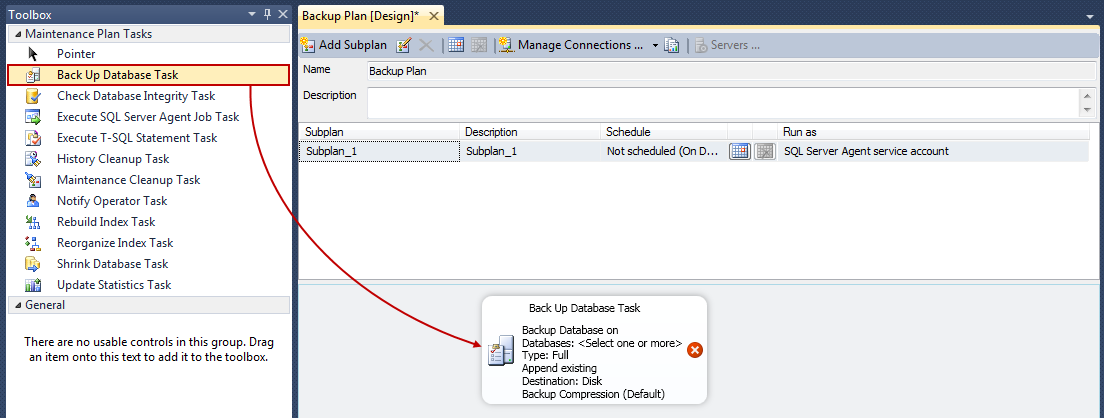
Backup Plan design tab appears, as well as the Toolbox control. Drag and drop Back Up Database Task from the toolbox to the designer surface of the backup plan design tab. Double click on the element to edit the settings for the backup task.
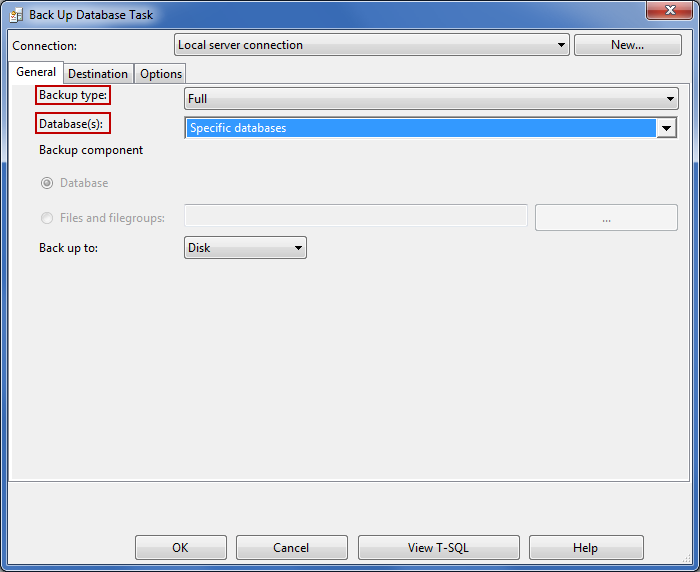
In General tab of the Back Up Database Task, specify the backup type that will be used for the task. Also, click on the down arrow button near Database(s) box, and select all databases that should be included in the backup plan.
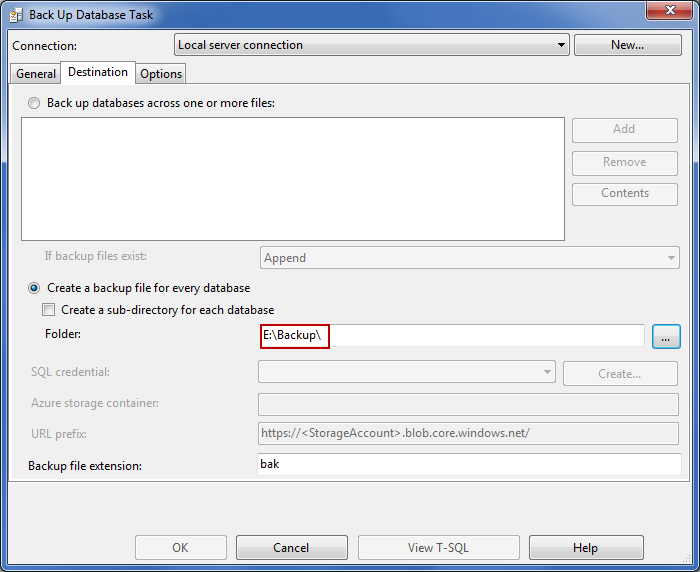
In the Destination tab, specify the destination for the backup files. It is possible to set additional tasks such as backup encryption, expiration and verification in Options tab, but that is not necessary for the current task. Click OK when done.
To set the schedule for the defined operations, click on the calendar button in Backup Plan design.

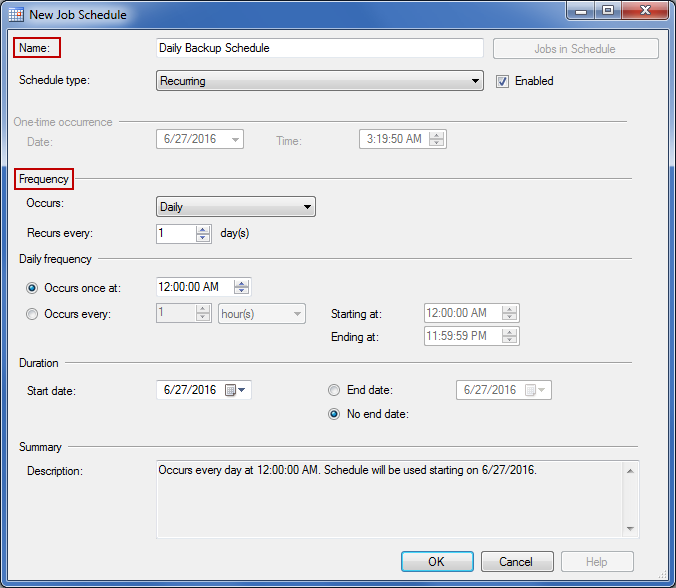
The New Job Schedule window opens. Enter the name of the new schedule, and set the frequency to daily. Check the description in summary, and click OK if it meets the requirements.
Right click on the heading of the Backup Plan [Design]* tab heading, and click on Save selected items option.
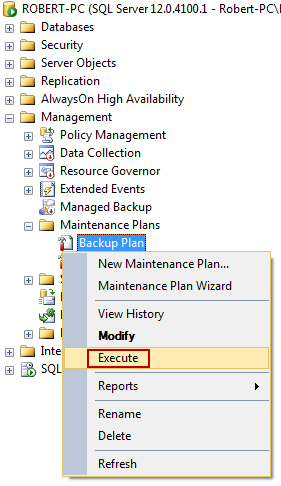
To test the created plan, expand the Maintenance Plans under Management node. Right click on the created backup plan, and select Execute…
The execution of the plan starts automatically. The success message is displayed upon completion. The following backup files are produced:

The filename contains all necessary information such as: year, month, date, hour, minute and seconds. Unfortunately, this format cannot be changed, and must be used as such for all Back Up Database tasks.
To get fully customized backup names for the maintenance plans, it is necessary to use Execute T-SQL Statement Task in step 3 with one of the T-SQL scripts from the previous chapter.
To create the new maintenance plan by using Maintenance Plan Wizard:
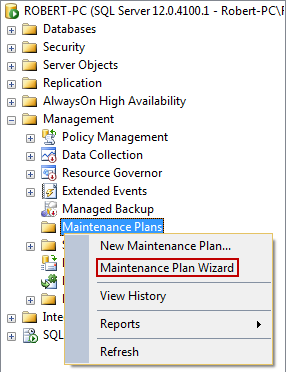
Expand the Management node in Server Explorer, right click on Maintenance Plans, and select Maintenance Plan Wizard.
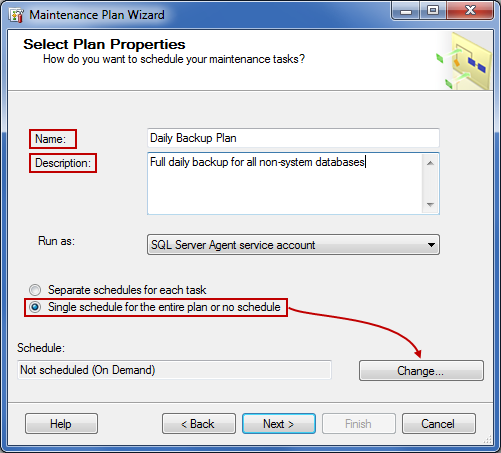
In first step of the wizard, enter the name and description for the maintenance plan. It is also necessary to set the schedule in this step. Since the entire plan consists of a few tasks there is no need to set separate schedule for each task. Mark the radio button in front of “Single schedule for the entire plan or no schedule”, and click the Change… button on the lower right.
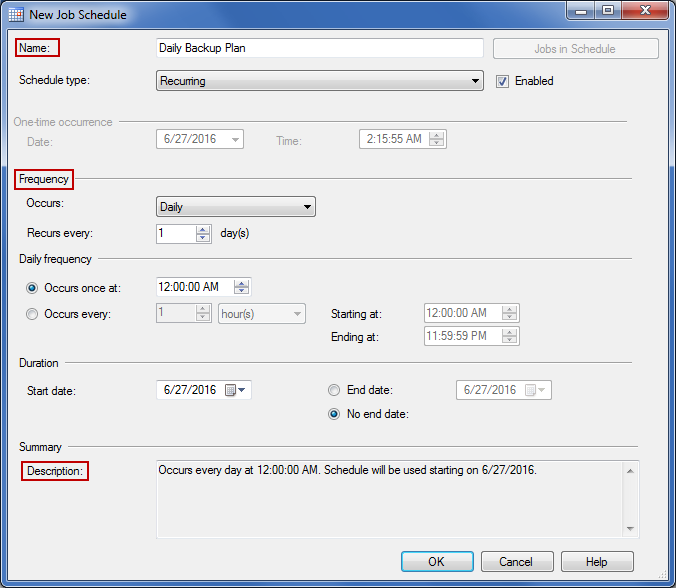
Provide name and frequency for the schedule, as described in previous chapters. For this example, the daily schedule will be used. Click OK when the schedule is set, and proceed to the next step of the maintenance wizard.
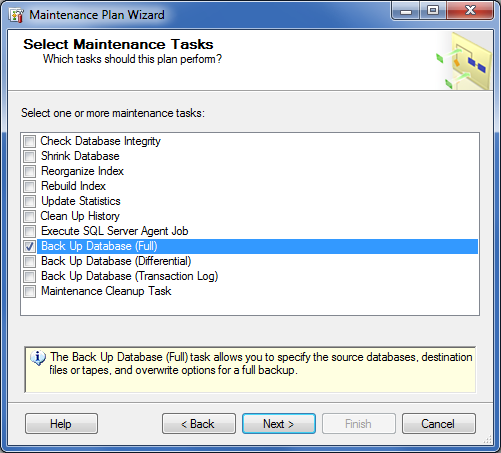
Check the boxes in front of the task that needs to be executed. Multiple tasks may be selected. The message box on the lower part of the window displays the brief description for each selected task. Click Next when done.
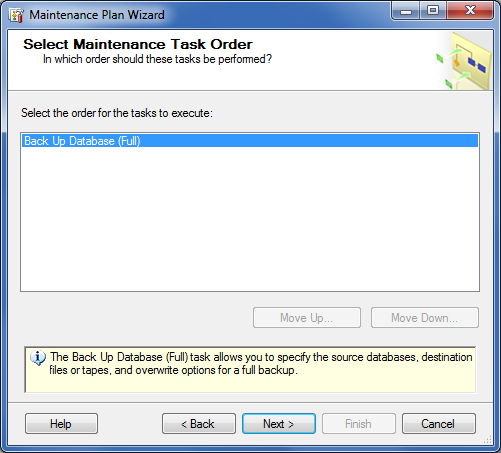
Set the order for the task execution, if multiple tasks were selected in the previous step. Proceed to the next step when done.
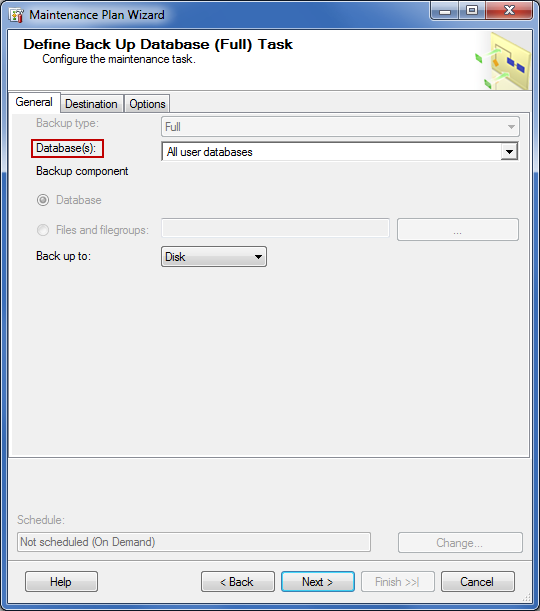
In General tab of the wizard, choose the databases that will be backed up in the task. Set the backup path in Destination wizard. Optionally, specify the expiration, verification, and encryption settings in Options tab. Proceed to the next step.
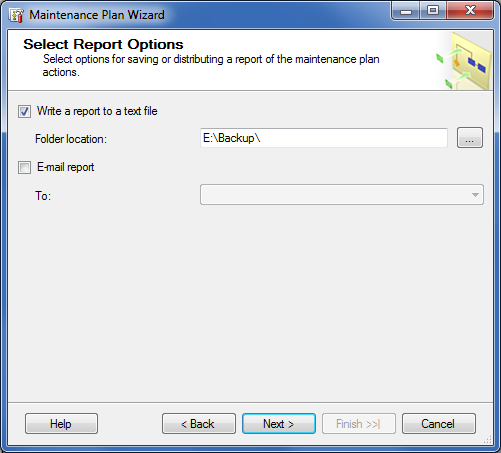
Select the report options for the maintenance plan. Set the preferred path for the report files, and provide an Email address for the Email notifications. Alternatively, leave both boxes unchecked if there is no need for reports or notifications.
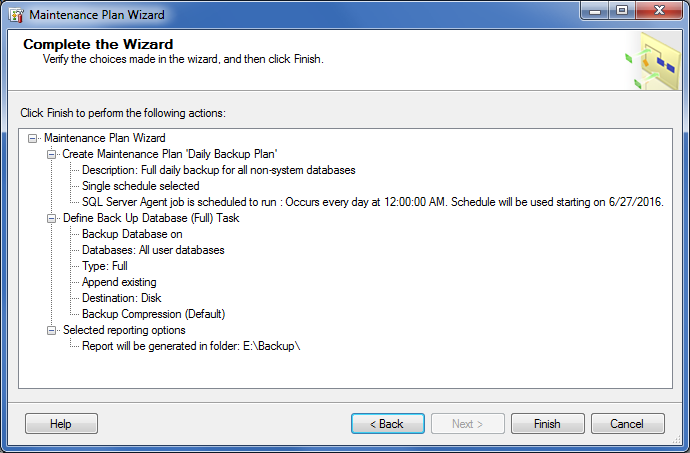
Review all defined settings in the final step of the wizard. If everything is all right, click Finish to complete the wizard.
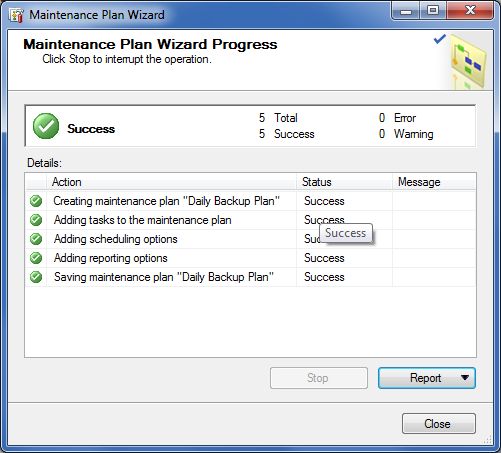
The success message is displayed upon creating the maintenance plan. Click Close when all operations get executed.
To test the created plan, expand the Management and Maintenance Plans nodes in server explorer, right click on the created maintenance plan, and select Execute.
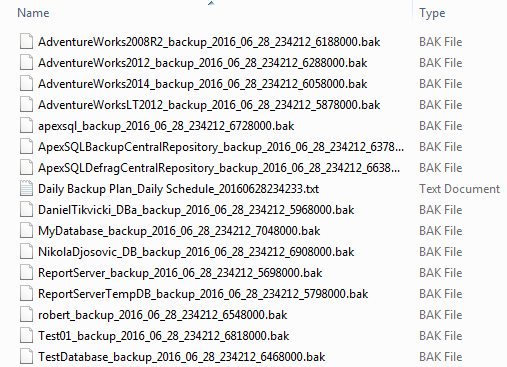
The job starts automatically. If all goes well, it completes with the success message. The filename format is the same as in previous case, and it cannot be changed. Since “All user databases” option is selected in step 6, the following backup files are produced, along with the report txt file:
ApexSQL Backup is a 3rd party tool with the primary function of creating, organizing and monitoring various backup, restore and maintenance jobs. Customizing the backup filenames and creating daily schedules is done easily by using just a few wizards. There is no need to use T-SQL or any other scripts. Additionally, all performed jobs can be monitored through the application.
To create the backup schedule with ApexSQL Backup, perform the following steps:
Select the Home Tab. In the Tasks group, click on the Backup button.

The Backup wizard starts. Click on the Browse button in databases box.
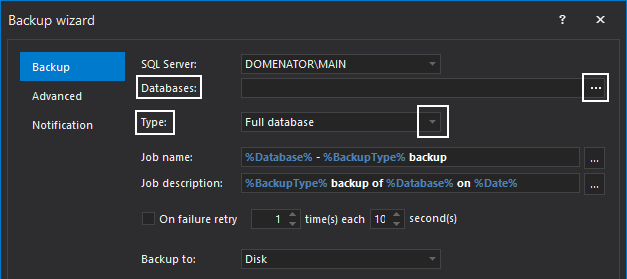
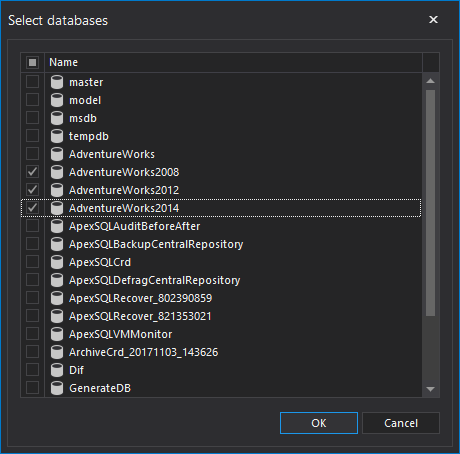
Select all databases that need to be included in the daily schedule.
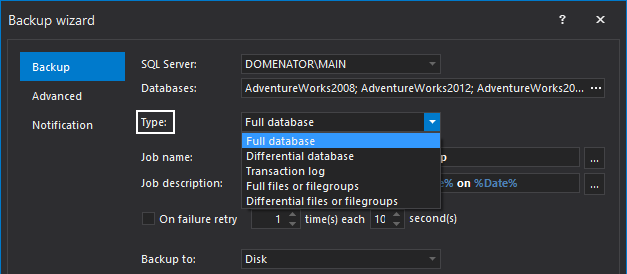
Click on the arrow button in Type box to open the drop down menu. Choose the backup type from the menu. This backup type applies to all databases selected in the previous step.
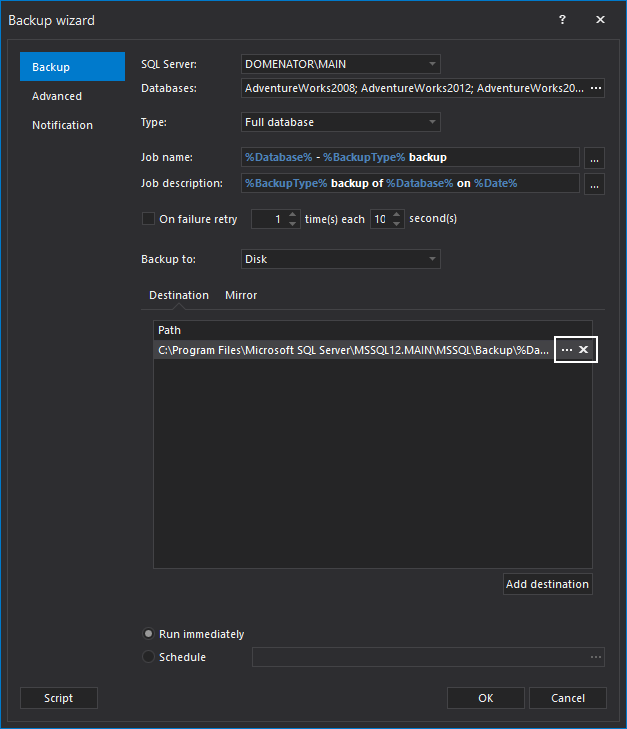
Leave the Name and Description options on default settings. These options are used to describe the backup operation in History and Activities views, but have no effect on backup filename. To set the backup file path and naming rules for the backup files, click on the Browse button (…) for the destination path.
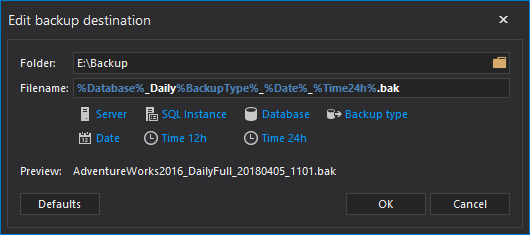
In the Folder text box, type the preferred backup path manually, or use Browse button to browse for the backup folder. Delete any default content from Filename text box.
Use the buttons bellow the text box to form suitable filename string. The application can automatically fetch the names of: server machine, SQL server instance and database and append it to the backup filename in the defined order. Same goes for the date and time strings.
To add any custom string to the filename, simply place the cursor between any variables in the filename, and type it. In this example, custom string “_Daily” is added between the database name and the backup type variables. Two underscore symbols are also added between other variables to separate them in the filename. It is not necessary to use underscore symbols – use any symbol for this purpose (including space), or simply use none at all (in that case, variable strings will stay joined in the filename. Add the “.bak” string at the end of the filename to specify the file extension.
The Preview shows an example of the filename for the currently set parameters. All changes made to the filename format can be seen in the Preview in real time. Click OK to save the changes.
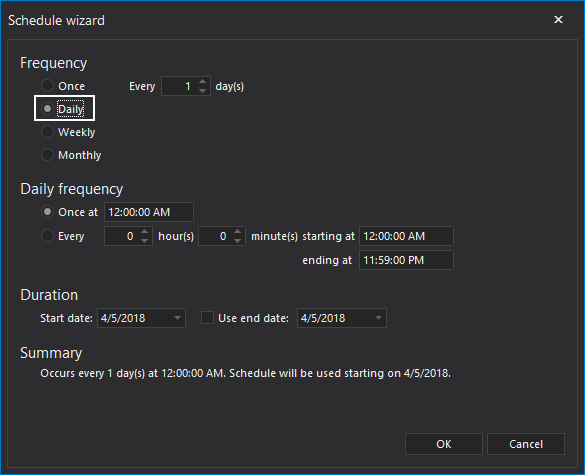
After marking the Schedule radio button, the Schedule wizard opens automatically. In Schedule wizard, set the frequency to daily. If needed, set any additional parameters for the schedule, and click OK when done.
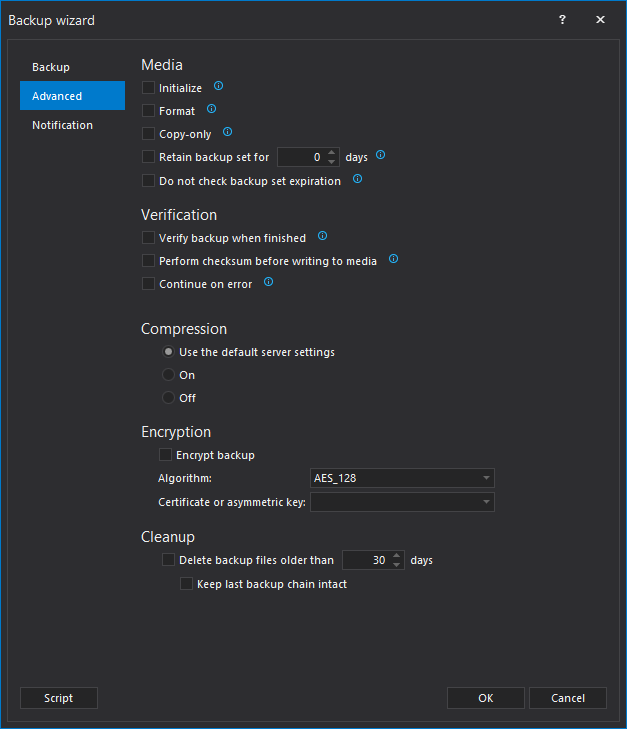
Optionally, open the Advanced tab of the setup wizard, and adjust settings regarding media, verification, compression or encryption.
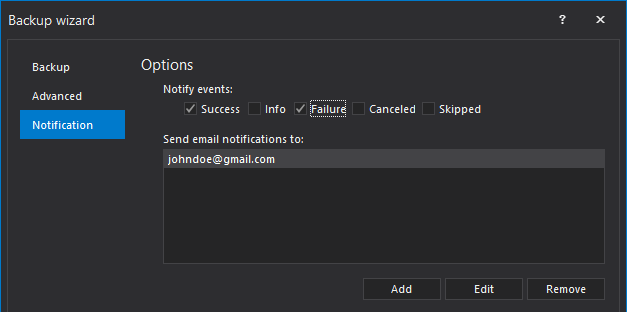
If needed, set Email notification conditions and recipients for the job in Notification tab of the wizard.
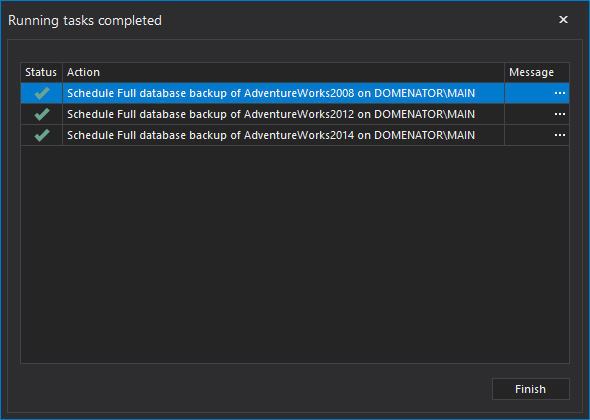
To complete the wizard and schedule the jobs, click OK button on the bottom. See the status of each action in Running tasks window. If everything went well, the job is scheduled for each database selected in step 3.
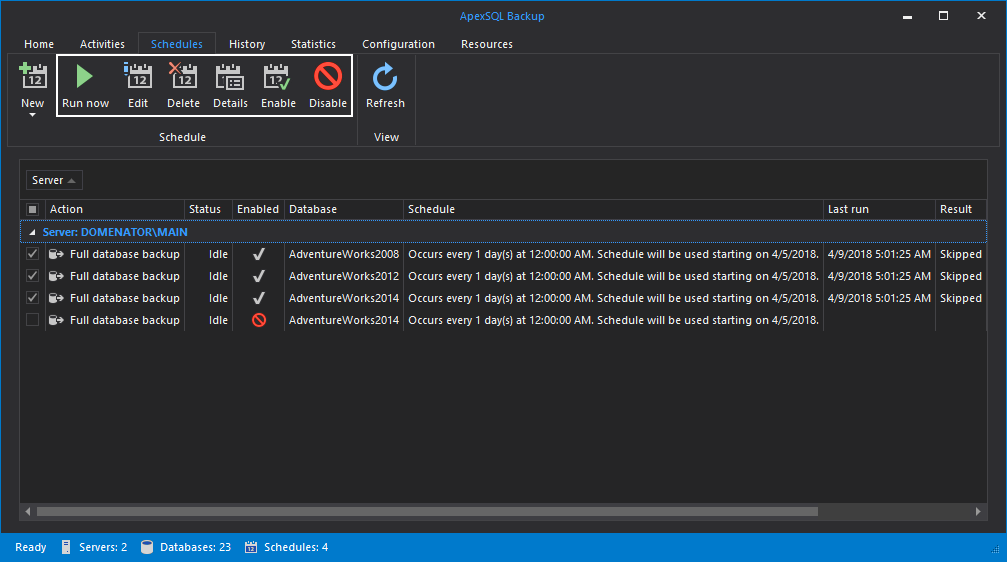
It is a good practice to test the jobs right after they are created. To do so, click on the Schedules tab. All created schedules are displayed, along with the crucial information about them. To perform the job right away, select any of the scheduled jobs, and click on Run now button on the upper left. Running all created schedules, produces the following backup files:

Other options from the Schedules tab give user the full control of the scheduled jobs: each scheduled job can be enabled, disabled or deleted. The Details button displays the detailed information for the selected schedule.