Editing Cloud Storage
To edit the properties of a registered Cloud Storage.
-
In the Recovery Manager for Active Directory console, expand the Storage node.
-
Select the Cloud Storage node in the console tree.
-
In the Cloud Storage pane, right-click the cloud storage that you want to edit, and select Properties.
-
In the Properties dialog box and the Storage Provider is Azure Blob Storage, then edit the Display Name, Azure Storage Account Connection String, and Container fields.
If the Storage Provider is Amazon S3 Storage, then edit the Display Name, Access Key ID, Secret Key, and Container fields. -
Select the checkbox for one or more computer collections in the Backups from selected collections will be copied to the cloud storage list. All available computer collections will be displayed. Backups from selected computer collections will be copied to the Cloud Storage.
note: If a computer collection has been configured with no access credentials to read the backup file a warning icon will be displayed. To enter access credentials refer to Computer Collection Properties Secondary Storage tab. If the computer collection has both local and remote primary storage configured, the local storage will be used to copy to Cloud Storage and access credentials for local storage are required.
-
Click OK
Removing Cloud Storage
To remove a Cloud Storage from Recovery Manager for Active Directory console
-
In the Recovery Manager for Active Directory console, expand the Storage node.
-
Select the Cloud Storage node in the console tree.
-
In the Cloud Storage pane, select the registered Cloud storage account to be removed, right-click and select Remove.
-
Select Yes to the confirmation message.
| note |
Removing Cloud Storage from Recovery Manager for Active Directory unregisters the cloud storage account from Recovery Manager. No backup files are removed. |

Cloud Storage Upload Sessions
After a backup creation session completes for a computer collection and the backup is saved to configured primary storage locations (Tier 1), an upload session will be started to copy the backup to all cloud storage locations. Recovery Manager for Active Directory supports multiple Cloud Storage locations per computer collection.
The backup upload session is created and managed with the Quest Recovery Manager Cloud Storage service on the Recovery Manager console machine. Each backup upload session is displayed in the Backup Upload Sessions pane. For each session, you can view the backup file path, upload location, creation timestamp, finished timestamp, and the status of the upload.

| note |
The Backup Upload Sessions pane has a display limit of 100 items and a time limit of the last 30 days. There may be upload sessions outside these limits. |
To view a backup upload sessions for a cloud storage account
-
In the Recovery Manager for Active Directory console, expand the Storage node.
-
Select the Cloud Storage node in the console tree.
-
Select the registered cloud storage in the Cloud Storage pane. The backup upload sessions for the selected cloud storage will be displayed in the bottom pane Backup Upload Session. The backup path, upload to path, created timestamp, finished timestamp and current status will be displayed.
-
To filter the upload sessions for the cloud storage, you can select the toggle buttons at the top right corner of the pane.
-
Select Total (7 days) to view all upload sessions in the last 7 days.
-
Select Queued to view all upload sessions that are waiting in the queue to be processed.
-
Select In Progress to view upload sessions that are in progress and backup files are being uploaded.
-
Select Completed to view successful and completed upload sessions.
-
Select Failed to view failed upload sessions. Any failed upload sessions can be retried.
-
| tip |
When you select Cloud Storage under Storage you will see that the different Cloud Storages are displayed and the Backup Upload Sessions for all of the Cloud Storages are displayed. When you select a specific Cloud Storage, the Backup Upload Sessions for that storage are displayed. Hold the Ctrl key down and select the Cloud Storage again, all Backup Upload Sessions are displayed (Hold Ctrl and select to toggle). You can also return the Backup Upload Sessions for all Cloud Storages by clicking anywhere in the white space of the Cloud Storage. |
To cancel a backup upload session
-
In the Recovery Manager for Active Directory console, expand the Storage node.
-
Select the Cloud Storage node in the console tree.
-
Select the registered cloud storage in the Cloud Storage pane.
-
In the Backup Upload Session pane, select the session with the status of In Progress or Queued, right click and select Cancel.
-
Select Yes on the confirmation dialog.
To retry a backup upload session
-
In the Recovery Manager for Active Directory console, expand the Storage node.
-
Select the Cloud Storage node in the console tree.
-
Select the registered cloud storage in the Cloud Storage pane.
-
In the Backup Upload Session pane, select the failed session, right click and select Retry.
To remove a backup upload session
-
In the Recovery Manager for Active Directory console, expand the Storage node.
-
Select the Cloud Storage node in the console tree.
-
Select the registered cloud storage in the Cloud Storage pane.
-
In the Backup Upload Session pane, select the session, right click and select Remove.
-
Select Yes on the confirmation dialog.
| note |
Only the backup upload session is removed from the Recovery Manager database. The backup file on the cloud storage is not removed. |
Secure Storage Server
Recovery Manager for Active Directory (RMAD) provides the ability to set up a dedicated secure backup storage server. If you use a Secure Storage server in your environment it helps prevent unauthorized modification or malware attacks on backup data, supporting your key data security and compliance initiatives. For more information on how a Secure Storage server is secured, see Hardening Secure Storage servers below.
| IMPORTANT |
Use of Secure Storage Server requires a Recovery Manager for Active Directory Disaster Recovery Edition license. |
Requirements
-
Operating system: Microsoft Windows® 2016 or higher
-
A stand-alone server to be used as your Secure Storage server. This server should be a workgroup server and NOT joined to an Active Directory domain.
-
An account that will be used to deploy the Storage Agent on the Secure Storage server. This account must also be a local Administrator on the Secure Storage server.
-
Physical access (keyboard) to the Secure Storage server. Once the server is hardened access with regular methods will be disabled (RDP).
-
Sufficient storage space on the Secure Storage server for all backup files. For one backup file, the space required is at least the size of the backed-up Active Directory database file (Ntds.dit) and the SYSVOL folder plus 40 MB for the transaction log files. The space check performed also includes an extra 1 GB to ensure enough space is available.
Best Practices
-
We highly recommend using a new, dedicated, clean physical server as your Secure Storage server to help ensure access methods are kept to a minimum.
-
Secure additional methods of accessing the Secure Storage server such as console or serial access.
-
Recommend the Secure Storage have additional volumes available in addition to the system drive. It is not advised to store backups on the system drive.
| note |
Virtual machines are more susceptible to ransomware attacks. It is highly recommended that a virtual machine not be used for your Secure Storage server, as a bad actor could gain access to backups on the server or delete the entire Secure Storage server. |
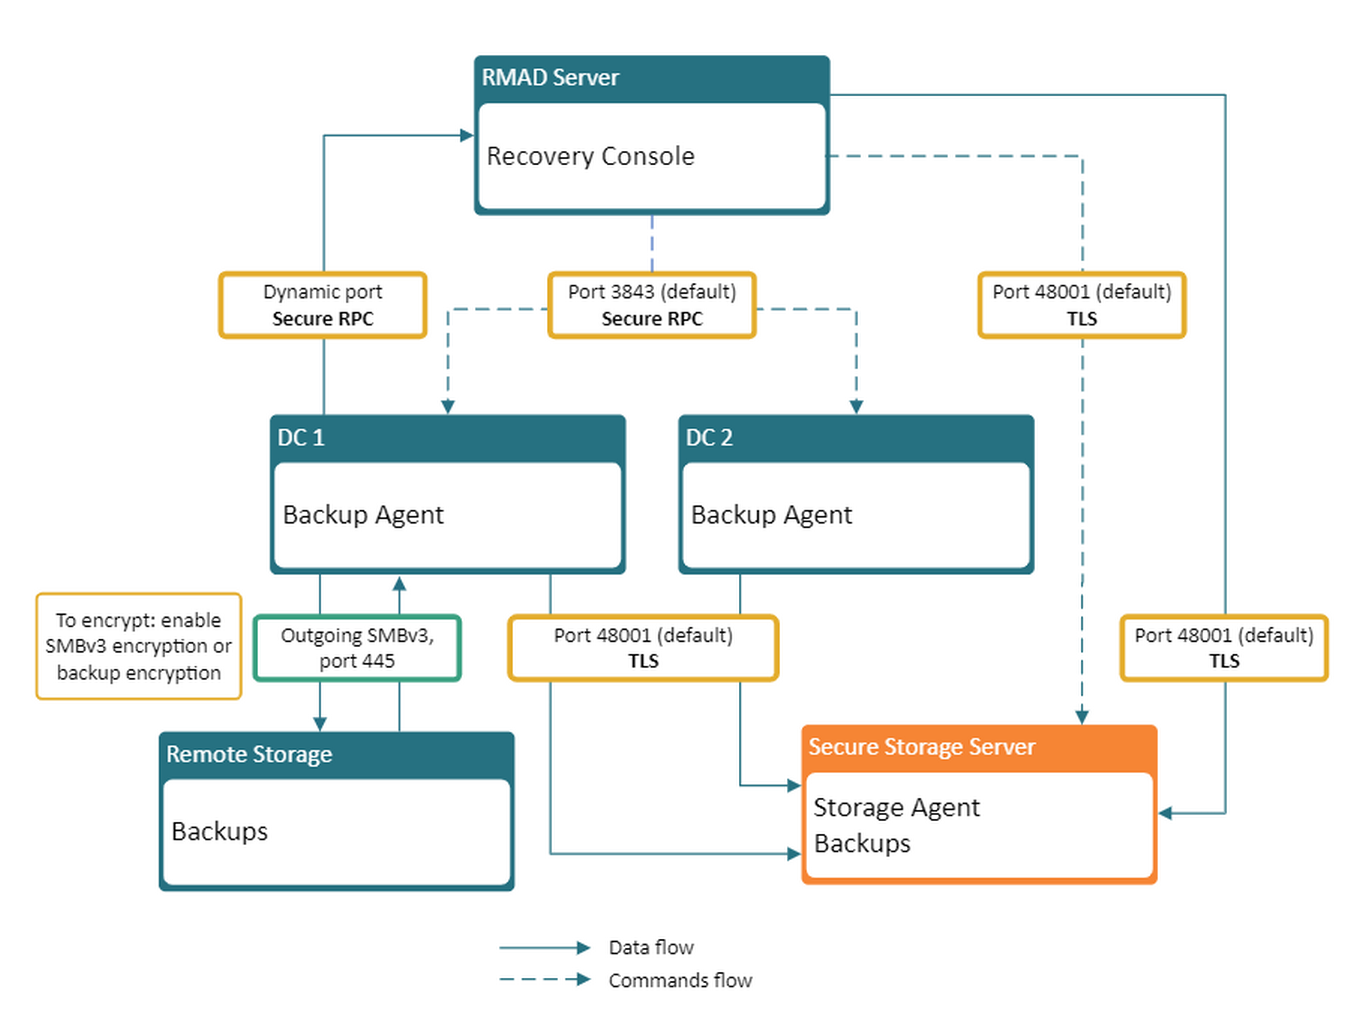
User Scenario
Backup data for all domain controllers can be accumulated on primary storage, and at the same time, you can make a copy of your backup data on a Secure Storage server. The Secure Storage agent will receive the backup securely either from Console or Backup Agent and write it to local storage while the firewall on the Secure Storage server remains in place. If disaster strikes, you could lose your backups on primary storage and even your installation of RMAD but your Secure Storage server will remain in place.