Chat now with support
Chat with Support

Quest VROOM 1.3 - User Guide

Virtual Machine Automation

The VROOM Virtual Machine Automation provides you with an approach to perform the Protect, Replicate, and Virtual Standby operations on virtual machines from either of the following dashboards, without interfacing with the Rapid Recovery console.

3
On the navigation panel, under Homes, click VMware Environment or Hyper-V Environment.
The VMware Environment or Hyper-V Environment dashboard opens.
4
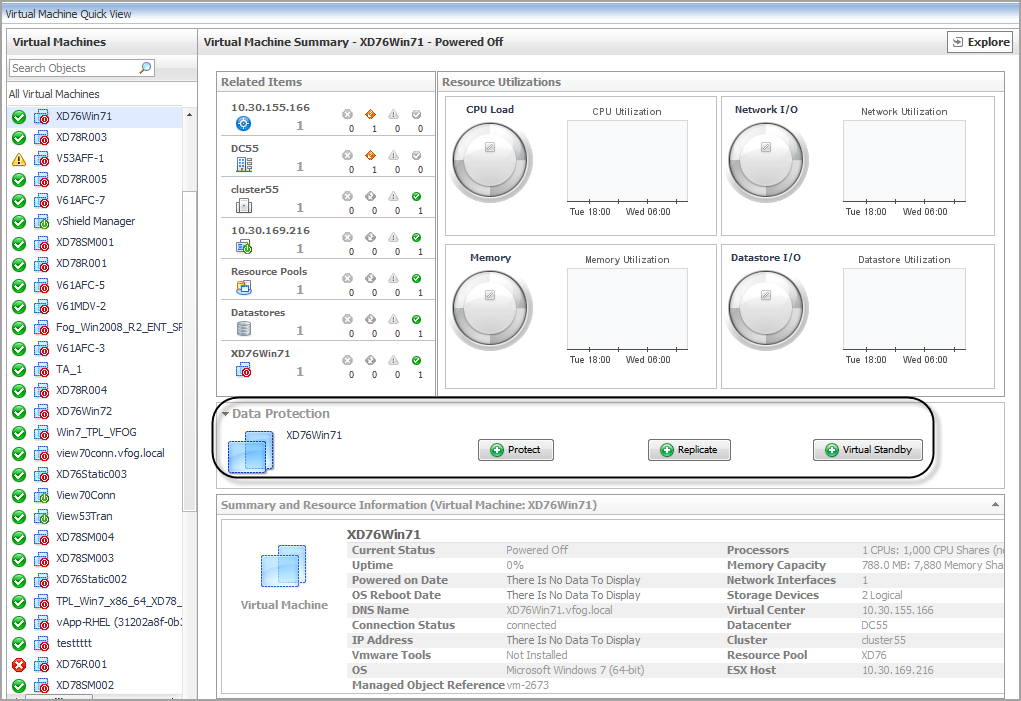
Select a Virtual Machine from the Monitoring > Virtual Machine Quick View > Virtual Machines tree view.
The VM Automation (Data Protection) view appears in the middle of Virtual Machine Summary view.

The VROOM Virtual Machine Automation includes the following three options:

Automation of VM Protection

The VMware VM Protection Setup Wizard guides you through the procedure for identifying virtual machines that you want to protect. This wizard also enables you to customize the schedule for performing the protection automation.

3
On the navigation panel, under Homes, click VMware Environment or Hyper-V Environment.
The VMware Environment or Hyper-V Environment dashboard opens.
4
Select a Virtual Machine that you want to protect from the Monitoring > Virtual Machine Quick View > Virtual Machines tree view.
The VM Automation (Data Protection) view appears in the middle of Virtual Machine Summary view.
5
Click Protect. The VMware VM Protection Setup Wizard opens.
6
In the Select Core Server step, select a Core Server from the drop-down list, and then click Next.
7
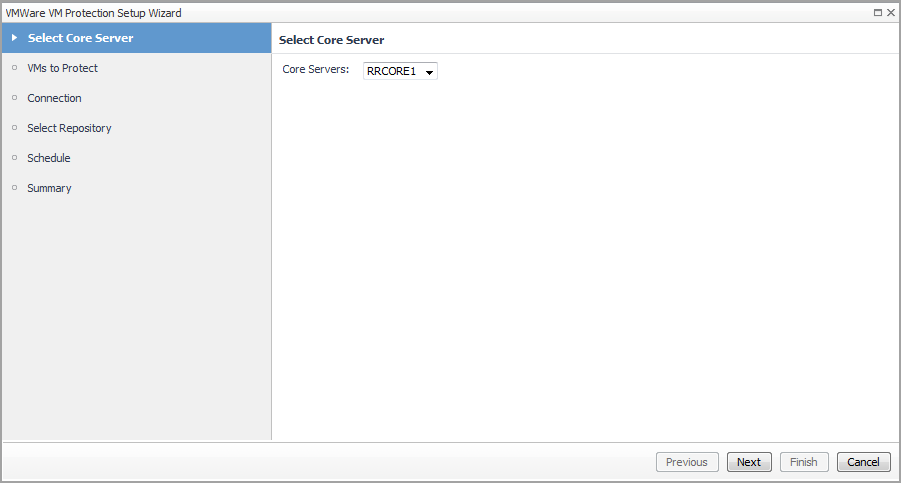
In the VMs to Protect step, select VMs from the left vCenter table, click >> to move selected VMs to the right table, and then click Next.
8
In the Connection step, specify the port number as needed, and then click Next.
9
In the Select Repository step, select a repository from the Core Repositories drop-down list, and then click Next.
10
In the Schedule step, select either of the following schedule options, and then click Next:
Default protection: The automation will be performed hourly for all volumes.
Periods: The automation will be performed on specified weekdays or weekends.
Daily protection time: The automation will be performed on a daily basis.
11
In the Summary step, review all configurations and click Finish.
The selected VM will be added into VROOM Rapid Recovery Protected VMs list and Rapid Recovery Core Server list after the VM protection automation is complete. The first time when a VM protection is added, its snapshot with the customized schedule will be transferred to the repository on the Rapid Recovery Core. You might need to wait for a while to see the VM’s status update and to collect data back to Foglight from Rapid Recovery server.

Automation of VM Replication

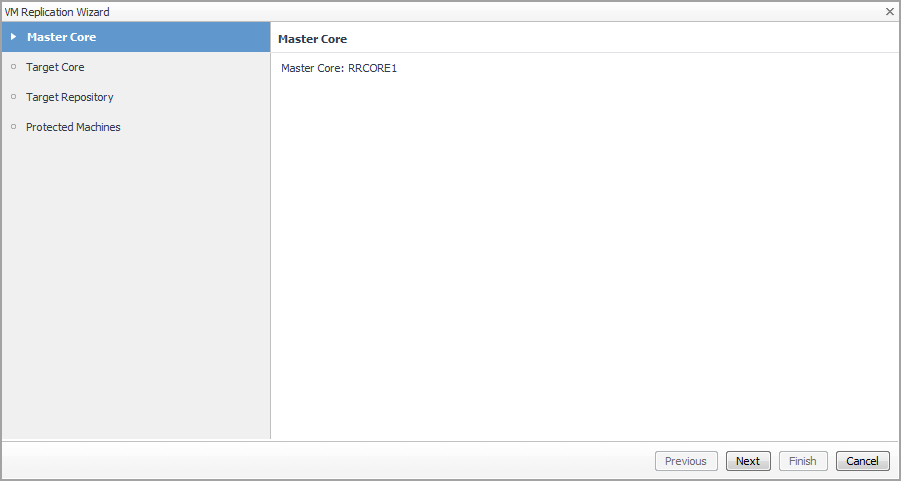
The replicate is the process of copying recovery points from one Rapid Recovery Core and transmitting them to another Rapid Recovery Core for disaster recovery purposes. The process requires a paired source-target relationship between two or more cores. The VM Replication Wizard guides you through the procedure for identifying virtual machines that you want to replicate.

3
On the navigation panel, under Homes, click VMware Environment or Hyper-V Environment.
The VMware Environment or Hyper-V Environment dashboard opens.
4
Select a Virtual Machine that you want to protect from the Monitoring > Virtual Machine Quick View > Virtual Machines tree view.
The VM Automation (Data Protection) view appears in the middle of Virtual Machine Summary view.
5
Click Replicate. The VM Replication Wizard opens.
6
In the Master Core step, click Next.
7
In the Target Core step, select the target Core Server, and then click Next.
NOTE: If there is no available target Core, go to Rapid Recovery Console > Replication and add a target Core in the selected Master Core manually.
8
In the Target Repository step, select a repository, and then click Next.
9
In the Protected Machines step, select other virtual machines that you want to replicated as needed, and then click Finish.

Automation of VM Standby

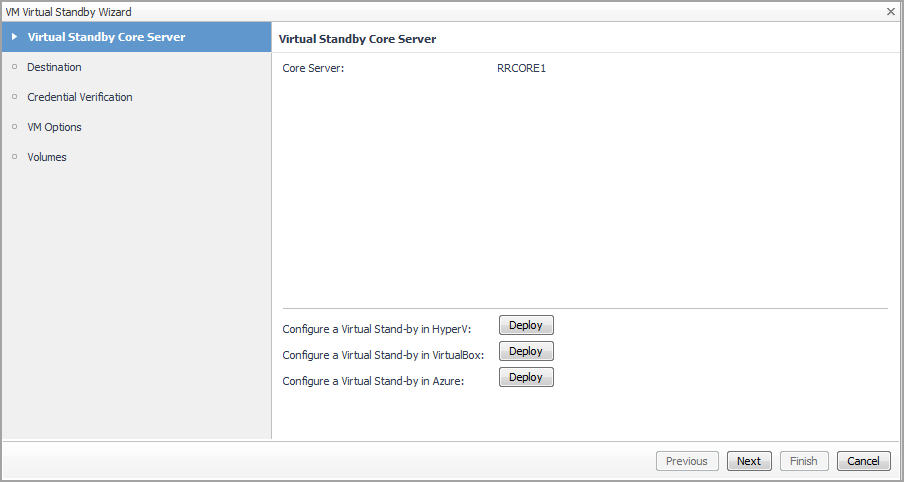
The VM Virtual Standby Wizard guides you through the procedure for performing a virtual standby of continual export of recovery point data from a protected machine to a virtual machine in any supported VM format.

3
On the navigation panel, under Homes, click VMware Environment or Hyper-V Environment.
The VMware Environment or Hyper-V Environment dashboard opens.
4
Select a Virtual Machine that you want to protect from the Monitoring > Virtual Machine Quick View > Virtual Machines tree view.
The VM Automation (Data Protection) view appears in the middle of Virtual Machine Summary view.
5
Click Virtual Standby. The VM Virtual Standby Wizard opens.
6
In the Virtual Standby Core Server step, verify the Core Server information, and then click Next.
7
In the Destination step, specify the host name and port number, and then click Next.
8
In the Credential Verification step, select new credential or an existing credential, and then click Next.
9
In the VM Options step, specify the following values, and then click Next.
10
In the Volumes step, select the volumes that you want to export, and then click Next.
11
On the summary step, click Finish to close the wizard and to start the export.


Related Documents

The document was helpful.

Select Rating

I easily found the information I needed.

Select Rating