
Database setup for Snowflake
Snowflake configuration prerequisites:
-
If any user has used Snowflake setup utility of a version prior to 11.4, they should first perform the following cleanup steps:
-
Drop the role 'SHAREPLEX_ROLE' from the Snowflake account using the owner role. For example, if 'SHAREPLEX_ROLE' was created with a user having the 'ACCOUNTADMIN' role, execute the following query using the same privileges:
drop role "SHAREPLEX_ROLE";
-
Drop the table 'SHAREPLEX_OPEN_TRANS' from the target DB.SCHEMA. Refer to the query below:
drop table SHAREPLEX_OPEN_TRANS;
Re-run the Snowflake setup utility now, following the guidelines below. 'SHAREPLEX_ROLE' will be re-created correctly by the setup using the 'USERADMIN' role."
-
-
Configure DSN in the ODBC directory as per your requirement (for password based authentication or for RSA based authentication).
-
Enter the warehouse name that SharePlex is using in the odbc.ini file. For more information, see Guidelines for use section.
-
SharePlex setup requires one Admin user to operate, below is the query is reference. Create an Admin user as shown in the following query::
create user <user_name> identified by '<user_password>'; -
Grant the SYSADMIN and USERADMIN roles to the Admin user using the following queries:
grant role SYSADMIN to user <user_name>;
grant role USERADMIN to user <user_name>; -
Snowflake_setup internally uses the USERADMIN role to create a new SharePlex role to be used in replication and user-related tasks. The SYSADMIN role is used to grant access to databases and warehouses.
-
If the SYSADMIN role does not have access to the intended database and warehouse, provide access using the following queries:
grant OWNERSHIP on database <database name> to SYSADMIN with grant option;
grant USAGE on warehouse <warehouse_name> to role SYSADMIN with grant option;
grant OPERATE on warehouse <warehouse_name> to role SYSADMIN with grant option;
-
The required privileges will be granted to the SharePlex role (SHAREPLEX_ROLE), which will then be assigned to the SharePlex user provided as input.
Overview
Use the Database Setup utility for Snowflake (snowflake _setup) to establish SharePlex as a Snowflake user and create the required SharePlex database objects.
This setup utility:
-
Create a new role SHAREPLEX_ROLE if it does not exist.
-
Creates a new user or uses an existing user
-
Creates SharePlex internal tables and objects
It is recommended that you review all of the content in this topic before running the setup utility.
Guidelines for use
-
Run the Snowflake_Setup utility on the target Snowflake instance in the SharePlex replication configuration.
-
Within a server cluster, run the Snowflake Setup utility on the node to which the shared disk that contains the SharePlex variable-data directory is mounted.
-
For consolidated replication, run the Snowflake Setup utility for each variable-data directory.
-
Provide a DSN (Data Source Name) as mentioned below:
-
If you have a DSN defined, and you want to use it for the SharePlex connection, copy or link the ODBC files in which that DSN is defined (odbc.ini and odbcinst.ini) to the odbc subdirectory of the SharePlex variable-data directory. This prevents connection errors when the SharePlex processes connect to the database.
-
If you do not have a DSN defined but want to use one, you can create it in the template files provided in the odbc subdirectory.
-
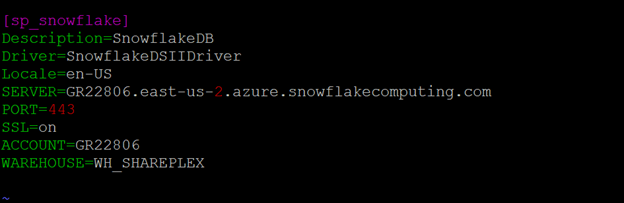
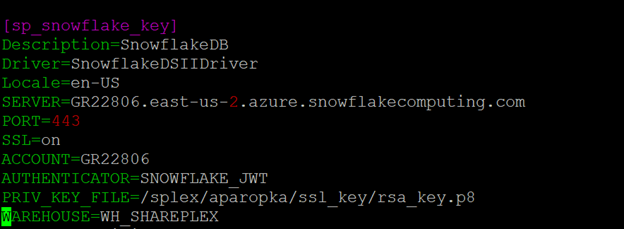
For an example of the sample odbc.ini and odbcinst.ini files, see the example below.
Sample of an ODBC file in a password based authentication:
Sample of an ODBC file for in an RSA based authentication:
Privileges granted to SharePlex
The database setup utility creates the SHAREPLEX_ROLE and assigns it to SharePlex users. SharePlex assigns the following privileges to the SharePlex_role:
|
Privilege types |
Privileges |
|---|---|
|
Database privileges |
|
| Schema | ALL PRIVILEGES |
| Warehouse | Usage |
Run database setup for Snowflake
Important! The Snowflake instance must be open before this procedure is performed.
Perform the following steps to run database setup for Snowflake:
-
(Linux only) If you are using multiple variable-data directories, export the environment variable that points to the variable-data directory for the SharePlex instance for which you are running Database Setup.
ksh shell:
export SP_SYS_VARDIR=/full_path_of_variable-data_directory
csh shell:
setenv SP_SYS_VARDIR=/full_path_of_variable-data_directory
- Shut down any SharePlex processes that are running, including sp_cop.
-
Run the Snowflake database Setup command (./snowflake_setup ) using password or RSA based admin user.
- Refer to the following table for the prompts and responses to configure SharePlex correctly for the desired connection type.
Table 11: Setup prompts and response for password based authentication
| Prompt | Response |
|---|---|
| Enter the snowflake DSN name [ ] : |
Enter a DSN name. Example: sp_snowflake_5 |
| Is authentication based on RSA public key? [n] : | For password based authentication, enter "n" |
| Enter the Snowflake administrator name : | Enter an administrator name. |
| Enter the password for the administrator account: | Enter the administrator account password. |
| Enter the replication target database name : |
Enter the name of the Snowflake database where you want to install the SharePlex objects. Example: shareplex_test |
| Database name database does not exist. Would you like to create it? [y] : | If this prompt is displayed, the specified database does not exist. Press Enter to have the setup utility create it for you. |
| Enter the DB schema name: |
Enter the DB schema name. Example: shareplex_test_5 |
| DB schema name does not exist. Would you like to create it? [y] : | If this prompt is displayed, the specified DB schema name does not exist. Press Enter to have the setup utility create it for you. |
| Would you like to create a new SharePlex user? [y/n] : | Press Enter to accept the default to create a new SharePlex database user account in the specified database, or enter n to use an existing SharePlex account. |
|
Enter the name of the new SharePlex user: Enter the name of the existing SharePlex user: |
One of these prompts is displayed depending on whether you elected to create a new user or use an existing user. Enter the name of the SharePlex user. |
| Enter the password for the new SharePlex user: | Enter a password for the new SharePlex user. |
| Re-enter the password for the new SharePlex user: | This prompt is only shown if you created a new user. Enter the SharePlex password again. |
A successful setup terminates with a message similar to the following:
Completed SharePlex for Snowflake database configuration
SharePlex user name: amore2
Database name: SHAREPLEX_TEST
- - The datasource identifier in the SharePlex configuration is 'r.SHAREPLEX_TEST' - -
-
The current version of SharePlex setup does not grant privileges to existing objects in the database. After successfully completing the Snowflake setup, run the following queries for smooth replication:
grant SELECT,INSERT,UPDATE,DELETE,TRUNCATE ON ALL TABLES IN DATABASE <DataBase name> to role SHAREPLEX_ROLE;
grant ALL PRIVILEGES ON ALL SCHEMAS IN DATABASE <DataBase name> to role SHAREPLEX_ROLE;
.
Table 12: Setup prompts and response for RSA based authentication
| Prompt | Response |
|---|---|
| Enter the snowflake DSN name [ ] : |
Enter a DSN name. Example: sp_snowflake_5 |
| Is authentication based on RSA public key? [y] : |
For password based authentication, enter "y". Note: Make sure that the RSA key has been configured for Admin user. |
| Enter the snowflake administrator name : | Enter an administrator name. |
| Enter the replication target database name : |
Enter the name of the Snowflake database where you want to install the SharePlex objects. Example: shareplex_test |
| Database name database does not exist. Would you like to create it? [y] : | If this prompt is displayed, the specified database does not exist. Press Enter to have the setup utility create it for you. |
| Enter the DB schema name: |
Enter the DB schema name. Example: shareplex_test_5 |
| DB schema name does not exist. Would you like to create it? [y] : | If this prompt is displayed, the specified database schema does not exist. Press Enter to have the setup utility create it for you. |
| Would you like to create a new SharePlex user? [y/n] : | Press Enter to accept the default to create a new RSA user account in the specified database, or enter n to use an existing SharePlex account. |
|
Enter the name of the new SharePlex user: Enter the name of the existing SharePlex user: |
One of these prompts is displayed depending on whether you elected to create a new user or use an existing user. Enter the name of the SharePlex user. |
| Enter path for RSA public key for configuration of New User. |
Enter the path for the RSA public key. (This field is applicable only for a new user) Note: For existing user account, make sure that the RSA key has been configured for Admin user. |
A successful setup terminates with a message similar to the following:
Completed SharePlex for Snowflake database configuration
SharePlex user name: amore2
Database name: PROVIDENCE
- - The datasource identifier in the SharePlex configuration is 'r.SHAREPLEX_TEST' - -
Solve Installation Problems for Oracle
Contents
Overview
This chapter reviews some common problems that you could experience when installing or running SharePlex for the first time after installation.
Sometimes there are special installation instructions that supersede or supplement certain instructions in this manual. In addition, there can be known issues for this version that you should be aware of during or after installation. Please read the Release Notes for the version of SharePlex that you are installing before you begin the installation process.
Solve database setup problems
Solve database setup problems for Oracle
This section helps you diagnose problems that are associated with the SharePlex database account and connection information that was created with the Database Setup utility when SharePlex was installed on the system.
Note: For more information about Database Setup, see Database Setup Utilities in the SharePlex Reference Guide.
If the issue you are experiencing is not listed in this documentation, search the SharePlex Knowledge Base at:
The Knowledge Base provides filtering options and links to other resources that can help you use and troubleshoot SharePlex.
Oracle setup issues
| Problem | Description | Solution |
|---|---|---|
| Incorrect ORACLE_SID and/or ORACLE_HOME | If SharePlex cannot interact with Oracle, it might be using the wrong ORACLE_SID and/or ORACLE_HOME. |
|
| Insufficient database privileges | If the Database Setup utility fails, the person who runs it may not have the correct privileges | |
| Asterisk as the ORACLE_SID entry | Sometimes, the oratab file has an * (asterisk) symbol instead of a value for the ORACLE_SID. | Ensure that a valid ORACLE_SID is in the oratab file, and then try running the database setup again. |
| More than one oratab file (Sun Solaris) |
On Solaris systems, the oratab file is typically located in the /var/opt/oracle directory, but because other platforms store the oratab file in the /etc directory, there could be a second oratab in the /etc directory. |
Either move, rename or delete the secondary oratab file, and then try running the database setup again. |
| Oracle not running |
Oracle must be running and the instance must be open while you run the Database Setup utility. The utility accesses Oracle to establish SharePlex as a user and install its internal tables. |
Start Oracle and open the instance. |
| sp_cop is running | The SharePlex sp_cop process cannot be running while you are running the Database Setup utility. | If it is running, shut it down using the shutdown command in sp_ctrl. Run sp_ctrl from the bin sub-directory in the SharePlex product directory. |
| Oracle library location not correct |
On Unix and Linux systems, SharePlex expects the Oracle library to be in the $ORACLE_HOME/lib or $ORACLE_HOME/lib32 directory. In some environments, the Oracle library has a different name than what SharePlex expects it to be, or it is installed in a different location than expected (or both). In that case, you will see an error message when you attempt to run the Database Setup utility. |
Install the appropriate library from Oracle and then re-start SharePlex (if it is stopped). SharePlex will link to the correct library from that point forward. |
| ld.so.1: sqlplus: fatal: libsunmath.so.1: can't open file: errno=2” error | On Unix and Linux systems, this error indicates that SharePlex cannot find the libsunmath and libshareplex libraries, even though the link exists in the proper place. |
You can use either of these solutions:
|
| Wrong user-id |
To run Database Setup on Unix and Linux systems, the set-user-id for the Oracle software need to be -rwsr-s--x. Those permissions allow non-Oracle users to log into SQL*Plus. |
Set the correct values for set-user-id. |
Solve database connection problems
Did you verify the credentials?
If SharePlex cannot connect to a source or target database, you can view the login credentials that are being used for that database by using the connection command with the show option. For example:
sp_ctrl> connection o.mydb show
You can also view connection settings in the connections.yaml file, which is stored in the data sub-directory of the SharePlex variable-data directory. If there are no settings in this file, it means that the SharePlex database setup procedure was not performed on this database.
To view the correct database setup procedure for the database, see SharePlex Reference GuideSharePlex Utilities
You can use the connection command to update connection properties. For more information, see the SharePlex Reference Guide.
Did you assign a DBA role to the SharePlex Oracle user?
The SharePlex Oracle user requires a DBA role with unlimited privileges. The SharePlex user is created with the default Oracle profile under the assumption that the profile has the unlimited resource privileges assigned by Oracle as the default. If SharePlex is unable to interact with Oracle, check to see if the default was changed. If so, assign SharePlex a DBA role with unlimited privileges for all definitions.