
Infrastructure tab
This tab is available only for the Restore Active Directory on Clean OS and Bare Metal Active Directory Recovery methods. To automatically boot a physical server or create and/or boot a virtual machine, from the Infrastructure drop-down list, select the type of physical server, virtual machine platform, or cloud platform on which you want to perform the selected recovery method.
iDRAC/iLO/Custom physical host controller settings
If you select Dell® server, HPE server, or Custom from the Infrastructure drop-down list, you must complete this section. For more information, see Boot from the ISO image automatically.
When recovering a DC to the VMWare® or Hyper-V® platform, from the Infrastructure drop-down list, select VMWare ESXi™ or Microsoft Hyper-V®. For more information, see VMware ESXi™ and Microsoft Hyper-V®.
If you selected the Restore Active Directory on Clean OS method, see Create virtual machines in Microsoft Azure.
Recovery Media Image
The Quest Recovery Environment image requires storage drivers to recognize the drives of the server, and network adapter drivers in order to communicate with the Forest Recovery Console over the network.
A generic set of Windows storage controller and network adapter drivers are included automatically when you generate the Recovery Environment image. This satisfies the requirements of newer systems. Systems from other manufacturers or older systems may require you to inject storage controller or network adapter drivers when creating the Recovery Environment image.
When creating the Recovery Environment image, driver injection is used to facilitate interoperability between the Forest Recovery Console, network adapter, and storage on the target machine.
Data restored from the Bare Metal Recovery Backup includes drivers for the hardware previously in place. Custom third-party drivers will be added automatically from the Recovery Environment image to the restored operating system. This allows the restored operating system to boot using the new set of hardware.
Recovery Environment Image area
-
Store recovery media on the Bare Metal Recovery backup share - By default, the Quest Recovery Environment image file will be saved on the backup share specified on the General tab.
-
Add third-party drivers - This option allows you to create the Quest Recovery Environment image supporting custom network cards and custom disks.
-
Add third-party drivers from Bare Metal Backup - Adds third-party drivers from Bare Metal Recovery backup.
If you choose not to add third party drivers and then run the Verify Settings operation, the Recovery Environment image will not contain any third-party drivers. You can add third-party drivers to the Recovery Environment image later by selecting the Add third-party drivers check box or the Add third-party drivers from Bare Metal Backup check box and running the Verify Settings operation again. You can also remove third-party drivers from the Recovery Environment image by clearing the Add third-party drivers check box and the Add third-party drivers from Bare Metal Backup check box and running the Verify Settings operation.
| Note |
Note that adding additional drivers may significantly increase the size of the Quest Recovery Environment image file. |
Advanced Actions tab
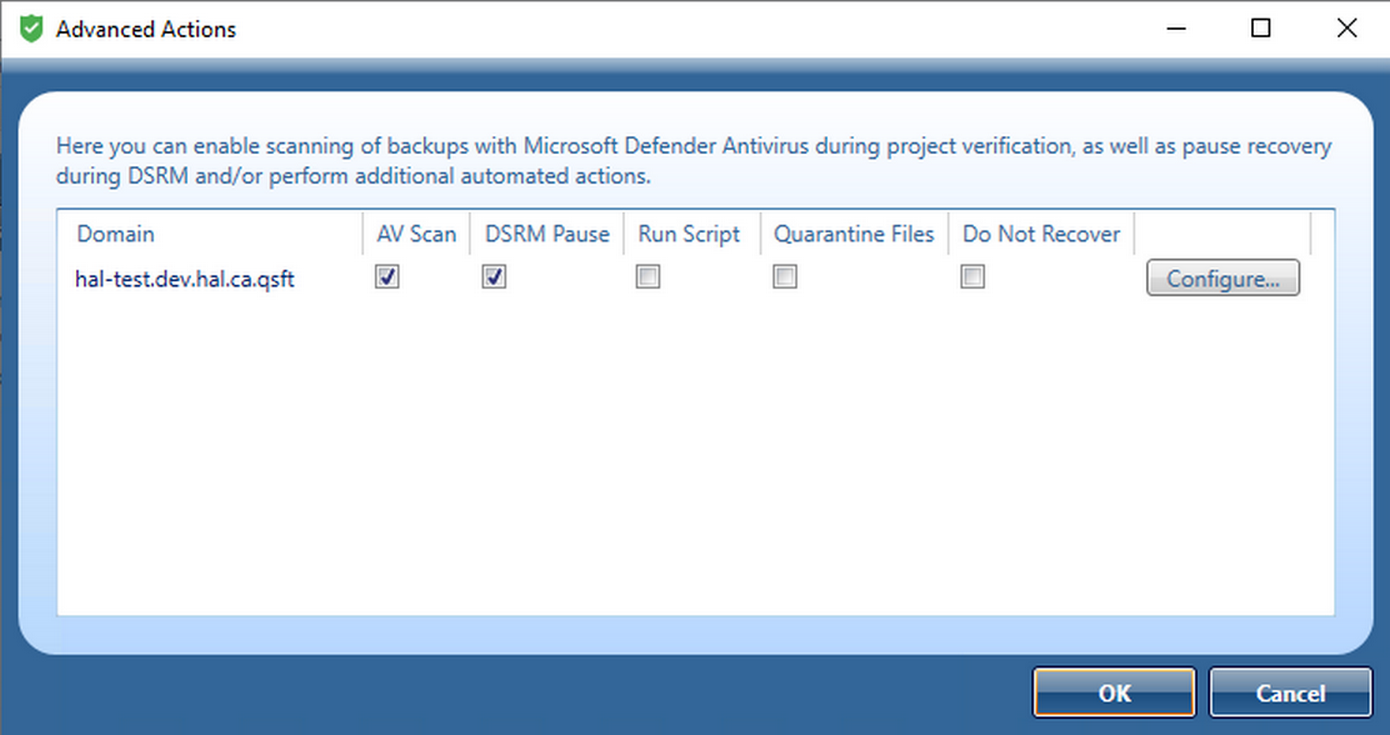
You can use this tab to make choices for scanning of malware or server maintenance during recovery. RMAD does not scan and remediate with this feature. The feature pauses the recovery during Directory Services Restore mode (DSRM) before the domain controller is restarted into normal mode allowing users to perform maintenance and run their own scans using third party tools and/or remediate if malware found.
The choices are:
-
Scan the selected backup with Microsoft Defender Antivirus during the project verification.
-
Pause recovery in DSRM to perform additional actions before booting to normal mode.
During the pause you have an option to run a script and quarantine files.
Pause recovery in DSRM to perform additional actions before booting to normal mode can be enabled for specific domain controllers by selecting the option from the Advanced Action tab from each domain controller in the project, or for all domain controllers in the entire domain/forest.

To select all of the domain controllers in a domain or forest to be paused during recovery in DSRM mode, select Configure by domain and select a domain or multiple domains within the forest. To configure Run Script, Quarantine Files, Do Not Recover select any or all of the three and click on the Configure button.
Run Script
In addition to pausing, you can run a Powershell script on the domain controller after restoring Active Directory data from a backup.
On the top of the dialog, note the title Configure Advance Actions for: which states the name of the domain you have selected and where the script will be applied.
There is a check box that can be selected to apply this script to all domains.
The script, for example, could be used to inspect SYSVOL, looking for any file extension that is executable (.exe, .dll, .bat, .cmd, .ps1, etc.), and then renaming by adding an extension that is not executable. The script can be used to perform any tasks on the domain controller after it is recovered from the backup.
A sample script can be found in C:\Program Files\Quest\Recovery Manager for Active Directory Forest Edition\DefaultAdvancedActions.ps1

The script executes right after the backup has been restored in DSRM mode and just before the reboot into normal mode. Essentially at the same time when recovery can be paused with the checkbox on DC properties.
The DSRM pause is after the scripts run and pauses the reboot to the normal mode step.
As with any other Forest Recovery agent operation, the script runs under the SYSTEM security context. Since the Domain Controller is in DSRM mode, you cannot use a script to enable accounts.
Quarantine Files
You can also quarantine files on the domain controller after restoring Active Directory data from a backup.
| NOTE |
The quarantine feature works on backup files and doesn't affect anything that might exist in SYSVOL. For example, if you create a backup (.bkf file) then add some files to SYSVOL, then run a recovery. The files added after the initial backup will still exist in SYSVOL. Usually, if your DC is infected, you should use Recovery to clean OS where the SYSVOL is empty. The quarantine feature does exactly what it says, when restoring data from a backup, it makes a decision what to do with each file in the backup: restore it to its original location; rename it; restore it to a different location; or do not restore it. This happens for every type of SYSVOL recovery from the backup (.bkf) file, including forest recovery and SYSVOL recovery mode. The backup is written into the current folder/file structure of SYSVOL folder while it may contain unwanted files. |
On the top of the dialog, note the title Configure Advance Actions for: which states the name of the domain you have selected and where the quarantine will be applied.
There is a check box that can be selected to apply this quarantine to all domains.

The list of file extensions is loaded from the file:
C:\Program Files\Quest\Recovery Manager for Active Directory Forest Edition\DefaultQuarantineFilters.txt
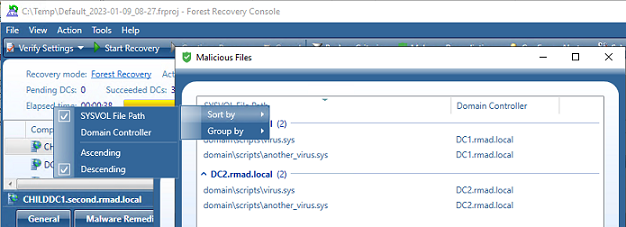
Click on the Show Files button to see a list of malicious files that will be automatically included in the quarantine rules (for both Quarantine Files and Do Not Recover tabs).

Malicious files are shown for each backup selected for a domain controller, and the list can be grouped and/or sorted by SYSVOL File Path and Domain Controller. A list of the files is also included in the Forest Recovery Report, click View | Report….
SYSVOL_Quarantined is created with the file detected as malicious by the antivirus.
In PowerShell, quarantine rules can be configured as follows:
$quarantineRule = (Get-RMADFEDomain -Domain "rmad.local").QuarantineSysvolFiles
$quarantineRule.IsEnabled = $true
$quarantineRule.MaliciousFiles = $false
$quarantineRule.SpecifiedFiles = $true
$quarantineRule.Filters = @("*.exe")
$quarantineRule.Exclusions = @("*\scripts\config\setup\*")
$quarantineRule.RenameFiles = $true
$quarantineRule.RenameSuffix = "_INFECTED"
$quarantineRule.MoveFiles = $false
Set-RMADFEDomain -Domain "rmad.local" -QuarantineSysvolFiles $quarantineRule
Do Not Recover
You can specify specific files from being restored from a backup.
On the top of the dialog, note the title Configure Advance Actions for: which states the name of the domain you have selected and where the Do Not Recover will be applied.
There is a check box that can be selected to apply this Do Not Recover to all domains.

When a domain is selected the Pause recovery in DSRM to perform additional actions before booting to normal mode is no longer available on each domain controller for the selected domain, and The option is managed by domain settings is displayed.

| NOTE |
When the Pause recovery in DSRM option is managed by domain settings, it applies to all domain controllers in the project for the selected domain. When enabled for entire domain, you can not individually enable the pause recovery in DSRM option for specific domain controllers. To do so, within Configure by Domain, unselect the domain(s). After a domain is unselected, within the project select each Domain Controller the pause is required for. From the Advanced Actions tab, select to enable Pause recovery in DSRM to perform additional actions before booting to normal mode. |
To Resume recovery when paused, select all or individual domain controllers in the recovery project. There are two choices which can be made:
-
Resume All DCs which allows the resume function of all Domain Controllers in the recovery.
Resume Selected DCs which will only allow the resume for the selected Domain Controllers.
Otherwise the Resume button will be unavailable.
Progress tab
You can use this tab to view progress of the recovery stages and steps applicable to the domain controller selected in the list. To view more information about a recovery step on this tab, point to that step, and then point to the question mark displayed next to it.
You can copy the information displayed on the Progress tab to the Clipboard and then paste it to another application (for example, a Microsoft Office Word file). To do so, point to the Progress tab, and then click the Copy button in the upper right corner of the tab. This copies all the information displayed on the Progress tab, including the current status of each recovery stage and step and any error messages displayed on the tab.
Script Results
When a script is run, the results are displayed in the Progress Tab under the Run Advanced Actions process, for any errors encountered.

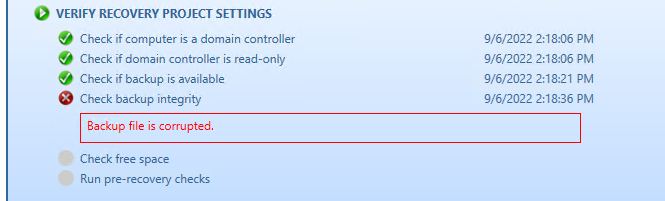
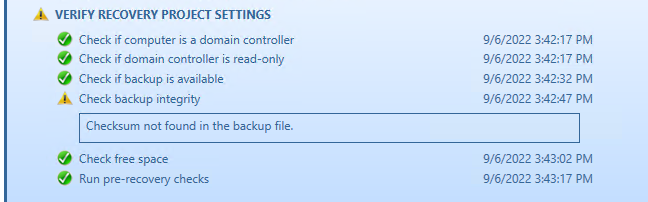
Integrity Check
When a backup is created, a checksum is calculated for the backup file and saved in the backup file when the backup is registered. An integrity check is performed on the backup during the progress and any issues are displayed as seen below.

The following statuses can be displayed after running the integrity check:
| Status | Description |
|---|---|
| Passed | The newly calculated checksum value matches the previously calculated checksum stored in the backup file. |
| Unknown | The integrity check was not performed. |
| Running | The integrity check is in progress. |
| Failed | The backup is not accessible (wrong credentials) or may have been moved from the path. |
| No Checksum | The previously calculated checksum could not be read. This could be due to the backup being created by a previous version of the product. The backup also may have been damaged in such a way that the checksum was also affected. |
| Corrupted | The newly calculated checksum value does not match the previously calculated checksum stored in the backup file. |
NOTE: Integrity checks are recorded as a Windows Eventlog event on the console during the integrity check. The events can be found in Applications and Services Log | Recovery Manager for Active Directory. If Email is configured, then email notifications are sent for integrity checks that are performed either after creating a backup (controlled by the Run an integrity check after creating a backup setting); or after creating a scheduled backup for the previous N sessions (controlled by the Check the integrity of previously created backups after a scheduled backup setting). The integrity check results are combined with the backup creation results and sent as a single message. If the Send notification upon errors or warnings only setting is selected, then an notification will only be sent if the integrity check report contains the results Backup file is corrupted or Integrity check failed. If all integrity checks are successful, no email notification will be sent.
Events tab
You can use this tab to view recovery events related to the entire Active Directory® forest, specific domain controllers, or both these categories of recovery events.
On this tab, you can use the following elements:
-
Show - Select a category of recovery events to view:
-
Forest-wide events. Shows recovery events related to the entire Active Directory® forest.
-
Events for selected DCs. Shows recovery events related to the domain controllers selected in the list.
-
All events. Shows forest-wide events and events related to the domain controllers selected in the list.
-
-
Copy - Copies events in the list to Clipboard.
-
Save - Allows you to export events in the list to one of the following formats:
-
Text (Tab delimited) (*.txt)
-
CSV (Comma delimited) (*.csv)
-