
Adding a Secure Storage server
To add a Secure Storage server it is recommended to install the agent manually. This method saves the agent installation package to the local machine. You must transfer the package manually to the Secure Storage server. This reduces the likelihood of any malware infecting your Secure Storage server by being exposed to your network before the server is secured. Your Secure Storage server is only secured after the Storage Agent has been installed and the Secure Storage server is hardened.
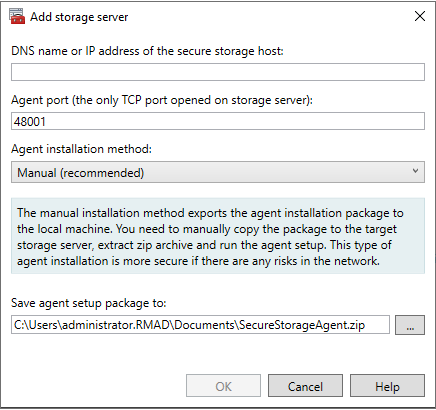
To add a Secure Storage server using manual method (Recommended)
-
In the Recovery Manager for Active Directory console, click the Secure Storage node.
-
In the Secure Storage Servers pane, click Add Server.
-
Type the DNS name or IP address of the server you want to use as your secure storage server.
-
In the Agent port field, type port number or use default port of 48001.
| note |
Ports cannot be changed after the Secure Storage server is added. To change the port after the Secure Storage server is added, it must be removed and added again. |
- From the Agent installation method drop-down list, select Manual (recommended).
-
Type the path or browse to path to Save agent setup package to.
-
Click OK. The agent setup package is saved to your local machine.
-
Copy the package, SecureStorageAgent.zip, to the server being configured as your Secure Storage server. This requires console (physical) access to the Secure Storage server.
-
Extract the installation package on the Secure Storage server and double-click the Install.bat file to install the agent.
-
The Storage Agent is installed and the server is hardened automatically. For more information on hardening, see Hardening Secure Storage servers below.
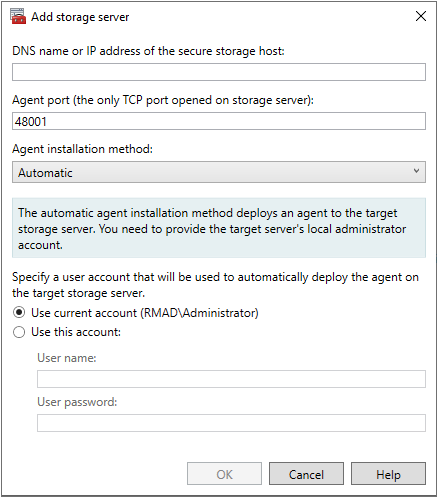
To add a Secure Storage server using automatic method
-
In the Recovery Manager for Active Directory console, click the Secure Storage node.
-
In the Secure Storage Servers pane, click Add Server.
-
Type the DNS name or IP address of the server you want to use as your secure storage server.
-
In the Agent port field, type port number or use default port of 48001.
| note |
Ports cannot be changed after the Secure Storage server is added. To change the port after the Secure Storage server is added, it must be removed and added again. |
- From the Agent installation method drop-down list, select Automatic.
-
Specify a user account that will be used to automatically deploy the agent on the target storage server. Select Use current account to use the currently logged in user account or select Use this account. Type the user name and password for the user account to be used to deploy the agent.
-
Click OK.
To manually export the setup package
If you forgot to export the installation package when manually adding a Secure Storage server or misplaced the installation package, you can manually export it.
- In the Recovery Manager for Active Directory console, click the Secure Storage node.
- In the Secure Storage Servers pane, right-click the Secure Storage server that you want to manually export the setup package for.
- Click Export setup.
| note |
The setup package is exported to your local machine. You must then copy the setup package to the server that you want to use as your Secure Storage server and run the installation. |
To delete a Secure Storage server from Recovery Manager for Active Directory console
- In the Recovery Manager for Active Directory console, expand the Secure Storage node.
- Right-click the Secure Storage server and select Delete.
| note |
The Secure Storage server is not automatically unhardened when deleted from the Recovery Manager for Active Directory console. To unharden use available PowerShell cmdlets on the Secure Storage server. See Unprotect-RMADStorageServer. |
Add an existing Secure Storage server on a clean Recovery Manager for Active Directory installation after full disaster
If the Recovery Manager for Active Directory server is lost, after installing the RMAD console on a new server, you can register the backups that are stored on the secure storage server on your new RMAD server.
| note |
Due to server hardening, the Automatic agent installation method is not supported when adding an existing Secure Storage server to a clean Recovery Manager for Active Directory installation. |
To add a Secure Storage server on a clean installation of Recovery Manager for Active Directory console
-
In the new Recovery Manager for Active Directory console, click the Secure Storage node.
-
In the Secure Storage Servers pane, click Add server.
-
Type the DNS name or IP address of the server you want to use as your secure storage server.
-
In the Agent port field, type port number or use default port of 48001.
| note |
Ports cannot be changed after the Secure Storage server is added. To change the port after the Secure Storage server is added, it must be removed and added again. |
-
From the Agent installation method drop-down list, select Manual (recommended).
-
Type the path or browse to path to Save agent setup package to.
-
Click OK. The agent setup package for the new Recovery Manager for Active Directory console is saved to your local machine.
-
Copy the package, SecureStorageAgent.zip, to the existing Secure Storage server. This requires console (physical) access to the Secure Storage server.
-
Extract the package on the Secure Storage server and double-click the Install.bat file to reinstall the agent and register the Secure Storage server with new Recovery Manager for Active Directory console.
-
In the Recovery Manager for Active Directory console, you will now see the Secure Storage server and can now retrieve your backups from the existing Secure Storage server for recovery purposes.
| note |
The existing Secure Storage server has continued to be hardened throughout this process. |
Default Storage Agent ports
By default, the Storage Agent port is 48001. If you want to use a different default port, you can configure it in the Secure Storage server Properties window or overwrite when adding each Secure Storage server.
To change the default Storage Agent port
- In the Recovery Manager for Active Directory console, right-click the Secure Storage node and select Properties.
- In the Storage Agent port field, type a port number.
The Storage Agent is used to pull the backup onto the Secure Storage server. - Click OK.
| note |
Ports cannot be changed after the Secure Storage server is added. To change the port after the Secure Storage server is added, it must be removed and added again. |
Hardening a Secure Storage server
After the Secure Storage server has been added and the Storage Agent has been installed on it, the server is hardened automatically. The following list outlines what happens to a Secure Storage server when it is hardened:
- All SMB server roles are disabled (SMBv1 - SMBv3).
- All incoming TCP ports are blocked by IPSec policies, except for the high-level Secure Storage Agent port.
- ICMP traffic is blocked (i.e. the server cannot be pinged).
- Remote desktop (RDP) traffic is blocked.
- Only one TCP agent port is left open on the server for communication with Recovery Manager for Active Directory, the Storage Agent port (by default, this is 48001).
- Agent traffic is encrypted by the public/private key pair.
- Logons to the server are only allowed via console (physical) access.
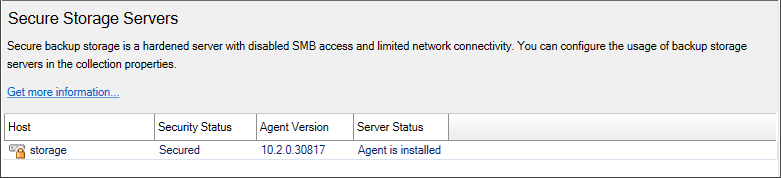
When a Secure Storage server is hardened, the lock icon next to the name of the Secure Storage server in the Secure Storage Servers window will be closed and it will have a Security Status of Secured.
To get the hardening status of a Secure Storage server
- During the installation of the Secure Storage agent on the Secure Storage server, a PowerShell module was installed and is located in the agent installation folder.
- On the Secure Storage server, run the PowerShell console. The module will be automatically imported.
- To get the hardening status, run the cmdletGet-RMADStorageServerHardeningStatus. Refer to Descriptions of PowerShell commands.
To unharden a Secure Storage server
- During the installation of the Secure Storage agent on the Secure Storage server, a PowerShell module was installed and is located in the agent installation folder.
- On the Secure Storage server, run the PowerShell console. The module will be automatically installed.
- To unharden a Secure Storage server, run the cmdlet Unprotect-RMADStorageServer. Refer to Descriptions of PowerShell commands for further details on Unprotect-RMADStorageServer.
To harden a Secure Storage server manually
- During the installation of the Secure Storage agent on the Secure Storage server, a PowerShell module was installed and is located in the agent installation folder.
- On the Secure Storage server, run the PowerShell console. The module will be automatically installed.
- To harden a Secure Storage server manually, run the cmdlet Protect-RMADStorageServer. Refer to Descriptions of PowerShell commands for further details on Protect-RMADStorageServer.
Viewing Secure Storage backups
After a Secure Storage server has been added, backups can be copied to the Secure Storage server. To enable and configure backups on the Secure Storage server you must enable backups for each Computer Collection separately. For more information on configuring backups on a Secure Storage server refer to Secure Storage server backups.
To view backups on Secure Storage server
- In the Recovery Manager for Active Directory console, expand the Secure Storage node.
- Select the Secure Storage server to view available backups on the server.
- All backups will be listed in the Backups on the Secure Storage Server pane.
- Backups are displayed with information about the backup on the server including DC name, Domain, Date, Size of backup, OS Version of backup, status of Integrity Check, backup Path.
Secure Storage server backups
Secure Storage is enabled and configured for each Computer Collection separately. When a backup is run for a Computer Collection with Secure Storage enabled, a copy of the backup is saved to the Secure Storage server.
Prerequisites
You must have completed the following steps before you can copy backups to your Secure Storage server.
- Secure Storage servers must be created and hardened.
- Computer Collections must be created.
- The backup type, either Standard (Active Directory) or Full (Bare Metal Recovery), must be set for the Computer Collection.
| NOTE |
Both Active Directory and Bare Metal Recovery backups can be copied to a Secure Storage server. |
To enable backups to a Secure Storage server for a Computer Collection
-
In the Recovery Manager for Active Directory console, expand the Computer Collections node.
-
Right-click the Computer Collection and select Properties.
-
On the Remote Storage tab, select the Save backups on the backed up DC, UNC share or on Secure Storage check box.
-
In the Backup path field, type the location to which you want to save your backups. The partition to store the backup is selected automatically based on backup size and available free disk space on the Secure Storage server.
| TIP |
Click Expression to add expressions such as, %COMPUTERNAME% or %DATETIME%, to your backup path. |
-
Select the Save backup copy on a Secure Storage server check box, and from the drop-down list, select the Secure Storage server that you want to copy backups to.
-
Select the Use the following account to access the backup storage check box.
-
In the Select Account dialog, type the user name and password used to store the backup on the remote storage and click OK.
^{NOTE} You can modify existing credentials by clicking Select Account, which opens the Select Account dialog. -
Click Apply then click OK.
To create backups and copy them to the Secure Storage server
- In the Recovery Manager for Active Directory console, expand the Computer Collections node.
- Right-click the Computer Collection and select Create Backup.
^{TIP} You can schedule backup creation on the Schedule tab on the Computer Collections Properties window.
To perform an integrity check
When a backup is created, a checksum is calculated for the backup file and saved in the Backups database when the backup is registered. An integrity check recalculates the checksum and compares it to the checksum stored in the Backups database.
-
In the Recovery Manager for Active Directory console, expand the Secure Storage node.
-
Click the Secure Storage server that contains the backup you want to perform the integrity check on.
-
In the Backups on the Secure Storage Server pane, right-click the backup and click Check Integrity.
-
The following statuses can be displayed after running the integrity check:
Status Description Passed The newly calculated checksum value matches the previously calculated checksum stored in the Backups database. Unknown The integrity check was not performed. Running The integrity check is in progress. No Checksum The previously calculated checksum could not be read. This could be due to the backup being created by a previous version of the product. The backup also may have been damaged in such a way that the checksum was also affected. Corrupted The newly calculated checksum value does not match the previously calculated checksum stored in the Backups database.
Copying backups from the Secure Storage server
You can copy backups stored on the Secure Storage server to another location.
- In the Recovery Manager for Active Directory console, expand the Secure Storage node.
- Select the Secure Storage server that you want to copy backups from.
- In the Backups on the Secure Storage Server pane, right-click the backup you want to copy and select Copy to.
- In the Network path to copy the backup to field, type the network path to which you want to copy the backup.
- In the User name and Password fields, type credentials that have write permissions for the network path.
- Click OK.
The backup is copied to the provided network path and can now be registered for use within a recovery project.