
NAS ReACL Profiles
The default NAS ReACL profile is used if a different profile is not defined and set on the NAS computers. The default NAS ReACL profile can be edited.
To add NAS ReACL profiles:
-
On the NAS ReACL Profiles page, click the Add button. The NAS ReACL Profile window appears.
- In the Profile Name field, enter a name to identify this NAS ReACL Profile.
- Select a Logging Level, either Informational (default) or Debugging.
- Enter the network errors that will trigger a retry in the Retry If the Following Error Codes Are Encountered box. By default, errors 53 and 64 will trigger a retry.
- Enter the number of retries to attempt in the Retry Count field. The default retry count is 10 times.
- Enter the number of seconds between network error retries in the Retry Interval field. The default interval is 1 second.
- Click Next.
-
Select the components to process.
If the Preserve the "Archive" Bit box is left unchecked, the archive bit will be reset. If checked, the archive bit will not be reset.
-
In the Exclude These Paths From Processing box, enter folder paths that will not be included in the ReACL process. Wild card characters (* and ?) can be used when specifying exclusion list folders. Separate the paths by pressing Enter. By default, the following folders are blacklisted:
- \Windows
- \WINNT
- \I386
- \Windows\I386
- \Program Files
- \PROGRAM FILES (x86)
- \MSOCACHE
- \System Volume Information
- \Recycler
- \$RECYCLE.BIN
- \CONFIG.MSI
- \RECOVERY
- \OEM
- \Quarantine
- \BOOT
- \ProgramData\Microsoft\Windows Defender
-
In the Exclude These Registry Keys From Processing box, enter registry keys that will not be included in the ReACL process. A leading '\' is not necessary. Separate the paths by pressing Enter. The following wild card characters are permitted when specifying registry keys:
- * matches zero or more characters in a key name, but not the '\' path delimiter.
- ? matches any single character.
- ** matches zero or more parent keys.
Examples:
- HKEY_LOCAL_MACHINE\SOFTWARE\XYZ – a single key
- HKEY_LOCAL_MACHINE\SOFTWARE\XY* – all keys starting with "XY" in HKEY_LOCAL_MACHINE\SOFTWARE
- HKEY_LOCAL_MACHINE\SOFTWARE\?YZ – all 3-character keys ending with "YZ" in HKEY_LOCAL_MACHINE\SOFTWARE
- HKEY_LOCAL_MACHINE\**\XYZ – all keys named "XYZ" anywhere under HKEY_LOCAL_MACHINE
- **\XYZ – all keys named "XYZ" in any registry hive
- Click Next.
-
The Reparse Point Processing Rules page appears. Reparse Points like Symbolic Links, Mount Points, and OneDrive folders will be processed by ReACL. Additional Reparse Tags can be added to the rules list in the Advanced view to change how ReACL will process those items. Click the Show Advanced button to edit the rules list.
When Show Advanced is clicked the rules list is displayed. Additional Reparse Points can added to the list in the "ReparseTag:Action" format. Skip, Recurse, Update, and Full are the available actions. Separate rules by pressing Enter.
- Click Next.
-
Select an option from the Elevate Permissions Failure Action drop-down list to choose the action that should be taken if any part of the ReACL process encounters errors.
In order to successfully adjust permissions, Migrator Pro for Active Directory must create a process with a security token that has been assigned additional permissions. The token is said to have elevated rights/permissions. If this process fails, it is likely that the ReACL will be largely unsuccessful in updating the operating system for use by target user accounts.
- The default is Terminate processing with fatal error, meaning the ReACL process for that computer is stopped as soon as an error occurs. This is a time-saving option. The ReACL process is reported as Failed in the Computers View. A computer cannot be Cutover if the ReACL process reports as Failed. This is the recommended setting.
- If you choose Log error entry, the entire process will attempt to complete when an Elevate Failure error is encountered, but the process will still be reported as Failed. This selection may take significantly more time than "Terminate processing with fatal error" because the entire process will attempt to finish before reporting as Failed.
- If you choose Log warning entry, a warning entry will be logged, however the process will be reported as Successful. This choice allows experienced migration architects to analyze the logs and choose to Cutover anyway based on their analysis of the results.
- If you choose Log informational entry, an info entry will be logged, however the process will be reported as Successful. This choice allows experienced migration architects to analyze the logs and choose to Cutover anyway based on their analysis of the results. We suggest choosing Warning over Info as that will make the entries easier to locate in the log.
-
Select an option from the Preserve Rollback Metadata in ACLs drop-down list.
Migrator Pro for Active Directory inserts a "breadcrumb” during the ReACL process to allow seamless rollback of the ReACL process if needed. You can control the insertion of these breadcrumbs (which are removed during the Cleanup process) if desired, here.
-
The default is Always and does not affect performance. We recommend this setting. This is the only setting where the changes performed by the ReACL process can be rolled back, or undone, in all scenarios.
-
If you choose Only If Ambiguous, metadata will only be included when the rollback settings would be ambiguous. Only If Ambiguous results in the addition of fewer breadcrumbs, preserving usage for times when it may be impossible to determine the original file or folder permissions. For example, when users have accounts in multiple domains that will be consolidated into a single domain.
Note that Only If Ambiguous guarantees a ReACL can be rolled back to the original state only when the file system permissions remained unchanged. Modification of ACLs on the file system could create a state where a rollback cannot complete with 100% success. To ensure the ability for a ReACL Rollback in all scenarios, Always should be selected.
-
If you are an experienced migration architect, you may choose Never to never include metadata.
If Never is selected, a complete rollback may not be possible.
-
-
Select Yes under Run Processing in Simulation Mode) to simulate the results of the ReACL process without actually making any changes to the ACL. Visit the logs/reports to determine any potential issues and correct them before running an actual ReACL process. You might use this setting to create a Device ReACL Profile specifically for testing purposes.
- Click Save Profile. The new NAS ReACL Profile is added to the list.
Credential Settings
Credential Cache and Offline Domain Join
Description
Microsoft’s Offline Domain Join (ODJ) process allows a workstation to join a domain without contacting a Domain Controller. Migrator Pro for Active Directory builds upon this functionality to allow machines to be cutover to the new domain without contacting a target domain controller.
This means that Migrator Pro for Active Directory can allow the workstation to join the new domain without having the user connect to the corporate VPN and manually join their workstation to the new domain.
Normally, VPN users can’t login right after joining a new domain and rebooting because Windows must be able to contact the target domain to authenticate against a domain controller for the very first login. Typically, this would mean that a remote user would need to log in to their machine first and then establish a VPN connection.
Migrator Pro for Active Directory resolves this by taking advantage of Windows ability to cache credentials. If users have logged in to a domain previously, Windows can still log them in even if they can no longer reach a domain controller by using their cached credentials. Therefore, Migrator Pro for Active Directory has functionality to have a user pre-login to the new domain before the computer is cutover so the target credentials can be cached and used for the first login without the need to contact a domain controller first.
The computers that the ODJ process is being run on must have network connectivity to BOTH the source and target environments at the same time in order to have the Cached Credentials function work properly.
Creating ODJ files for each workstation
The first step will be to use Microsoft’s DJOIN utility to create a provisioning file. Only the provisioning part of the DJOIN process is needed. Complete information on DJOIN can be found here:
https://technet.microsoft.com/en-us/library/offline-domain-join-djoin-step-by-step(v=ws.10).aspx
The Provision, Domain, Machine, and Savefile parameters are required at a minimum. There is the option to control where the target machine will be created using the MachineOU parameter as in the sample shown here.
DJOIN.EXE /Provision /Domain BTADLAB.com /Machine Sales220 /Savefile “C:\Program Files\Binary Tree\ADPro\Downloads\ODJ\Sales220.txt” /MACHINEOU OU=SalesComputers,OU=Sales,DC=BTADLAB,DC=COM
The file must be saved in the ODJ folder in the downloads path that was chosen during the installation.
By default, this is C:\Program Files\Binary Tree\ADPro\Downloads\ODJ.
This can be completed for all relevant workstations early in the migration process.
 |
WARNING: Be sure to name each text file with the exact matching machine name. |
Configuring the Credential Cache Profile
The next step is to configure the existing Default Credential Cache profile with the IP address of a Target domain controller, or to create a new profile.
Click on Add to create a new profile, or Edit to modify an existing profile. If you choose to use the Default profile, you must edit it to include a Target DC IP address.
- The Target Domain Controller Ping Interval setting determines how long the script will sleep before pinging the DC again.
- The Timeout Before Job Failure setting determines the Credential Cache app timeout value that will be used for the job once downloaded to the agent managed machine.
- The Timeout For User Credential setting determines how long the user is presented with a dialog box to enter their target domain credentials.
Cache Credential Jobs
Now that a profile has been configured with a target DC IP address, we can assign a Cache Credentials job to the workstation(s).
In the Computers list, select one or more Computers. Select Cache Credentials from the Actions menu and click the Apply Action button. The Credential Cache Options box appears.
Select a Credential Cache Profile.
A date and time for the Cache Credentials job can be chosen to run the job at a later time. This date/time combination represents the earliest time that this job could run. The actual time thereafter depends on the Polling Interval of the workstation.
If a date/time is not chosen, this job will run on the workstation the next time the agent checks for jobs.
The Computers list will reflect a status of "Queued". When the job is collected by the agent the status will change to "In Progress", and then finally it will transition to a status of "Completed" or "Failed".
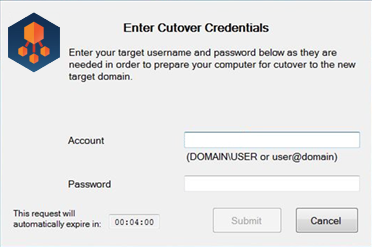
On the workstation side, when the Cache Credentials Job is received, the user will be prompted to enter their target credentials. Below is an example of what the user will see when the Cache Credential job runs:
ReACL
The next recommended step is the ReACL process. The ReACL process can be run repeatedly as needed before ODJ, but it is suggested to be run at least once right after the Cache Credentials process is run.
Offline Domain Join Job
The final step is the actual Offline Domain Join. This is similar to the Cutover process for machines that are directly connected to the network.
| |
WARNING: Do not perform the Cutover process on Offline Domain Join workstations. The Offline Domain Join process takes the place of Cutover for workstations connecting via VPN. |
In the Computers list, select one or more Computers. Select Offline Domain Join from the Actions menu and click the Apply button.
The Job Options box appears. A specific date/time combination can be chosen for when to run the job, or just click Apply Action to have this job received by the workstations during their next check for jobs.
| |
WARNING: The Offline Domain Join (Job Scheduling Options dialog box) start date and time must be set AFTER the Cache Credentials job (Cache Credential Options dialog box) start date and time. The Offline Domain Join process does not support rollback. |
Credentials
Use the Credentials page to add credentials used for either a computer Cutover or for an Admin Agent.
The specified cutover credentials must be able to join and disjoin a computer from the specified domain and well as disable a computer in the specified domain. A trust between the source and target domain is not required.
To add Cutover credentials:
- Click the Add button. The Add Your Credentials window appears.
- Enter a Credential Name to identify the credentials (for example, "DomA to DomB Admins").
-
Select Cutover from the Credentials Type drop-down list. The Source and Target fields appear.
- Enter values in the following fields under Source Domain Credentials:
- FQDN of Domain - The domain FQDN of the source in source.domain.dom format.
- Username - The username to access the source domain in domain\username or UPN (username@domain.dom) format.
- Password - The password credential to access the source domain.
- Enter values in the following fields under Target Domain Credentials:
- FQDN of Domain - The domain FQDN of the target in target.domain.dom format.
- Username - The username to access the target domain in domain\username or UPN (username@domain.dom) format.
- Password - The password credential to access the target domain.
- Click Save Profile. The cutover credentials are added to the list.
To add Admin Agent credentials:
- Click the Add button. The Add Your Credentials window appears.
- Enter a Credential Name to identify the credentials (for example, "Move User Credentials").
-
Select Admin Agent from the Credentials Type drop-down list. The Credentials fields appear.
- Enter values in the following fields Credentials:
- FQDN of Domain - The domain FQDN in domain.dom format.
- Username - The username to access the domain in domain\username or UPN (username@domain.dom) format.
- Password - The password credential to access the domain
- Click Save Profile. The Admin Agent credentials are added to the list.