
Information Checklist
Please ensure you capture all the details needed for the Evolve Designer user to continue with the server configuration. See Appendix B – Post Install Information Checklist for details.
Appendix A Pre Install Components
Installation of the Web Server (IIS) Role is required prior to Evolve installation.
To install the IIS Role:
-
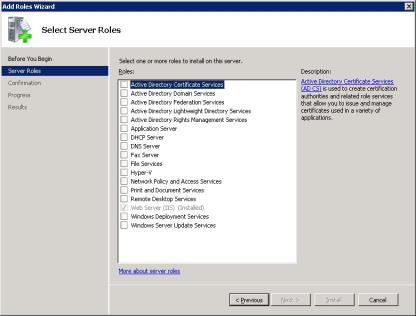
Navigate to the Add Roles Wizard and select the Server Roles option.
-
A list of Roles with corresponding checkboxes will display:
-
Check the Web Server (IIS) box.
-
Press the Next button.
-
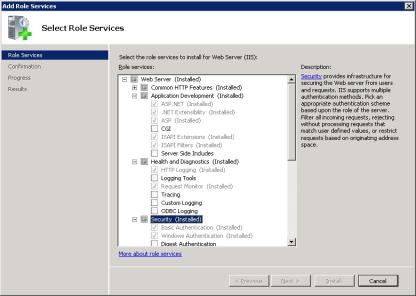
The Web Server (IIS) role will expand to list the different features to be installed:
-
-
Check the related checkboxes to install the following features:
|
Application Development Features:
Security
|
Performance Features
Static Content Compression
Common HHTP Features:
Health and Diagnostics
|
|---|
Appendix B Post Install Information
In order to create an Evolve Site, the following information gained from the installation needs to be available to the Evolve Administrator:
|
Type |
Description |
Required for |
Deployment Type |
|---|---|---|---|
|
IIS USer |
The Username and Password of a User of the web server machine that the Evolve application can run as.
This User must have Administrative rights on the web server machine.
Note: When Active Directory |
IIS Configuration when Creating a Site (post installation), or during manual setup of IIS. |
Dynamic Static |
|
CW System Manager User Account |
When running Dynamic Sites you must enter the details of a Evolve System |
This account is used by Evolve to access the repository. |
Dynamic |
|
ACTIVE DIRECTORY USER |
The Username and Password for a domain user which can read the Active Directory. |
Only required if |
Dynamic |
|
Active Directory connection path |
The path to connect to the Active |
Only required if |
Dynamic |
|
Active Directory Social User grouP |
The name of the Active Directory group used for Social Users. |
Only required if |
Dynamic |
|
Active Directory Contributor GROUP |
The name of the Active Directory group used for Contributing Users. |
Only required if |
Dynamic |
|
active directory Diagram GROUP |
The name of the Active Directory group used for Diagram Editor users. |
Only required if |
Dynamic |
|
active directory Static GROUP |
The name of the Active Directory group used for Static Site users. |
Only required if |
Static |
Appendix C IIS MIME Type Support
Your web server machine must be configured to understand some specific file formats used by Evolve Web Platform.
You can do this task now, at the Default Web Site level in IIS, or you can do this later for the specific Evolve application, once the Evolve Administrator has created it.
To specify the new MIME Types:
-
In IIS Manager’s left-hand pane, select the Default Web Site node
-
Ensure you have the central pane set to Features View, then double-click MIME Types in the IIS section
The MIME Types settings are displayed
-
Check the list of extensions that are already configured and see if any of the following are missing:
-
.eot
-
.json
-
.ttf
-
.woff
-
.woff2
-
-
For each extension that is not already configured, do the following:
-
Right-click in the central pane and select Add…
-
Enter the following details, depending on which you need to add
|
File Name Extension |
MIME Type |
|---|---|
|
.eot |
application/octet-stream |
|
.json |
application/json |
|
.ttf |
application/octet-stream |
|
.woff |
application/font-woff |
|
.woff2 |
application/font-woff2 |
-
Click OK
-
Repeat steps a to c as required and then close IIS Manager.