|
1 |
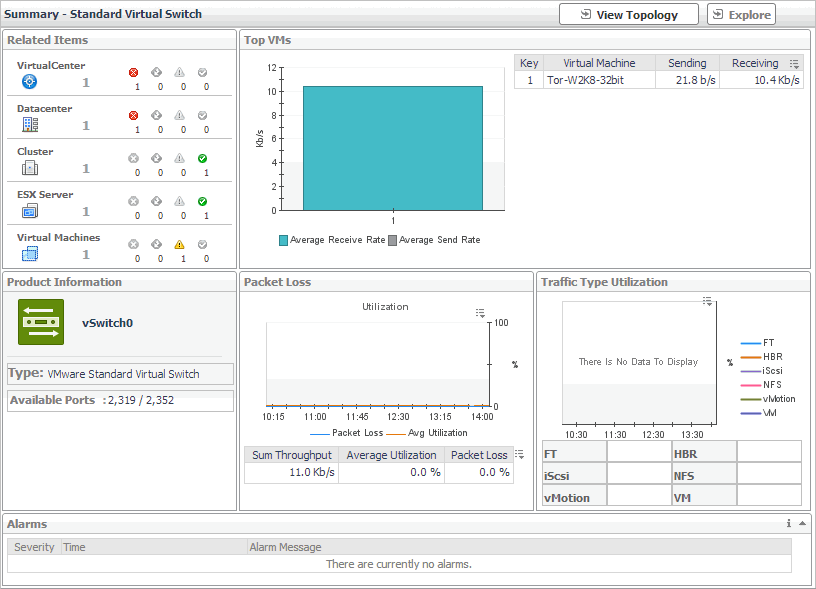
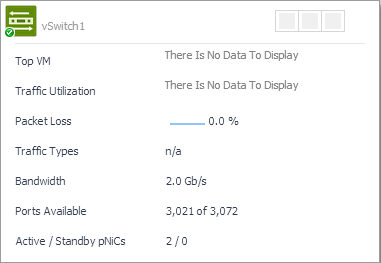
On the VMware Environment dashboard, on the Monitoring tab, in the Virtual Environment Overview, select the Virtual Switches tile. |
|
2 |
In the Quick-View, in the Virtual Switches view, under Standard Virtual Switches, select a virtual switch. |
|
• |
|
• |
| |||
| |||
| |||
|
| |||
| |||
| |||
| |||
| |||
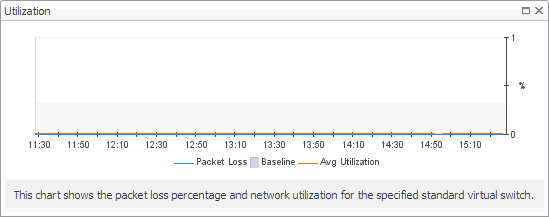
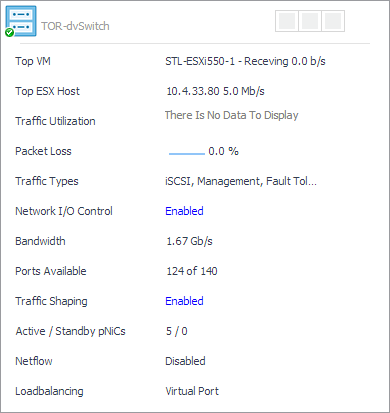
Figure 384. Utilization dialog box
 |
| |||
| |||
Figure 385. Product Information dwell
 |
| |||
| |||
| |||
| |||
| |||
Figure 386. Clusters Inventory dwell
| |||
Figure 387. Datacenters Inventory dwell
| |||
Figure 388. Virtual Centers Inventory dwell
| |||
Figure 389. Virtual Machines Inventory dwell
|
| |||
| |||
| |||
| |||
| |||
|
| |||
| |||
| |||
| |||
| |||
| |||
Figure 390. Traffic Type Utilization dialog box
 |
|
1 |
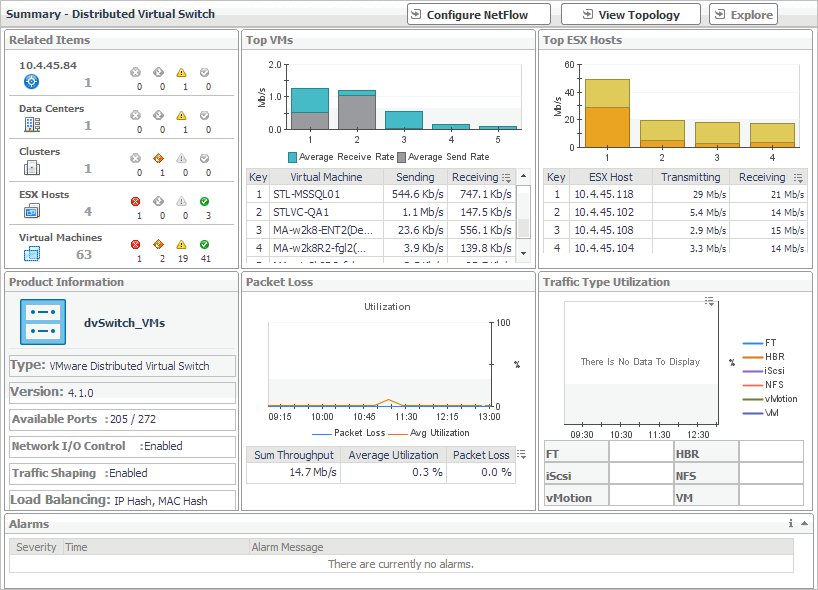
On the VMware Environment dashboard, on the Monitoring tab, in the Virtual Environment Overview, select the Virtual Switches tile. |
|
2 |
In the Quick-View, in the Virtual Switches view, under Distributed Virtual Switches, select a virtual switch. |
|
1 |
|
2 |
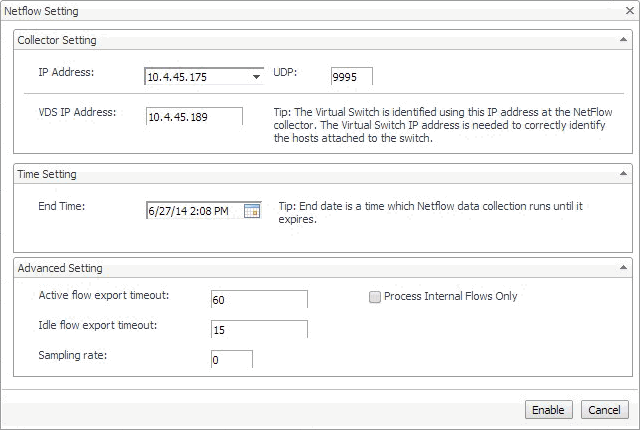
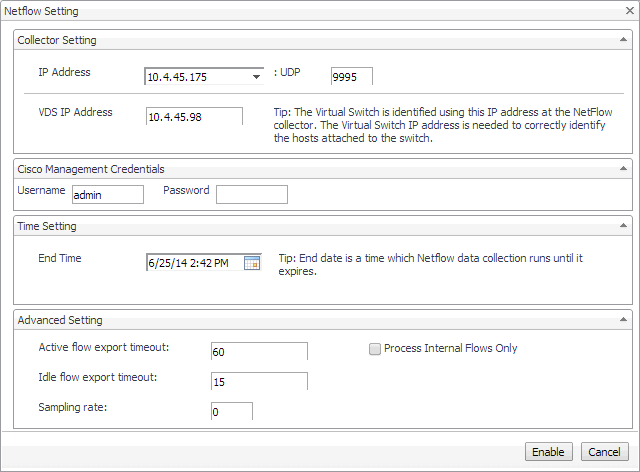
In the Netflow Setting Dialog box, provide the following information: |
|
• |
IP Address and UDP: Type the IP address and port number of the NetFlow collector. |
|
• |
VDS IP Address: Type the IP address of the distributed virtual switch. |
|
• |
End Time: Select the time when you want the collector to stop obtaining NetFlow data. |
|
• |
Active flow export timeout: Type the number of seconds after which an active data flow times out. |
|
• |
Idle flow export timeout: Type the number of seconds after which an idle data flow times out. |
|
• |
Sampling rate: Type a number indicating how often you want to collect data packets. For example, a value of 2 instructs the collector to obtain data from every second packet. |
|
• |
Process Internal Flows: Select this check box if you want to collect data only during network activities between virtual machines on the same host. |
|
3 |
Click Enable. |
|
• |
|
• |
| |||
| |||
| |||
| |||
| |||
| |||
Figure 393. Product Information dwell
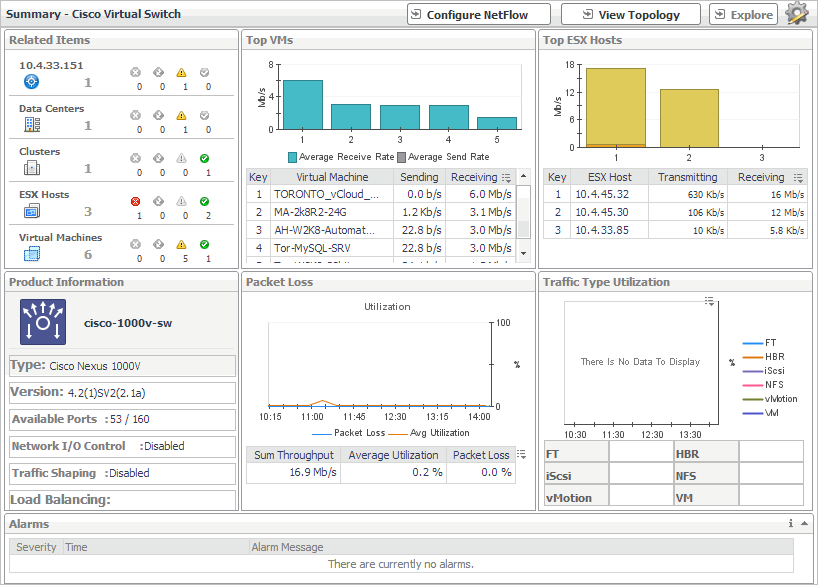
 To find out more about the network I/O traffic passing through the selected switch, in the dwell, on the right of Network I/O Control, click Enabled.
Figure 394. Network resource pools
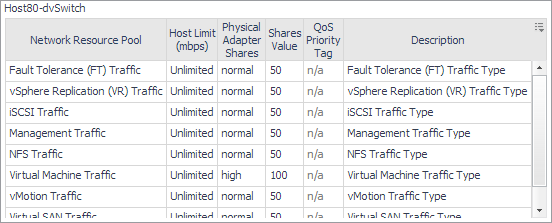 Figure 395. Traffic shaping policies
 |
| |||
| |||
| |||
| |||
| |||
Figure 396. Traffic Type Utilization dialog box
| |||
Figure 397. Utilization dialog box
|
|
1 |
On the VMware Environment dashboard, on the Monitoring tab, in the Virtual Environment Overview, select the Virtual Switches tile. |
|
2 |
In the Quick-View, in the Virtual Switches view, under Cisco Virtual Switches, select a virtual switch. |
|
1 |
|
2 |
In the Netflow Setting Dialog box, provide the following information: |
|
• |
IP Address and UDP: Type the IP address and port number of the NetFlow collector. |
|
• |
VDS IP Address: Type the IP address of the distributed virtual switch. |
|
• |
Username and Password: Type the credentials needed to access the Cisco virtual switch. |
|
TIP: Cisco virtual switch credentials can also be updated using the Configure Switch button on the Summary - Cisco Virtual Switch view. |

|
• |
End Time: Select the time when you want the collector to stop obtaining NetFlow data. |
|
• |
Active flow export timeout: Type the number of seconds after which an active data flow times out. |
|
• |
Idle flow export timeout: Type the number of seconds after which an idle data flow times out. |
|
• |
Sampling rate: Type a number indicating how often you want to collect data packets. For example, a value of 2 instructs the collector to obtain data from every second packet. |
|
• |
Process Internal Flows: Select this check box if you want to collect data only during network activities between virtual machines on the same host. |
|
3 |
Click Enable. |
|
• |
|
• |


|
1 |
On the VMware Environment dashboard, on the Monitoring tab, in the Virtual Environment Overview, select the Virtual Switches tile. |
|
2 |
To display a standard virtual switch in the Standard vSwitch Topology View, complete the following steps. |
|
a |
In the Quick-View, in the Virtual Switches view, under Standard Virtual Switches, select a virtual switch. |
|
b |
|
3 |
To display a distributed virtual switch in the Distributed vSwitch Topology View, complete one of the following procedures. |
|
a |
In the Quick-View, in the Virtual Switches view, under Distributed Virtual Switches, select a virtual switch. |
|
b |
|
4 |
To display a Cisco virtual switch in the Distributed vSwitch Topology View, complete one of the following procedures. |
|
a |
In the Quick-View, in the Virtual Switches view, under Cisco Virtual Switches, select a virtual switch. |
|
b |
