End users will need a valid M365 source account and be assigned a valid RBAC role to log into the self-service portal and manage their device cutover schedule. Instead of adding each individual user to On Demand, configure RBAC access for Entra groups using the steps below.
- In your source M365 tenant, create one or more groups that will contain the end users who will access the self-service portal.
- Log in to On Demand.
- Navigate to Tenants and add the source tenant, which will grant the Core consent. No additional tenant consents are required for self-service.
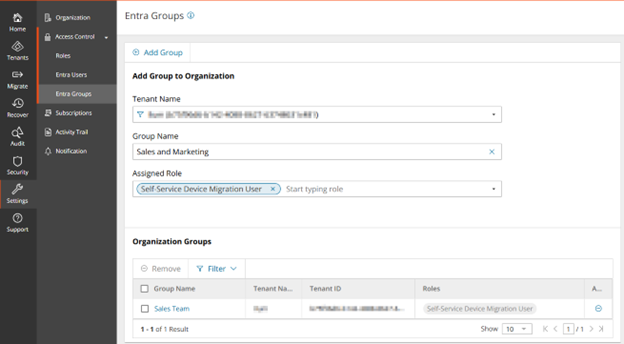
- Navigate to Settings > Access Control > Entra Groups.
- Select your tenant and enter the name of the group you created.
- Assign the role Self-Service Device Migration User and click Add Group.
- Add additional groups as needed.
|

|
NOTE: If the source devices are migrating from Active Directory, ensure the source UPN of the device’s user profile matches the UPN of the M365 account used to log into the portal. |
In On Demand, navigate to Migrate > Self Service > Device Migration to access the self-service admin portal to configure your settings and manage individual device cutovers..
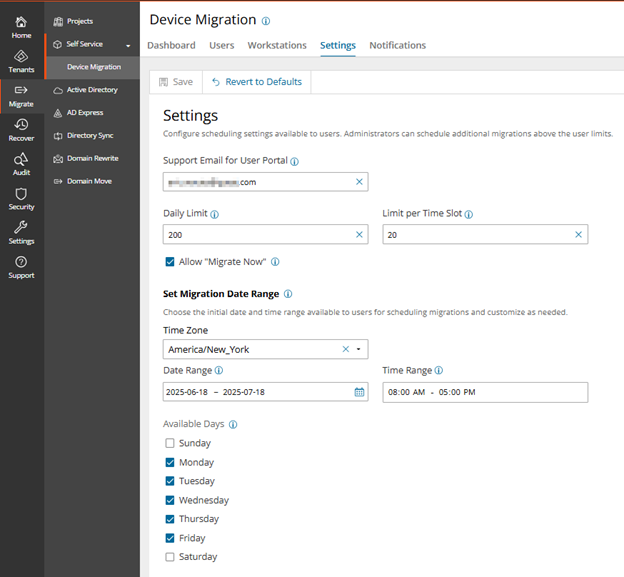
Settings
Select the Settings tab to configure the scheduling parameters that will be available to end-users.
Support Email for User Portal -This email address will be displayed to end-users on their portal dashboard.
Daily Limit and Limit per Time Slot - Restrict how many migrations can be scheduled each day or timeslot to control the volume of potential helpdesk calls. Once a limit is reached, that day or time slot will not be available for additional end-users to select.
Allow Migrate Now - Choose whether end-users will have the option to migrate their device immediately from the self-service portal or whether they will be required to schedule the cutover.
Time Zone, Date Range, Time Range, Days - Configure which days, dates, and times will be available for end-users to select. The time zone setting helps you plan the time range in context of your support team’s availability.
Notifications
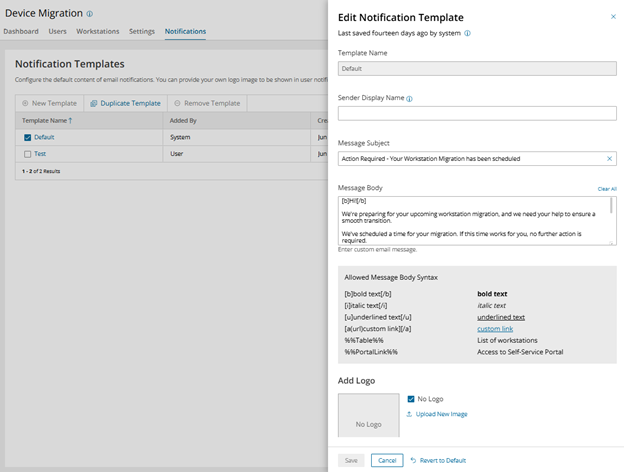
Select the Notifications tab to configure email notifications. A default template is provided for notifying end-users that their device is ready for scheduling. You can modify the default template as well as create new templates.
Sender Display Name - Configure a friendly Display Name that should be shown on notifications to end-users; the message itself will come from a no-reply Quest address.
Message Subject and Message Body - Customize the content and formatting as desired and upload an optional image to help end-users recognize the notification is from their company. The default message includes a table that lists all devices where ODMAD discovered a user profile tied to the user’s source account as well as a link to access the end-user portal.
|
|
NOTE: Create additional templates to customize the message content for different types of users or create separate pre- and post-migration email reminders. |
