Review the following solutions to help troubleshoot SQL Server connection issues in Toad.
| Issue | Cause/Solution |
|---|---|
|
Cannot specify a port number when connecting |
Currently, Toad does not have a separate field for specifying a port number. Solution: You can connect if you know the port number for the instance by entering the following in the Server name field on the New Connection window: ServerName,Port or IPAddress,Port For example: 10.1.29.129,1234 (where 1234 is the port number of the instance) |
|
Cannot connect to a remote instance in SQL Server 2005 |
Remote connections may not be enabled in SQL Server 2005. Also, named instances are configured to use dynamic ports and select an available port once the SQL Server Service starts. If you are connecting to a named instance through a firewall, configure the Database Engine to listen on a specific port, so that the appropriate port is opened in the firewall. Note: Remote connections are disabled by default in the Express and Developer editions of SQL Server 2005. Solution: To enable remote connections, see "How to configure SQL Server 2005 to allow remote connections" at: http://support.microsoft.com/kb/914277 |
|
"Path is not of a legal form" error message when connecting or "Could not find a part of the path |
You attempted to migrate settings from a previous install of Toad to the current install, but the settings file (InitialSqlServer.Sql) for the previous install was either removed, moved, or corrupt. You may also receive this error if you installed Toad and migrated settings from a previous version, and later uninstalled the previous version. Solution: You must specify a valid location for the InitialSqlServer.Sql file in Toad. To specify a valid location
By default, this file is located in the following directory: C:\Program Files\Quest Software\Toad Data Point version \Templates\Scripts Note: Clicking |
| Cannot establish Named Pipes connection |
If you are trying to connect to the server using Named Pipes, "Poll service status in connection list" option should be cleared. Solution:
|
| Cannot access some functionality when working with Azure connection. |
To utilize majority of Toad functionality VIEW DEFINITION grant is required for those databases you want to work with. |
Toad allows you to create a native Databricks connection, which provides you with a full-featured Object Explorer, Query Builder and SQL Editor.
Note: You must have a Simba Apache Spark ODBC Connector 2.8.2 (or later) installed before a native connection is created.
To install the Simba Apache Spark ODBC Connector
Download and install the ODBC Connector from the Databricks Web site.
Click 
Enter the connection information in the Create New Connection dialog.
Review the following for additional information:
| General Tab | Description |
|
Host |
Enter the server where the Databricks instance is hosted. |
|
Authentication |
Select the type of authentication to use for this connection. Toad offers two options:
|
|
Port |
The default port number is 443 |
|
HTTP Path |
Enter the endpoint used to route queries to the appropriate cluster or resource. |
|
Token |
Enter your authentication token |
|
Optional |
A connection can be made without providing this information |
|
Catalog |
Enter the name of the Catalog you would like to connect to |
Click Connect to save the connection and immediately connect to the database.
or
Click Save to save the connection without connecting to the database.
Notes:
The Enable Query Result Download checkbox, located in the Advanced tab, allows you to enable or disable the downloading of query results. Disabling this option can improve performance when working with large result sets.
To use Databricks native connections in Toad Data Point, Unity Catalog must be enabled in your Databricks workspace.
Tip: Connections are stored in the connections.xml file and can be found by clicking the Application Data Directory link in Help | About.
Troubleshoot SQL Server® Issues
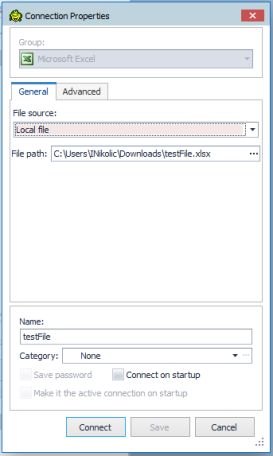
Connecting to an Excel file is easy. To create the connection, simply open the Excel file from the Create New Connection dialog
Create a connection to an Excel file stored locally
Click
Select Excel from the Group list.
From the General menu choose the Local File.
Complete the Create New Connection dialog.
Click Connect to connect immediately while saving the connection information. Optionally, click Save to save the connection without connecting.
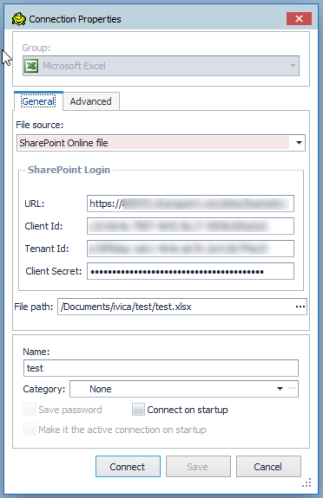
Create a connection to an Excel file stored on SharePoint online
Click
Select Excel from the Group list.
From the General menu choose the File Source and select the SharePoint online file.
To successfully connect to your SharePoint account, you need to complete the SharePoint Login information, insert the SharePoint URL, Client ID, Tenant Id, Client Secret.
Click Connect to connect immediately while saving the connection information. Optionally, click Save to save the connection without connecting.
NOTE: Before creating the connection, consider the following details
Review the following for additional information:
| General Tab | Description |
|
Category |
Select a category if you want to color code your connection. Tip: The color is applied in the Connection Manager and other connection dialogs. You can also create a new category for your connection. |
| Advanced Tab | Description |
|
Enable import mode |
Select this checkbox to set IMEX=1 in the connection string, which converts intermixed data to text. |
|
Show system tables |
Select to display worksheets as system tables. Toad uses the worksheet name suffixed with a dollar sign ($). |
|
Read-Only Connection |
Open connection in read only mode. |
|
Automatically create ranges |
Select this option if you want Toad to automatically create named ranges. Toad creates one named range in each worksheet (unless the Toad name, AutoRange_<worksheet name>, already exists). Note: Toad does not overwrite the user defined named ranges. The Toad-created named ranges and the user defined named ranges are both visible in the Object Explorer after connecting. Deselect this option if the Excel file contains user defined named ranges and you do not want Toad to create additional named ranges. Important: If you deselect this option, and your Excel file does not contain named ranges, Toad is unable to create tables from your data. The feature is selected by default. |
|
Hide named ranges |
Select the named ranges to hide. Note: Named ranges are not displayed until after a connection is created (in the Connections or Connection Properties dialog). In Excel 2007 files, named ranges are not displayed for active connections. |
|
Open in Excel |
Click to open the selected file in Excel. This is useful if you want to modify your file or define named ranges before connecting. |
Understand how Toad creates data tables from an Excel file
Toad uses Excel named ranges (regions) to define the data to include in a table. Therefore, any data that you want to display and easily query in Toad must be included in an Excel named range (region).
You can create named ranges using one of the following methods:
To create a named range in Excel
In the Excel file, select the data that you want to include in the table (including column headings). Then define a named range.
| » | In Excel 2003, select Insert | Name | Define. |
| » | In Excel 2007, right-click the data and select Name a Range. |
To allow Toad to automatically create named ranges
| » | When creating a new connection to the Excel file, in the New Connection dialog, select Automatically create ranges. Toad creates one named range for each worksheet and includes the contents of every formatted cell. |
Tip: For an Excel file with an existing connection, in the Navigation Manger, right-click the file and select Properties. On the Advanced tab, select Automatically create ranges. Toad creates the named ranges the next time you reconnect to this file.
To hide named ranges
You can hide an Excel file's named ranges so that they do not display as tables in the Object Explorer.
In the Navigation Manager, right-click an Excel file connection and select Properties.
Note: In Excel 2007 files, the connection must be inactive for the named ranges to display.
To view or modify connection properties
To view an Excel connection's properties, do one of the following:
 on the Connections toolbar to open the Connections dialog. Select the Excel file connection in the left pane to view the connection properties in the right pane.
 | Consideration/Limitation | Description |
|---|---|
|
Excel 2016 64-bit or Office 365 64-bit |
To successfully create a connection to an Excel file using Excel 2016 64-bit, the Microsoft Access Database Engine is required and might not have been included in the Excel installation. In addition, the architecture (bitness) of the engine must match the bitness of Toad. If using 64-bit Toad, the 64-bit version of Microsoft Access Database Engine is required. If using 32-bit Toad, the 32-bit version of Microsoft Access Database Engine is required.
Note: This requirement applies only to connections to Excel, not to the Toad functionality of importing/exporting to Excel. |
To troubleshoot Excel issues, see the following:

Tip: Connections are stored in the connections.xml file and can be found by clicking the Application Data Directory link in Help | About.
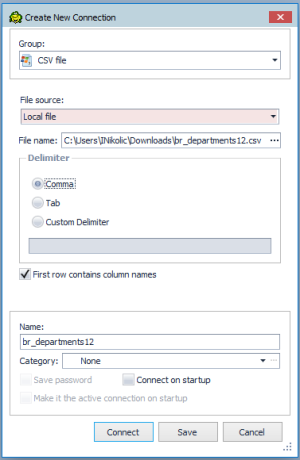
You can create a connection to a CSV or text file. Once a connection is made to one CSV or text file in a folder, Toad displays all CSV and text files located in the same folder as individual tables in the Object Explorer. In order for all files to display correctly as individual tables, all files must use the same delimiter.
Create a connection to local stored CSV file
on the Navigation or Connection Manager toolbar.
Specify the connection properties.
|
Delimiter |
Select the type of delimiter used in the CSV (or text) file. Custom Delimiter—If delimiter is not a comma or a tab, enter the delimiter used in the CSV (or text) file. |
|
First row contains column names |
Select this option to instruct Toad to read the first row as column names. |
|
Name |
Enter a custom name for the connection |
|
Category |
(Optional) Select an existing category or create a new one to color-code your connection. |
A Schema.ini file is added to the folder. This file sets the delimiter and column header option used to read all the files in the folder. The settings correspond to the last file to which a connection was made.
For example, if you create a second connection in the same folder, all files are now read according to the delimiter and column header specified for that connection.
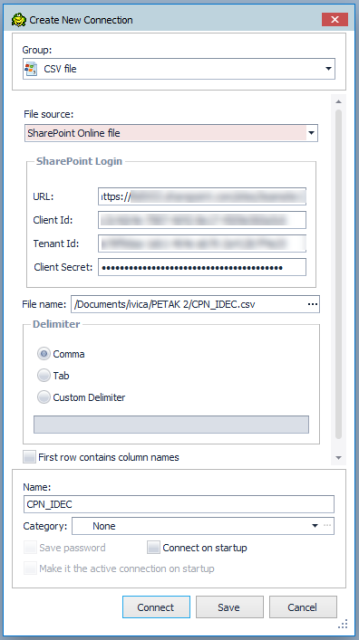
Create a connection to a CSV file stored on SharePoint online
on the Navigation or Connection Manager toolbar.
To successfully connect to your SharePoint account, you need to complete the SharePoint Login information, insert the SharePoint URL, Client ID, Tenant Id, Client Secret.
Browse to and select the CSV file
Specify the connection properties.
|
Delimiter |
Select the type of delimiter used in the CSV file. Custom Delimiter—If delimiter is not a comma or a tab, enter the delimiter used in the CSV file. |
|
First row contains column names |
Select this option to instruct Toad to read the first row as column names. |
|
Name |
Enter a custom name for the connection |
|
Category |
(Optional) Select an existing category or create a new one to color-code your connection. |
| Consideration/Limitation | Description |
|---|---|
|
Excel 2016 64-bit or Office 365 64-bit |
To successfully create a connection to a .csv file using Excel 2016 64-bit, the Microsoft Access Database Engine is required and might not have been included in the Excel installation. In addition, the architecture (bitness) of the engine must match the bitness of Toad. If using 64-bit Toad, the 64-bit version of Microsoft Access Database Engine is required. If using 32-bit Toad, the 32-bit version of Microsoft Access Database Engine is required.
Note: This requirement applies only to connections, not to the Toad functionality of importing/exporting to .csv. |
Tip: Connections are stored in the connections.xml file and can be found by clicking the Application Data Directory link in Help | About.

 may result in a "Path not found error". If you receive this error, manually enter the location in the field.