Installing Agents
The InTrust agent installation procedure (for auto and manual installation) is described in the Deploying Agents topic and in Installing Agents Manually.
By default, agents run under the LocalSystem account. For information on how to change the agent account, refer to the Changing the Agent Account topic.
Configuring and Populating InTrust Sites
InTrust is shipped with a number of predefined elementary configuration objects, such as InTrust sites, gathering policies and tasks, monitoring rules, and so on.
It is recommended that you not change predefined sites directly to conform to your environment. Instead, consider copying existing predefined sites that correspond to the sites you need, and making changes to the copies.
To configure sites that will be used within your gathering task and monitoring policy, take the following steps:
- Run InTrust Manager.
- Based on the “All Windows servers in the domain” site, create sites corresponding to your domains that include all servers, give them descriptive names, and assign each of the sites the InTrust server from the corresponding domain.
- In each site, add a shortcut to the corresponding domain.
- Add computers located behind the firewall (agents must be installed manually).
- Commit the configuration.
Setting Up Gathering and Reporting on Events
You are going to make InTrust do the following:
- Gather data to several repositories
- Consolidate from repositories to a central repository
- Import from the central repository to an audit database (for centralized reporting)
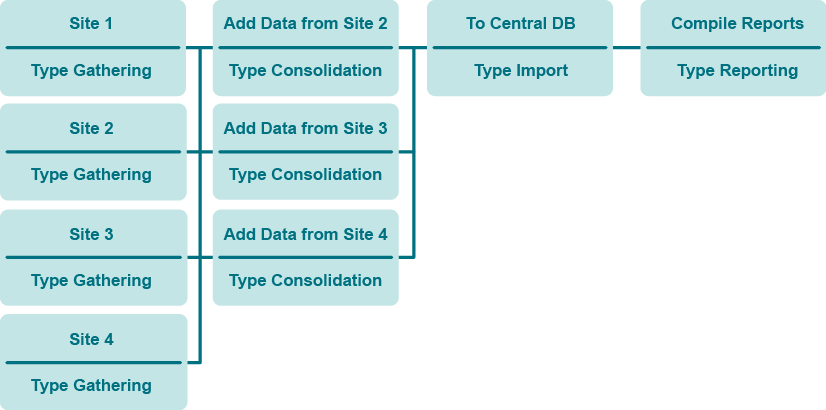
Take the following steps:
- Remove the link between the predefined gathering job and the predefined reporting job; to do it, right-click either job and select Dependencies to open the corresponding dialog box.
- Configure the gathering job to collect data from an InTrust site to the central repository.
- Create more gathering jobs on the InTrust servers from other sites. These jobs collect data to separate repositories.
- Create consolidation jobs that consolidate the gathered data from the repositories to the central repository.
- Link each of the gathering jobs except the first with each of the consolidation jobs (you can use the drag and drop operation to create a link); this will ensure that the consolidation does not start until the gathering is finished.
- Create an import job that imports the data from the central repository to the central audit database.
- Link the each of the consolidation jobs with the import job to ensure that the import follows the consolidation.
- Link the import job with the predefined reporting job.
- Modify the reporting job as necessary. Configure a notification option in the reporting job to stay informed about the reporting process.
- Commit the configuration.
You can also add notification jobs next to the gathering jobs to stay informed of the data gathering process.
For details about setting up tasks and jobs, see the Auditing Guide.
Extra: Configure Gathering of Microsoft IIS Events
- Use a copy of the predefined InTrust site for Microsoft IIS servers.
- Add servers located behind the firewall to the site.
- Configure the "IIS Daily Collection task" similar to the "Windows and AD Security Daily Collection and Reporting" task.
Setting Up Real-Time Monitoring of Security Events
To deploy the predefined Windows/AD Security: full policy
- Specify parameters for predefined rules, such as authorized groups.
- Right-click the Windows/AD Security: full policy and select Properties.
- On the General tab, select Activate.
- On the Sites tab, specify the sites to be monitored (TESTDOMAIN_1: All servers and so on).
- Click OK.
- Commit the configuration.
Monitoring Your Environment
The following are instructions on testing real-time monitoring of business critical security events in your network. The “Member added to administrative group” rule will be involved. When an account is added to an administrative group, this rule generates an alert, removes the account from the group and disables the account that added it. Take the following course of action:
- In Monitoring Console, use the default profile or create a new one, than create an alert view for user accounts (those which have sufficient rights to view the alerts and modify their state for specified sites and rule groups).
- In the InTrust Manager, right-click the “Member added to administrative group” rule, from the shortcut menu select Properties, and in the Properties dialog box enable the rule; on the Response Actions tab, select to execute two scripts (Disable User and Remove User from Group).
- Verify that the rule is applied to the right InTrust site via the right monitoring policy; to do it, open the Properties dialog box of the corresponding policy.
- Make sure that the users for which you created the profile have sufficient rights to work with alerts in Monitoring Console. This step is optional.For that, open InTrust Manager and right-click the policy bounding the rules you need to the InTrust sites you want to monitor, and from its shortcut menu, select Properties. Click the Alert Security tab and configure access rights for user or group accounts you need.
- Enable the monitoring policy.
- Commit the changes.
- Verify that the rule works as expected: open the Active Directory Users and Computers snap-in under an account that is not an InTrust organization administrator (see InTrust Organization Administrators for details) and not the InTrust agent account, and add a user to the administrative group:
- Check the Monitoring Console view for the alert generated by the rule.
- Check in the Active Directory Users and Computers snap-in that the account responsible for the addition has been disabled.
Once the rule has done the following, consider the test passed:
- Disabled the account that added the user to the administrative group
- Removed the user from the administrative group
- Generated an alert viewable in Monitoring Console
For details about real-time monitoring in InTrust, see the Real-Time Monitoring Guide.
