Step 10. Decommission the Migrated Environments
Decommission the migrated source Exchange servers.
Active Directory and Exchange Migration
Starting with Exchange 2000, Microsoft effectively merged Exchange directory and Active Directory. In the majority of Active Directory and Exchange deployments, users get authenticated in the same directory that hosts their Exchange system.
Therefore, moving users to another forest includes moving both their security accounts and mailboxes. That is why you need both Migration Manager for Active Directory and Migration Manager for Exchange for this migration scenario.
There are two possible ways to migrate Active Directory and Exchange:
Parallel Active Directory and Exchange Migration
This scenario is a combination of the Active Directory Migration and Exchange Migration scenarios described above. It allows you migrate Active Directory accounts, resources, mailboxes, and public folders in parallel.
The Active Directory Migration and Exchange scenario is shown schematically in the figure below:
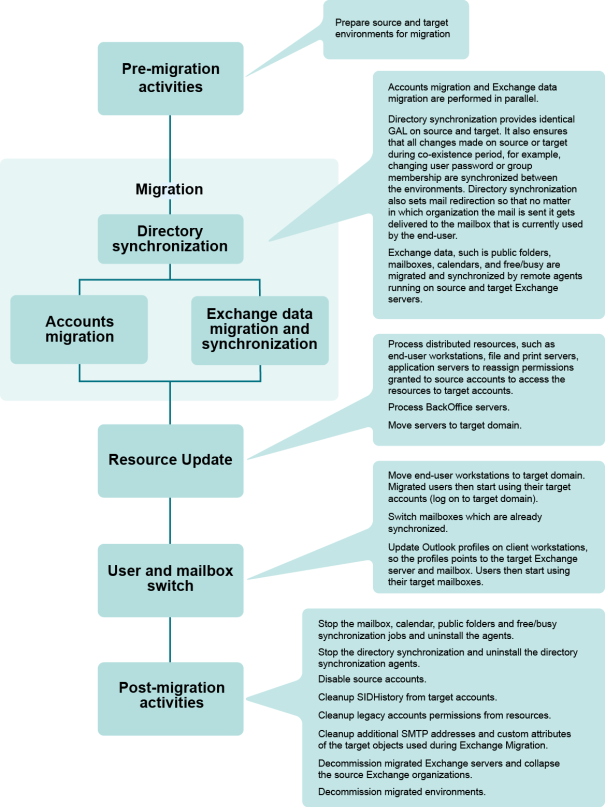
Figure 3: Overview of the parallel Active Directory and Exchange migration process.
To migrate Active Directory and Exchange in parallel, complete the following steps:
To migrate Active Directory and Exchange in parallel, complete the following steps:
- Establish directory synchronization between the source and target domains.
- Configure the Directory Synchronization Agent to synchronize source and target objects and mailbox-enable target user accounts that do not have mailboxes yet.
- Allow the Directory Synchronization Agent to create new objects in the staging OU if the matching object cannot be found in the target domain.
- Configure the Directory Synchronization Agent to create disabled user accounts in that OU.
Directory synchronization ensures that account properties and Global Address Lists (GALs) are identical in the source and target organizations. Directory synchronization also sets mail redirection so that mail is delivered to the mailbox currently used by the end user, regardless of which organization the mail is sent from.
- Start public folder and calendar synchronization. Establishing public folder synchronization ensures that changes made in one organization get replicated to the other, so users can share the same public folder space. Migration Manager also allows you to set calendar synchronization independently of mailbox migration. That way you can ensure that calendar information is also available for any user in any organization.
- Establish free/busy synchronization (optional). Free/busy synchronization enables users to schedule common activities. Migration Manager can synchronize free/busy information independently from other data and thus make sure that the information gets updated as closely to real-time as possible.
- Synchronize mailbox data. When mailbox synchronization is launched, Migration Manager starts transferring the source mailboxes’ content to the target mailboxes and synchronizing mailbox permissions.
- Migrate the directory. Migrate accounts from the source to the target domain in migration sessions. This is really a re-migration of accounts but effectively it moves the disabled account created during the directory synchronization to the permanent destination OU in the target directory. You can also delegate rights to migrate accounts to other administrators in your environment.
- Process distributed resources. Update distributed resources (such as user workstations, file and print servers, and application servers) using Resource Updating Manager, adding permissions to the resources for the target users. When user workstations are updated, user profiles should also be updated, so the migrated users will get the same profile as the corresponding source users when they log on to the target domain for the first time. You can delegate rights to perform resource update to other administrators in your environment.
- Move user workstations to the target domain. This step is actually the user switch, because when you move a workstation to a target domain using Resource Updating Manager, the last logged-in domain on users’ workstations is changed from the source to the target domain and thus users start to log in to the target domain. Then also move file and print servers and other application servers that have been processed by Resource Updating Manager to the target domain.
- Switch to the new Exchange mailboxes. When a mailbox is switched, Migration Manager sets redirection to the opposite direction: all new mail sent to the old (source) mailbox is automatically forwarded to the new mailbox in the target organization. Migration Manager also marks the mailbox in a way that initiates the Outlook profile update at the user’s next logon.
-
Update Outlook profiles. Migration Manager is shipped with the Profile Updating Utility (EMWProf), which handles Outlook profile update. After update the profile points to the target Exchange server and user mailbox. The majority of the properties stored in a profile also get updated.
|

|
NOTE: Migration of users can be performed in batches. If you choose this approach, repeat steps 5 through 9 for each group of users you migrate. |
|

|
CAUTION: Note that user and mailbox switch (steps 7–9) should be completed in a closed time period to make sure that users will not access their source mailboxes when they start to log on to the target domain (with target accounts). This is to ensure that target users do not create new items in their old (source) mailboxes or public folders. If they do create such items, the owner of all those newly-created messages will be set to ‘unknown’ and the creators will not be able to modify the items later. |
- Change the mail exchanger or alias records. Switch incoming SMTP traffic to the target Exchange bridgehead server when about 50 percent of the users have had their mailboxes switched to the target in order to optimize routing.
- Stop and uninstall the synchronization agents. When all mailboxes are migrated and switched, you can stop the synchronization. The following agents should be stopped and uninstalled:
- Directory Synchronization Agents
- Mailbox Synchronization Agents
- Synchronization Agents
- Folder Synchronization Agents
- Free/Busy Synchronization Agents (if they were used)
- Process BackOffice servers and move them to the target domain. Update Microsoft BackOffice servers, such as Exchange, SQL, and SMS Server, using the corresponding processing wizards. You can delegate rights to perform BackOffice servers update to other administrators in your environment. You can move the server to the target domain before or after it is updated. Note that you can start to update BackOffice servers right after all accounts have been migrated to the target domain (step 5).
- Disable the source accounts. If the source accounts were not disabled before user and mailbox switch in order to set the Associated External Account to the source accounts (see the note above), disable them in this step. We recommend that you wait some time after disabling the source accounts before proceeding with the next step to make sure that all users are using their target accounts.
- Enable SID filtering. After SID filtering is enabled, wait some time to ensure that all target users can access the resources they used before the migration.
- Clean up SIDHistory attributes from the target accounts. After SIDHistory is cleaned up, wait some time to ensure that all target users can access the resources they used before the migration.
-
Clean up legacy account permissions from resources. Note that cleanup is hard to undo. It is recommended that you clean up permissions only when you are sure that all users are using their target accounts for all applications and have no problems accessing resources.
-
Clean up the additional SMTP addresses and custom attributes. Clean up the additional SMTP addresses set for redirection purposes and the custom attributes of the target objects used during Exchange migration.
-
Decommission the migrated environments.
Exchange First, Then Active Directory Migration
The migration according to this scenario consists of two separate phases:
- Exchange data migration, as described in the Exchange Migration topic.
- Active Directory migration, as described in theActive Directory Migration topic. One additional step is required: process all target Exchange servers with the Exchange Processing Wizard.
The main idea of this scenario is to complete the Exchange migration first; that is, implement the Exchange Resource Forest, and then complete Active Directory migration to that forest, merging source user with their stub mailboxes in the Exchange Resource Forest. These migration phases are independent and can be separated in time.
After the first phase is complete, source users access their target mailboxes. The Associated External Account of each target mailbox-enabled user (stub) contains a SID of the corresponding source user. Thus, the ACLs of all items created in the target mailboxes by source users contain source users’ SIDs.
When you complete the second phase, the Active Directory migration, the only additional step you need to take is to process all target Exchange servers with the Exchange Processing Wizard. This is needed to translate permissions on items in mailboxes and public folders granted to source users through the Associated External Account from source to target accounts.
