サポートと今すぐチャット
サポートとのチャット

NetVault 13.0 - Administration Guide for Managed Service Providers

Introduction Getting started Configuring clients Managing catalog search Configuring storage devices
About storage devices SAN considerations Quest DR Series systems Quest QoreStor NetVault SmartDisk EMC Data Domain Systems Snapshot Array Manager Virtual Tape Libraries Virtual standalone drives Shared Virtual Tape Libraries Physical tape devices Storage tiers
Backing up data Managing policies Restoring data Managing NetVault dashboard Managing jobs Monitoring logs Managing storage devices
Role-based access to manage storage devices Monitoring device activity Managing disk-based storage devices in list view Managing disk-based storage devices in tree view Managing the Snapshot Array Manager Managing tape libraries in list view Managing tape libraries in tree view Managing tape drives in list view Managing tape drives in tree view Adding shared devices
Managing storage media Managing user and group accounts Managing Tenant Monitoring events and configuring notifications Reporting in NetVault Working with client clusters Configuring default settings for NetVault
About configuring default settings Configuring encryption settings Configuring plug-in options Configuring default settings for post-scripts Configuring default settings for Verify Plug-in Configuring Deployment Manager Settings Configuring Job Manager settings Configuring Logging Daemon settings Configuring Media Manager settings Configuring Network Manager settings Configuring Process Manager settings Configuring RAS device settings Configuring Schedule Manager settings Configuring Web Service settings Configuring Auditor Daemon settings Configuring firewall settings Configuring general settings Configuring security settings Synchronizing NetVault Time Configuring the reporting utility Configuring NetVault WebUI default settings Configuring NetVault to use a specific VSS provider Configuring default settings using Txtconfig
Diagnostic tracing Managing diagnostic data Using the deviceconfig utility NetVault processes Environment variables Network ports used by NetVault Troubleshooting
Common errors Safe Mode in NetVault

About configuring default settings

NetVault runs with some default settings that can be customized to suit your environment. You can view and modify these settings from the Change Settings link in the Navigation pane. The default settings are available for the following services and components.
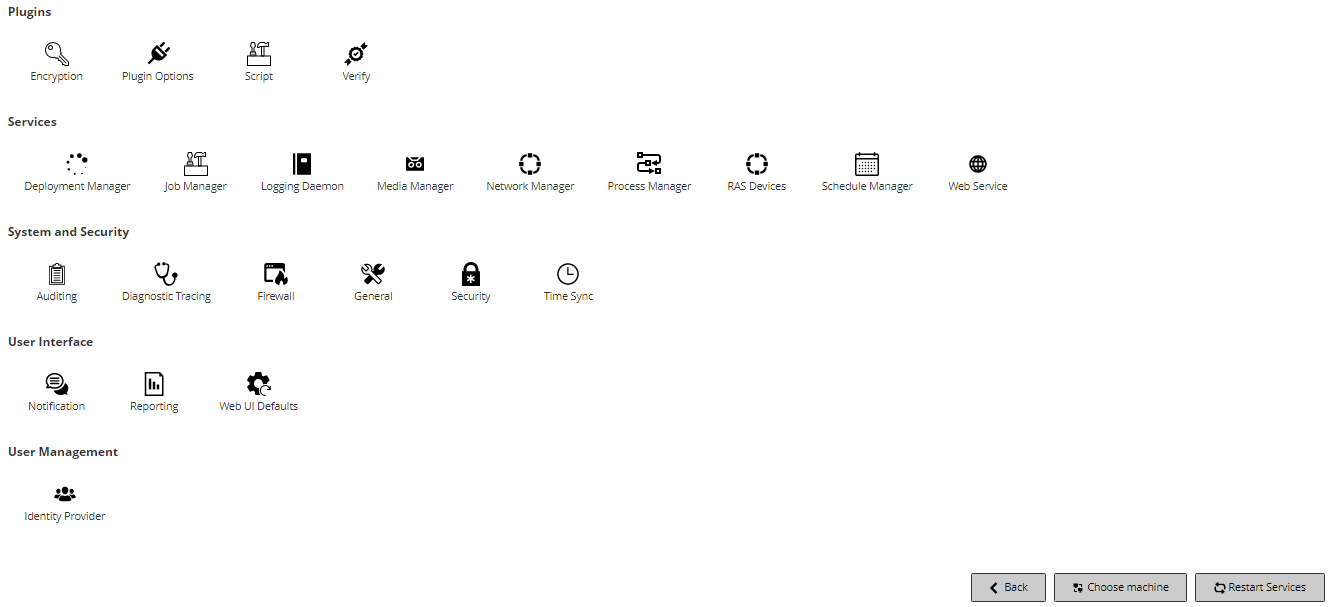
Table 126. Server settings

Plugins

Services

System and Security

User Interface

User Management

You can view and modify the NetVault Client settings by clicking Choose Machine on the Server Settings page or from the Manage Clients link in the Navigation pane.

Other configuration utilities

You can also use the Txtconfig utility to customize default settings for the server and client machines.

The Txtconfig utility provides a text-based interface to customize various settings for the server and client machines. This utility is available on all supported operating systems. The Txtconfig utility resides in the bin directory under the NetVault installation directory. You must be logged-in with Administrator privileges on Windows and root user privileges on Linux and UNIX to use the Txtconfig utility. For more information, see Configuring default settings using Txtconfig.

Configuring encryption settings

Before you can start using the Plug-in for Standard Encryption or Plug-in for Advanced Encryption, you must configure the encryption settings, which specify the encryption algorithm and encryption key that you want to use. You can configure these settings from the Change Settings link.

The encryption plug-ins provide support for CAST-128, AES-256, and CAST-256 algorithms to meet regulatory backup security requirements. You can install these plug-ins on the NetVault Server or Clients to perform encrypted backups for that machine. For more information about these plug-ins, see the Quest NetVault Built-in Plug-ins User’s Guide.

To configure default settings for a NetVault Client, click Clients. In the NetVault Clients table, select the client, and click Next.
3
Under Plugins, click Encryption, and configure the following settings.

Encrypt ALL Backups on this Client

Once the Plug-in for Standard Encryption or Plug-in for Advanced Encryption is installed on a client, you can do either of the following:

To enable encryption for all backups, select this check box. When you enable encryption for all backups, you cannot change the setting on a per-job basis.

For more information about performing job-level encryption, see Specifying additional options.

Encryption Key String

Type the string that serves as the encryption key for the NetVault machine.

Different platforms allow varying characters and password lengths. We recommend that you use passwords of 32 characters or less. You can use characters from the following set: “A–Z”, “a–z”, “0–9”, and “_”. Key strings that do not conform to these specifications may work on one platform, but may be invalid in another environment.

Available Encryption Algorithms

Select the encryption algorithm that you want to use for backups and restores. Depending on the products that you have installed, the list includes the following options: CAST-128, CAST-256, and AES-256.

4
Click Apply to apply the new settings and close the dialog box.

Configuring plug-in options

You can configure default settings for various built-in and licensed plug-ins from the Change Settings or Create Backup Job page. The plug-in configuration procedures are covered in the respective user guides.

This section includes the following topics:

関連ドキュメント

The document was helpful.

評価を選択

I easily found the information I needed.

評価を選択