
System Requirements
Operating Systems Support
ExpertAssist can be deployed to the following operating systems.
- Microsoft Windows Server 2012 R2
- Microsoft Windows Server 2012
- Microsoft Windows 8.1 (32-bit or 64-bit)
- Microsoft Windows 10 (32-bit or 64-bit)
- Windows Server 2008 R2 any Service Packs
- Windows 7 (32-bit or 64-bit) Service Pack 1 or later
- Windows Server 2008 (32-bit or 64-bit) any Service Packs
- Windows Server 2016
- Windows Server 2019
Where possible, be sure to have the latest Service Pack installed on a remote computer when you are deploying ExpertAssist.
Browser Requirements
The following web browsers can be used to manage ExpertAssist hosts:
-
Web Browsers:
• Windows Internet Explorer 11
• Mozilla Firefox (latest version recommended)
• Google Chrome (latest version recommended)
Microsoft Edge (latest version recommended)
-
Latest Java Runtime Environment (Oracle and OpenJDK supported)
Additional Software Requirements
- PowerShell 1.x command line shell installed on the remote computer for the Scripting functionality
Licensing the ExpertAssist
Licensing ExpertAssist
The ExpertAssist component is licensed as a part of the overall Desktop Authority licensing framework. Therefore, a valid Desktop Authority license (Standard or Professional) is required in order to use ExpertAssist.
Remotely Accessing a Workstation
When the ExpertAssist software installation is complete, each workstation may be accessed from any machine using a Java-enabled web browser.
To access the host machine:
- Open an Internet browser.
- In the Location/Address bar, enter the FQDN, DNS name or the IP address of the host machine as shown in the examples below.
Example:
- http://pc345-XP:2000
- http://192.168.3.26:2000
- http://192.168.3.26:5050
where:
- “192.168.3.26” represents the IP address of the host machine.
- “2000” represents the default port entered on the ExpertAssist configuration tab.
- “pc345-XP“ represents the DNS machine name of the host machine.
- “5050“ represents the port custom defined via the ExpertAssist configuration tab
Logging In
After entering the URL into your browser and pressing enter, the ExpertAssist login screen will be displayed.
Windows Authentication
Depending upon who is logging in to the system, the SAM database, Active Directory, and ExpertAssist’s own user database are accessed for authentication.
For the first-time logon:
-
Log on as someone who is a member of the local Administrators group.
This default behavior can be changed later by granting Windows users or groups access to ExpertAssist through the Access Control section of the Security node.
-
Type in the credentials that can be used to authenticate on the remote computer and click Login.
NTLM
ExpertAssist will use the current credentials (those entered by you at the Windows logon screen on the computer running the browser) to identify the computer to the remote computer. This is only available on local networks.
To login using your current Windows login credentials:
Click the Login button within the NTLM section.
If available, NTLM requires that the remote computer IP address be added to the Local intranet security zone in your browser.
Typically, the browser will automatically figure out for you if the remote computer is on the local network or not by analyzing the remote computer’s IP address class. If not, make sure to manually add the remote computer’s address to the Local intranet security zone in your browser, otherwise you will be prompted to enter your credentials despite using NTLM. The behavior is by browser design and depends on the Logon radio button setting in the security zone setting. This setting is typically set to Automatic logon only in Intranet zone in zones’ settings.
Smart Card
This logon type will verify your identity based on the credentials stored on a Smart Card. Smart Card support is available on computers running Microsoft Windows 7 or later.
To login using credentials stored on a Smart Card:
Click the Login button within the Smart Card section.
Advanced Options
Additional login and access options are detailed below.
To get access to additional login options:
Click on the Show advanced options button in the login window
Figure 1: Login screen with additional options.
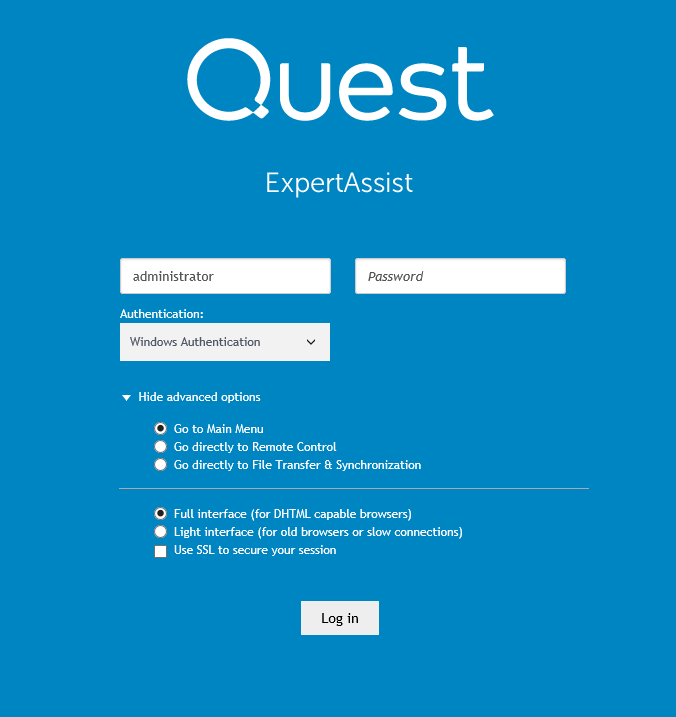
Go directly to
Using any of the first three buttons selects whether to go directly to Remote Control, to File Transfer & Synchronization or to the Main Menu page (default) directly upon login.
Full/Light Interface
Choose between the full and light interfaces. The full interface is for DHTML capable browsers. The light interface is more suitable for old browsers or users with slow connections.
This only works for ExpertAssist users defined within the Access Control page. ExpertAssist administrators always have full interface enabled for them unless specified explicitly. See details in the Access Control section.