
Scripts
What is a script?
A script entry is used to securely store a PowerShell script file and can be run as part of workflow at any point in the process using the Script Task.
Where do I manage saved Scripts?
To manage saved scripts, simply open the left navigation menu and click Scripts, located under Settings, see figure 1.

Figure 1: Directory Sync Setup and Settings Menu
How do you select a PowerShell script to run?
On the Run PowerShell Scripts screen, choose an existing script to run. Stop workflow on error will stop the workflow if an error is encountered, so placement of this step within the workflow sequence must be considered.
How do you add a new PowerShell script?
On the Scripts page, click the New button to add a new script to the collection. Name your script, and choose a local environment for it to apply to. Power365 Directory Sync does not validate your scripts, so be sure that you test them first in a non-production environment. Note that all scripts are run under the service account and an account with the required AD Rights must be configured to logon to the service.
Data Sets
What is a Data Set?
Data Sets can be used in conjunction with the “LookupValue” function to find source values and replace with target values.
What are Data Sets used for?
Data Sets are ideal for managing long lists of replacement strings commonly associated with Directory migration and consolidation projects.
For example, if a Data Set is named "Domains" and you want to replace "contoso.com" with "hr.contoso.com", set the Key Value to "contoso.com" and Return Value to "hr.contoso.com". Then in the appropriate attribute advanced mapping (e.g. UserPrincipalName) you could reference a formula like, LookupValue('Domains', s.UserPrincipalName, null)
This formula will find contoso.com from the UserPrincipalName attribute with hr.contoso.com.
Some other common uses cases might be:
- Update common attributes values like Department from the old format to the new format (e.g. HR to Human Resources)
- Reorganize OUs but applying data sets to determine the target OU
- Map complex environments with multiple source domains to different target domains
- Breakdown complex text strings into smaller pieces for use within another function
Where do I manage saved Data Sets?
To manage saved data sets, simply open the left navigation menu and click Data Sets, located under Settings, see figure 1.
Figure 1: Directory Sync Setup and Settings Menu
How do I create a new Data Set?
To create a Data Set:
- Select "Data Sets" under Settings in the left navigation menu.
- Click “New”.
- On the General tab, enter a name and description for the Data Set and click "Save".
- Click the "Values" tab.
- Click "New" to enter key values and return values or click "Import" to choose a file of key values and return values. If importing a data set, click "Download Example" to download an example CSV.
How do I import a Data Set?
On the Data Sets details screen, click the Import button to select a CSV with Key Value and Return Value columns.
Note: The imported CSV will replace any existing data in the data set.
Can you export a Data Set?
Select the data set(s) and click the Export button to generate a CSV file of existing data sets. You can then use the Import action to upload modifications to the list if desired.
How do I archive a Data Set?
Select the data set(s) and click the Archive button to archive the data set(s).
How-To
Guest User How-Tos
How do I prevent Guest Users from being sent an Invitation during creation?
To prevent an invitation being sent when a Guest user is created, modify the default mappings for the property named SendInvitationMessage to be False before creating your Guest users.
Follow these steps to complete this task:
- Log in to Power365
- From the landing page or the application menu, choose Directory Synchronization
- Open the left navigation menu

Select Templates under Setup

Figure 2: Navigate to Templates
- Locate the template to be modified
- Select the template then click Settings
- Navigate to the Mapping tab
- Search for the attribute SendInvitationMessage
Double click the resulting record to open for editing

Figure 3: Example Search within Template Mapping Tab
- Once open, click Advanced
Modify the default value of “True” to be “False”

Figure 4: Example of Advanced Mapping used to prevent Guest Invitations from being sent
- Click Save
- Once saved you may navigate out of Templates to your next destination
How do I create local users, so they are ready to be synchronized up to Microsoft Entra ID as a Guest?
Once you have decided on the local on-premises attribute to be used for this purpose, then it is simply a matter of setting that attribute mapping to set a value of “Guest” for the appropriate set of users.
The following provides a simple example template mapping using ExtensionAttribute1 as the designated local attribute to be set as “Guest” for Microsoft Entra Connect to sync them up to Microsoft Entra ID as B2B accounts.
- Log in to Power365
- From the landing page or the application menu, choose Directory Synchronization
- Open the left navigation menu
Select Templates under Setup
Figure 5: Navigate to Templates
- Locate the template to be modified
- Select the template then click Settings
- Navigate to the Mapping tab
- Search for the attribute ExtensionAttribute1
- Double click the resulting record to open for editing
- Once open, click Advanced
- Modify the value to be “Guest”
Set the Condition to Action = “create” if you wish to only apply this rule to new users

Figure 6: Example of Advanced Mapping used to create local users, so they are ready to be synchronized up to Microsoft Entra ID as a Guest
- Select User as the Target Object Type
- Click Save
- Once saved you may navigate out of Templates to your next destination
When you run your workflow to create your local users with the above mappings and Microsoft Entra Connect is configured to sync as B2B users. This is only one example, there are different methods that be used to provide the same result depending on your environment needs.

For details on How to enable synchronization of UserType for Microsoft Entra Connect then please read this Microsoft document.
How do I ensure my Guest Users are visible in the Global Address Lists (GAL)?
By default, guests aren't visible in the Exchange Global Address List.
If you have already created your Guest Users manually or otherwise, you may run a few PowerShell commands to set the appropriate property. Here’s how to Add guests to the global address list.
If you are using Power365 Directory Sync to create and update your Guest Users, then use the steps listed below to make sure your guests are visible in the global address list.
To ensure the Guest user is visible in the GAL, modify the default mappings for the property named HiddenFromAddressListsEnabled to be False before creating or synchronizing your Guest users.
The default mapping for HiddenFromAddressListsEnabled is to synchronize the source user object visibility property to the same in the target. If this is not the desired behavior, then follow these steps to guarantee the user will be visible.
Follow these steps to complete the task:
- Log in to Power365
- From the landing page or the application menu, choose Directory Synchronization
- Open the left navigation menu
Select Templates under Setup
Figure 7: Navigate to Templates
- Locate the template to be modified
- Select the template then click Settings
Navigate to the Mapping tab
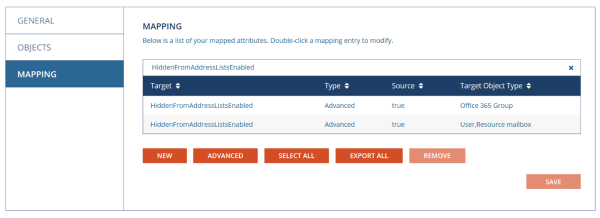
Figure 8: Example Search within Template Mapping Tab (click t enlarge)
- Search for the attribute HiddenFromAddressListsEnabled
- Locate the mapping where the Target Object Type is User
- Double click the resulting record to open for editing
- Once open, click Advanced
Modify the value to be “false”

Figure 9: Example of Advanced Mapping used to ensure a Guest User is visible in the GAL
- Optionally you may set a condition action ("create", "update", or "delete") whereby the object is only acted upon when the condition is satisfied
- Click Save
- Once saved you may navigate out of Templates to your next destination