Tchater maintenant avec le support
Tchattez avec un ingénieur du support

NetVault 12.3 - Administration Guide for Managed Service Providers

Introduction Getting started Configuring clients Managing catalog search Configuring storage devices Backing up data Managing policies Restoring data Managing NetVault Backup dashboard Managing jobs Monitoring logs Managing storage devices
Role-based access to manage storage devices Monitoring device activity Managing disk-based storage devices in list view Managing disk-based storage devices in tree view Managing the Snapshot Array Manager Managing tape libraries in list view Managing tape libraries in tree view Managing tape drives in list view Managing tape drives in tree view Adding shared devices
Managing storage media Managing user and group accounts Managing Tenant Monitoring events and configuring notifications Reporting in NetVault Backup Working with client clusters Configuring default settings for NetVault Backup
About configuring default settings Configuring encryption settings Configuring plug-in options Configuring default settings for post-scripts Configuring default settings for Verify Plug-in Configuring Deployment Manager Settings Configuring Job Manager settings Configuring Logging Daemon settings Configuring Media Manager settings Configuring Network Manager settings Configuring Process Manager settings Configuring RAS device settings Configuring Schedule Manager settings Configuring Web Service settings Configuring Auditor Daemon settings Configuring firewall settings Configuring general settings Configuring security settings Synchronizing NetVault Time Configuring the reporting utility Configuring NetVault Backup WebUI default settings Configuring NetVault Backup to use a specific VSS provider Configuring default settings using Txtconfig
Diagnostic tracing Managing diagnostic data Using the deviceconfig utility NetVault Backup processes Environment variables Network ports used by NetVault Backup Troubleshooting

About Virtual Tape Library

Virtual Tape Libraries (VTLs) emulate tape libraries on disk. VTLs are included in NetVault Backup as a licensable option.

With VTLs, you have the flexibility to perform quick backups to disks, and during off-peak hours migrate or duplicate the backups to physical devices for off-site storage. The Media Manager does not distinguish between virtual and physical tapes. Therefore, you can use the same process to set up backup policies, including retirement period and rotation schemes.

VTLs are represented as directories on the disk. Each VTL contains three directories: drives, slots, and media. These directories contain numbered subdirectories. The virtual drives reside as files in the drives subdirectories. These files contain links to the media files. The virtual tapes reside as media files in the media directory. When a virtual tape is moved between slot and drive, the media file itself stays in the media directory, while the drives and slots files are modified to emulate the moving of the media.

A VTL can handle any number of concurrent NetVault Backup Client backups. As with a physical library, the number of drives contained in the VTL dictate how many simultaneous operations can be performed. The number of slots should be the same as or more than the number of configured drives. Different operating systems may impose maximum file-size limits, which can affect the maximum VTL media size.

Virtual Tape Library considerations

Before creating and adding a VTL, review the following information:

Here <x> is the additional disk space considered for the following requirements:

Creating and adding a Virtual Tape Library

You can use the configuration wizard to create a virtual tape library on the NetVault Backup Server or a SmartClient. When creating a VTL, you can choose the number of virtual tape drives and slots, and specify the size of the virtual tapes. After the device is created, it is automatically added to the server.

1
In the Navigation pane, click Guided Configuration, and then on the NetVault Configuration Wizard page, click Add Storage Devices.
In the Navigation pane, click Manage Devices, and then click Add Device.
2
On the Add Storage Devices page, select the Virtual tape library/media changer option, and click Next.
4
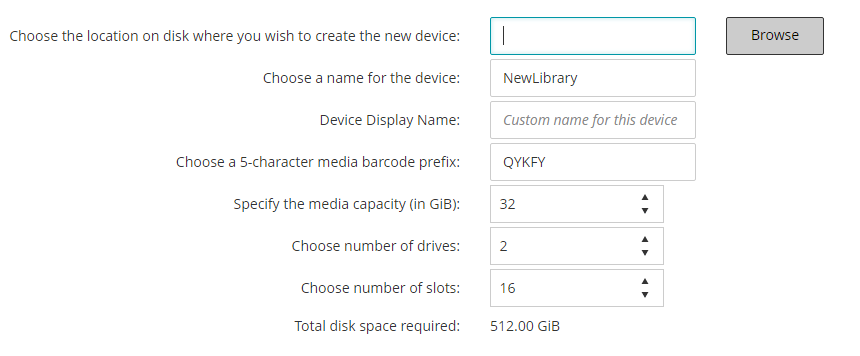
On the Add Virtual Tape Library page, provide the following details.

Choose the location on disk where you wish to create the new device

Enter the location where you want to create the VTL, or use the Browse button to select a location.

When entering a location, make sure that the path is already created on the selected machine. NetVault Backup does not automatically create any non-existing directories in the path.

To create a path, click Browse, select a parent folder, and then click Add new folder, After you click OK, the new folder is added to the parent folder and can be used as the location for the new device.

Choose a name for the device

Specify a unique name for the device.

Device display name

Specify a display name for the device.

Choose a 5 character media barcode prefix

The NetVault Backup Server automatically generates a barcode prefix and assigns it to the VTL media. If you want to change it, type a unique code for the device.

Specify the media capacity

Type or select the size of the virtual tape. The media size is specified in GiB. Each slot contains a piece of media of the given size. The default value is 32GiB.

Choose number of drives

Type or select the number of drives for the VTL. You can create maximum of 100 drives. The default value is two drives.

Choose number of slots

Type or select the total number of slots that hold the media. You can specify a maximum of 999 slots. The default value is 16 slots.

5
Click Next to create and add the device.

Re-adding a previously created VTL

You can use the configuration wizard to find previously created virtual tape libraries and add the devices to the server. You can use this method to add a device that was removed from the server.

2
On the Add Storage Devices page, select the Virtual tape library/media changer option and the Re-add previously generated virtual device check box.
3
4
In the Device list, select the device that you want to add, and click Next.
Documents connexes

The document was helpful.

Sélectionner une évaluation

I easily found the information I needed.

Sélectionner une évaluation