New Analysis Wizard: Abstract Plan Page
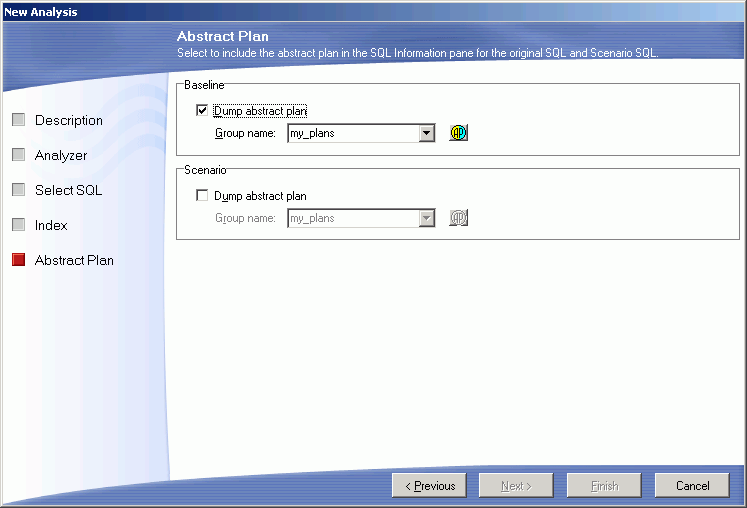
In the New Analysis wizard, the Abstract Plan page is used to include the abstract plan with SQL statements.
Baseline Plan
Dump abstract plan
Specify whether to retrieve the abstract plan for the SQL statement for the before new indexes are created. The abstract plan displays in the right pane for SQL statements. This retrieves a new abstract plan even if one was saved with the original SQL. It is important to use this option if you originally saved the SQL statement and abstract plans in version 12.5.0.3 or earlier of Adaptive Server and are now using Adaptive Server 15.0 or later since the format of the abstract plan has changed.
Note: This option is disabled if you have selected Using existing query plan saved with the SQL on the Select SQL page.
Group name
Specify the abstract plan group name where the abstract plans are saved. The default group names in Adaptive Server are: ap_stdout and ap_stdin. These groups are usually used by the Database Administrator to enable server-wide abstract plan capturing and retrieving.
ap_stdout is used by default to capture an abstract plan.
ap_stdin is used by default to retrieve the abstract plan associated with a SQL statement during the execution of the SQL statement.
Abstract Plan Manager button
Opens the Abstract Plan Manager window to view, create, and modify abstract plan group.
Scenario
Dump abstract plan
Specify whether to retrieve the abstract plan for the SQL statement after the indexes are created. The abstract plan is displayed in the right pane for SQL statements.
Group name
Specify the abstract plan group name where the abstract plans are saved. The default group names in Adaptive Server are: ap_stdout and ap_stdin. These groups are usually used by the Database Administrator to enable server-wide abstract plan capturing and retrieving.
ap_stdout is used by default to capture an abstract plan.
ap_stdin is used by default to retrieve the abstract plan associated with a SQL statement during the execution of the SQL statement.
Abstract Plan Manager button
Opens the Abstract Plan Manager window to view, create, and modify abstract plan group.
Drop Indexes
The Index Impact analysis first creates the indexes on your database. Then it retrieves the query plan for each SQL statement that you have selected for your analyzer. When you set up the individual scenarios, you determine if you would like the indexes dropped or to leave them on your database.
If you do not have the analysis process drop the indexes, you can drop them in any one of the following ways:
-
In the tree pane (left pane), right-click the scenario name and select Go To Drop Indexes.
-
When you close the Index Impact Analyzer window, you are prompted to drop the indexes. Click Yes.
-
In the tree pane (left pane), click the scenario name and select the Create/Drop Indexes button at the top of the right pane. Click
next to the Drop Indexes or Drop All Indexes pane.
You can make the changes permanent, in one of the following ways:
-
In the tree pane (left pane), right-click the scenario name and select Confirm Index Changes. Click Yes.
-
When you close the Configuration Analyzer window, you are prompted to rollback the changes. Click No.
View Index Impact Analysis Details
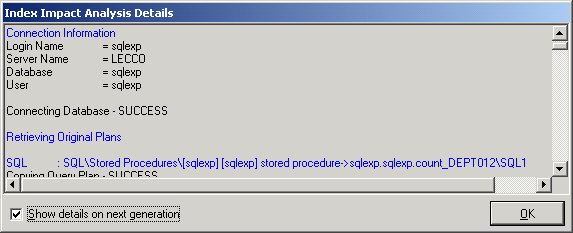
The Index Impact Analysis Details window displays information about the creation of the indexes and the retrieval of the query plans. The Index Impact Analysis Details window displays after the Index Impact Analysis process is completed unless the Show details on next generation checkbox in the Index Impact Analysis Details window is unchecked.
To review the Index Impact Analysis Details window after completing Index Impact Analysis
-
Select View | Last Index Impact Analysis Details.
-
Review this information to see if an error occurred during the retrieval of the query plan. Errors may occur if the selected SQL statements are from one database and user and you have set another database and user in the drop-down boxes at the bottom left of the main window.
Add SQL to an Index Impact Analysis
After creating an Index Impact Analysis, you can add more SQL statements from the SQL Repository to it.
To add more SQL statements to an Analysis
-
From the left pane, select the Analyzer in which you want to add the SQL.
-
Right-click and select Add SQL.
-
In the Add SQL window under the Select SQL to be added pane, check the SQL statements you want added.
-
Under the Select Scenario to include SQL pane, check the Scenarios you want the SQL added to.
-
Click OK to add the SQL, retrieve the query plans and re-execute the Scenario.

 View New Analysis Wizard: Abstract Plan Page
