In the Recovery Manager Console tree, select the Computer Collection from which you want to remove items.
In the details pane, select the items you want to remove. Use CTRL and SHIFT to select multiple items.
Right-click the selection, and then click Delete.
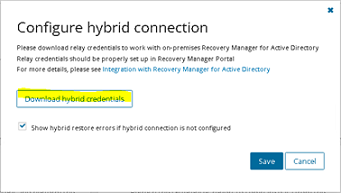
Recovery Manager for Active Directory integration with On Demand Recovery enables the restoration and undelete of on-premises objects that are synchronized with Azure Active Directory.
The Hybrid Connector Windows service establishes a secure connection to the On Demand Recovery online service enabling simultaneous restoration of both on-premises and online objects.

On-premises groups
Office 365® licenses (assignedLicenses property for cloud users) and cloud group membership
Deleted on-premises users and groups
Service principals' appRoleAssignments to on-premises users
appRoleAssignments to non-Office 365® groups (used for SSO and App Roles)
Directory roles: Global administrator, Exchange administrator, Compliance administrator
Other cloud-only properties: such as Block sign in, Authentication contact information, Minors and Consent
Multifactor authentication (MFA) settings if a customer uses cloud MFA
Azure® application custom attributes (schema extension attributes)
Conditional access policies
Inactive mailboxes of permanently deleted users; the Federated Domain scenario is also supported.
To restore on-premises objects, On Demand Recovery uses attribute values from the RMAD backup that is closest in time but older than the cloud backup unpacked in the On Demand Recovery user interface. If the closest on-premises backup is 24 hours older than the cloud backup, you will receive the warning message.
By default, the search of the closest in time on-premises backup is performed among the backups that were unpacked in RMAD. You can use the Use unpack and encrypted backups for restore operations option on Hybrid Recovery settings of RMAD – in this case, the on-premises backup will be unpacked automatically during the restore operation.
On Demand Recovery shows only on-premises attributes synchronized with the cloud and cloud-only attributes for the selected object when you click Browse in the Restore Objects dialog. On-premises only attributes are not included in this list. To restore on-premises only attributes, you must select the Restore all attributes option in the Restore Objects dialog.
After the hybrid restore operation, On Demand Recovery forces Azure AD Connect synchronization to push on-premises changes to the cloud and wait until it completes the synchronization. Restore events can be used to track steps of Azure AD Connect synchronization, such as export and import.
To restore 'member' or 'memberOf' attributes for an object, restore the group from the Unpacked Objects view. Restoring of group memberships from the Differences report is not supported in hybrid environments.
Hybrid restore from the Differences report uses attribute values from the on-premises backup. These values may be different from the corresponding values shown in the Differences report.
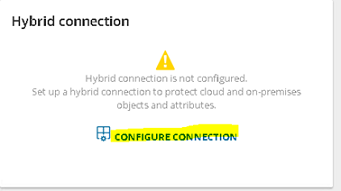
On Demand Recovery supports one hybrid connection per On Demand organization. If you need to manage multiple hybrid tenants, create a separate On Demand organization for each Hybrid Azure AD tenant.
On Demand Recovery restores Back Link attributes: 'memberOf' (the back link for the 'member' attribute) and 'directReports' (the back link for the 'manager' attribute). These attributes can be selected along with all other attributes when you click Browse in the Restore Objects dialog.
Separate Microsoft Azure Relay service is used for each hybrid connection (one per On Demand organization). On Demand Recovery creates WCF Relay per On Demand organization. No changes to On-Premises Firewall settings are required.
On Demand Recovery users can restore objects from all on-premises domains and forests that are synchronized with the Azure AD tenant. Also, in Recovery Manager, you need to add domain controllers for every domain that will be restored and specify the account under which the restore operation will be performed.
Depending on which kind of restore operation (agent-based or agentless) you are going to perform in a hybrid configuration, the account under which you want the selected Recovery Manager for Active Directory instance to recover data in the domain must meet the corresponding requirements. For details about account permissions for agent-based and agentless restore, see Permissions required to use Recovery Manager for Active Directory.
To push an Azure® synchronization, the specified account must be a member of the ADSyncOperators group on the Azure® Active Directory® synchronization server. This account must also be able to run remote PowerShell commands against the server.
If hybrid integration is configured on the Web Portal it must be disabled prior to configuring hybrid integration from the Recovery Manager for AD (RMAD) console. Failure to do so may result in a failed online restoration.
Follow the steps below to fully disable hybrid integration on the Web Portal.
Logon to Web Portal
Select the “Configuration” tab at the top
Expand the “Portal Settings” expander
Click on the “Configure On Demand” button
Remove the checkmark from the “Enable integration” checkbox
Click “OK” to save and close the dialog
Open the Windows “Services” application
Find the Windows service “Quest Recovery Manager Portal” from the list
Right click on the service and select “Stop”
Once the service has been stopped it can then be re-enabled if desired
To continue using the Web Portal with newer versions of the RMAD console some configuration changes must be made.
For instructions on how to make the necessary configuration changes follow the steps below.
Navigate to the installation directory of the Web Portal (the default installation location is C:\Program Files (x86)\Quest\Recovery Manager Portal)
Open the file EnterprisePortalSettings.xml
Inside the GeneralSettings element find the property VersionValidationMode. If this property is not present one will have to be created
Change the value of the VersionValidationMode to None
Below is a sample of what the configuration should look like once the changes have been made.
<GeneralSettings>
    <add key="VersionValidationMode" value="None" />
    Other configuration values…
</GeneralSettings>
From within the RMAD Console, select the Hybrid Recovery node from the tree on the left.
Select the Enable integration with On Demand Recovery checkbox to enable a secure connection to the online On Demand Recovery service.
Enter the On Demand Recovery Settings using the following procedure:
Enter in the Azure AD Connect host and its associated credentials under Azure AD Connector Settings. The values entered depends on where Azure AD Connect is installed.
NOTE: If Azure AD Connect is currently installed on the same server as the Recovery Manager for Active Directory console, then these fields can be left blank.
Azure AD connector Host: Enter in the host name or IP address of the system where Azure AD Connect is installed.
Username: Enter in the domain username for this server. This account should have the necessary permissions listed under the Required Permissions section.
Password: Enter in the domain password for this server.
Enter in the domain username, password and primary computer for each domain listed under Discovered Domains. The designated primary computer will be used for hybrid recovery operations.
The domains listed under Discovered Domains are pulled from backups; this means to fully populate this list at least one backup per domain is required.
After performing a backup, it may be necessary to manually refresh this list which can be done by clicking on the refresh button , 
Once all configuration has been entered click on the Save settings button located at the bottom of the screen
In this section:
To restore data from Active Directory® or AD LDS (ADAM) backups, Recovery Manager for Active Directory (RMAD) requires specific dynamic link libraries (DLLs) supplied with the Windows operating system. In case RMAD cannot find these DLLs, the backup restore operation may fail with an error message similar to the following:
“The Active Directory® database (ntds.dit) file in the backup is incompatible with the esent.dll file version found on this computer.”
Before you start using RMAD to extract and restore data from Active Directory® or AD LDS (ADAM) backups, it is recommended to ensure the required DLLs are available on the RMAD computer.
Operating system on the Recovery Manager for Active Directory computer
| NOTE |
The OS version on the domain controller cannot be higher than the OS version on the Recovery Manager Console machine. For the list of supported OS, see Release Notes. |