
Configuring the On Demand Port on the Agent Manager Concentrator
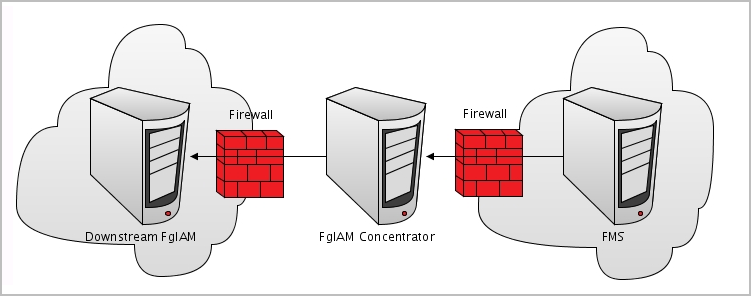
This issue can be resolved by creating an RMI proxy server on the concentrator — an Agent Manager instance that works similarly to an HTTP proxy. This RMI proxy server can be configured to accept RMI requests from the Management Server and direct them to the Agent Manager instances (called downstream instances). For additional details about the concentrator, see Configuring an Agent Manager Instance as a Concentrator in the Agent Manager Installation Guide.
A concentrator agent, created specifically for Foglight for Oracle, allows controlling the RMI server so that the server is initialized (starts collecting data) when the agent starts, and stops when data retrieval by the agent is brought to an end. The agent, which is created manually by the user, requires configuring the following parameters:
|
1 |
|
2 |
Click Create Agent. |
|
3 |
Select the agent type DB_Oracle_Concentrator. |
|
5 |
Click Create. |
|
2 |
Click Edit Properties. |
|
3 |
Click Modify properties for this agent only. |
|
6 |
Click Edit to edit the list of downstream Agent Managers. |
|
7 |
Click Add Row. |
|
IMPORTANT: When editing the properties of the Foglight Agent Manager concentrator (Dashboards > Administration > Agents > Agent Status), the name of the Foglight Agent Manager should be entered in the Downstream FglAMs section exactly as it appears in the topology, under Home > Agents > All agents > <Agent name> > RMI data > Fglam host property. The <Agent name> parameter refers to any of the Foglight for Oracle agents that reside on the selected Foglight Agent Manager. |
|
10 |
Click Save Changes. |
|
11 |
Click Save at the lower right corner of the screen. |
|
12 |
Click Back to Agent Status. |
|
14 |
Click Activate. |
|
15 |
Click OK to complete the process. |
Installing and Monitoring a Single Oracle Instance
Foglight for Oracle provides a graphic, intuitive method for creating and configuring multiple agents, which can be used instead of Foglight’s default method for creating agents and editing their properties using the Agent Administration dashboard. Foglight for Oracle allows you to run a wizard that provides a common entry point for adding and discovering all database instances within a user-specified range, and then configuring these instances for monitoring.
|
IMPORTANT: When running Foglight for Oracle in a Federation architecture, neither the creation nor the administration of agents can be accomplished from the central Foglight Management Server (the Federation Master). These two tasks should be carried out from the stand-alone Management Servers (the Federated Children). |
|
NOTE: When the feature multitenant container database (CDB) architecture is enabled, the customer should create the user with "container=all". create user c##cust identified by cust container=all; grant connect to c##cust container=all; |
|
a |
Click the Agent Manager Host <agent manager> link located at the top of the Oracle Connection section. |
|
4 |
|
6 |
|
7 |
In the Configuration section, select the Alarm Template to use for this instance. The Factory Template will be applied by default. Refer to Viewing, Creating, and Managing Alarm Templates in the Foglight User Guide for more information. |
|
8 |
Optional — In the Monitoring Extensions pane, click the SQL PI monitoring extension. You are prompted to choose the Agent Manager on which the SQL PI repository will be installed. |
|
9 |
Optional —In the Monitoring Extensions pane, click the Operating System link. |
|
• |
Local user — using the same credentials that were used to launch the Agent Manager. |
|
• |
Windows — the user name (in the domain\user name format) and password, used for logging in to a Windows-based monitored host. |
|
• |
SSH (DSA) — using the SSH private key, generated via the DSA algorithm. |
|
b |
Navigate to the Foglight Management Server credentials view (Dashboards > Administration > Cartridges > Credentials > Manage Credentials). |
|
c |
Add credential of type DSA key and link this credential to the agents created in Step a. For details, see “Adding and deleting credentials” in the Foglight Administration and Configuration Guide. |
|
d |
Go to Agent Status screen (Administration > Agents > Agent Status) |
|
f |
Click Edit Properties. |
|
g |
Select Modify the private properties for this agent. |
|
10 |
Optional — In the Monitoring Extensions pane, click Collect VM statistics. |
|
11 |
Click Monitor. |
Discovering Multiple Instances to Monitor
|
1 |
In the upper left corner of the Databases View, click Monitor > Oracle. |
|
2 |
Click the Use this option to discover multiple Oracle instances link. |
|
6 |
Click Set credentials on the toolbar to provide the login credentials of the instances |
|
7 |
Follow the steps described in Installing and Monitoring a Single Oracle Instance , beginning with Step 5 to enter the monitoring credentials and enable the monitoring extensions for this instance. |
|
NOTE: To use stored credentials when enabling the Operating System monitoring extension, click the Operating System > Select from stored credentials link to open the Stored Credentials dialog box. Here you can review the login credentials and authentication methods used for logging in to Foglight. Foglight stores encrypted credentials in lockboxes, which may be password-protected for added security. Database agents store all user login credentials in a default lockbox called DB-Agent Lockbox. If credentials have already been entered in another lockbox, use the Lockbox list to select from that lockbox. |
|
8 |
Click Validate. |
|
9 |
Select the check boxes near the multi-node RACs and click OK. After the validation process completes, all instances that passed the validation process successfully are displayed in the table with the status Validated. |
|
• |
If the message is Insufficient database privileges, this issue can be resolved using the Insufficient Database Privileges dialog box that appears. For details, go to Step 12. |
|
• |
|
12 |
Click Insufficient Database Privileges. |
|
1 |
Click Show details to view the error's description. |
|
2 |
Click Set credentials to display the dialog box used for entering the credentials, and enter the required changes. |
Loading a TNS file
|
1 |
Click Load TNS file. |
|
2 |
Click Choose file and browse for the requested file. |
|
3 |
Click Open. |
|
4 |
Click OK. |